Summer pruned black raspberries

TWO BLACK BRAMBLES

Good Stuff

What an unexpected treat this year. Black brambles galore. I choose my words carefully. 

Over twenty years ago I grew blackberries, the variety Chester because it was the most cold-hardy variety of the thornless varieties, available at the time. Chester blackberryI finally gave up on Chester because winter cold would snuff out many of its canes down to ground level. If I remember correctly, surviving canes bore fruit that was too late in the season to ripen fully or in sufficient quantity. Read more

Hardy cyclamen in pot

FINDING MY ROOTS

Elbow Room and Food

What’s happening in the soil beneath your potted plants? Over time, roots fill up the pot so there’s little more room left for them to grow. And nutrients get sucked out of the soil or washed out by water.

I keep my potted plants hale and hardy with periodic repotting. This also gives me a look at the roots, which I always find interesting. (It was one area of my research when I worked for Cornell University.) If I see roots are pressed around the outside of the rootball, especially if traveling around and around it, they’re telling me they want out. A plant might also indicate its roots need more elbow room by looking like it’s ready to topple over. More subtle signs are potting soil that dries out very quickly, a plant hardly growing, or roots attempting escape out a pot’s drainage holes.

Rapidly growing plants need repotting yearly, especially when they are young; older plants and slow growers can get by with being repotting every two or three years. Some plants hardly ever need repotting, such as — looking around my collection — my amaryllis (Hippeastrum), bay laurel, hardy cyclamen, jade plant, aloe, and cactus.

Amaryllis and my dog

Amaryllis & Sammy

I wait to repot my ponytail palm until its bulbous base breaks open the pot it’s growing in; this happens about every 15 years. Same goes for my clivia.
Read more

MY FIG GROWS OLD, AND LOOKS IT

Weeping Fig, Growth in Check

My little fig tree put on a lot of new growth this year. Let me qualify this statement. By “fig,” in this case, I mean my weeping fig (Ficus benjamina). It’s a relative of edible fig, also edible (but rarely eaten), and a common houseplant, valued for its relaxed appearance, its small, glossy green leaves, and its tolerance for indoor environments. By “a lot of new growth,” I mean a half an inch or so.Bonsai fig

Despite that meager growth, the plant has grown too large. Nothing like it would have grown outdoors in open ground in the tropics, where this trees’ branches quickly soar skyward and sideways to the size of our sugar maples. From those branches drip aerial roots which anchor themselves in the ground, the ones nearest the trunk eventually merging together to become part of a fattening trunk.Weeping fig in Puerto Rico

My little fig, you probably guessed by now, is a bonsai. The tree, if I may call a four-inch-high plant a “tree,” began life here as one of a clump of what evidently were rooted cuttings in a small, plastic pot I purchased on impulse from a big box store. 

Back here at the farmden, I got to work on it, first teasing the plants apart from each other, selecting one as keeper. The road to bonsai-dom began as I trimmed back the roots to be able to fit the plant into its new home, a 3 by 4-1/2 inch shallow pot about an inch deep. There was little to prune aboveground, but I made any cuts necessary, with the future in mind.

Read more

MY BICOASTAL PLANT

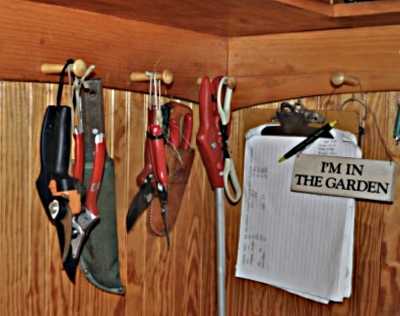
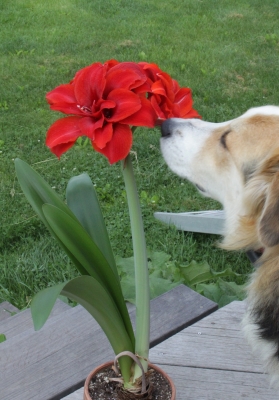
A Tree Takes a Plane Ride

I managed to pack lightly for a journey, many years ago, to the West Coast, toting along only an extra pair of pants, a couple of shirts, and a few other essentials. But on the return trip, how could I resist carrying back such bits of California as orange-flavored olive oil and chestnut-fig preserves? The most obvious bit of California that I brought back was a potted bay laurel plant (Lauris nobilis), its single stem poking out of my small backpack and brushing fragrant leaves against the faces of my fellow travelers.

standard bay, rosemary, citrus

Bay, with its subtropical pals, rosemary and citrus

Not only did the bay laurel bring a bit of California to my home, but also traditions dating back thousands of years from its native home along the Mediterranean coast. Ancient Romans crowned victors with wreaths of laurel and bestowed berried branches upon doctors passing their final examinations. (The word “baccalaureate” comes from bacca laureus, Latin for “laurel berry”.) Bay laurel was sacred to Apollo, so was planted near temples. 

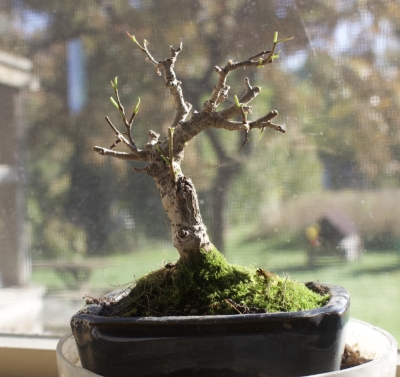
Although bay laurel can grow fifty feet tall, my plan was to develop this plant into a small tree with a single, upright trunk capped by a pompom of leaves. The Mediterranean climate is characterized by hot, dry summers, and cool, moist winters. Since the plant is hardy only to about fifteen degrees Fahrenheit, I had to grow it in a pot. The plant is allegedly a rich feeder, but my plants grows fine in my homemade potting mix which contains a healthy portion of compost and — for some extra oomph — some soybean meal.

The potted tree decorates the house in winter, the terrace in summer, and provides fresh bay leaves for soups and other dishes year-round.

A Winter Home

It is in winter that my plant realizes just how far it is from its Mediterranean home. Winters in its home lands are typically cool and moist. Winters inside a northern home are typically warm and dry. Since cool rooms are moister than warm rooms in winter, the cooler the room the better, preferably below fifty degrees. My bay laurel has wintered well either in sunny window in a cool room or near a bright window in my basement, where temperatures are very cool. The warmer the temperatures, the more light bay laurel needs.

The other challenge to my bay tree has been scale insects. They sit along leaves and stems under their protective shell as they suck sap from the plant. scale insects on bark
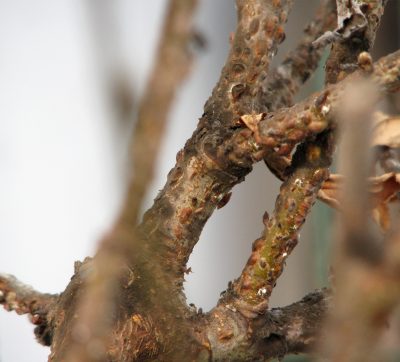
Actually, it’s more of a challenge to me because the plant tolerates scale reasonably well. Once moved outdoors in spring, the plant soon recovers from the attack and its resident scale population, either from the changed environment or from predators, subsides.

The problem for me is that the insects exude a sticky honeydew that drips onto furniture and the floor. A sooty black fungus then feeds on the honeydew.

This summer I’ve taken a more active role in thwarting scale by spraying the plant weekly with horticultural oil, which is nontoxic to humans and soon evaporates.
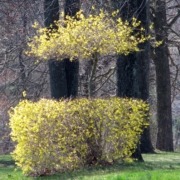
Lollipops

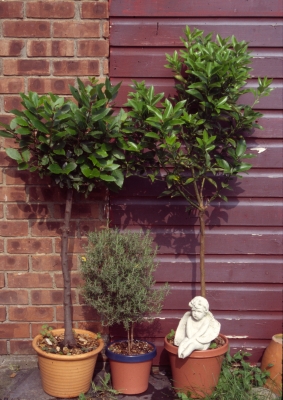
Bay laurel can be trained to any number of shapes such as a pyramid, cone, or globe, with these shapes beginning at ground level or capping a long or short piece of trunk.

Right from the get go, I chose to grow my tree as a “standard.” “Standard” has many meanings both in and out of horticulture, so let’s first get straight which kind of “standard” we are dealing with: Here, I mean a naturally bushy, small plant trained to have a clear, upright stem capped by a mop of leaves. A miniature tree. Standard evergreens along front pathIn the world of gardening, people are divided over how they feel about “standards.” Some gardeners love them, others will have nothing to do with them.Standard bay laurel

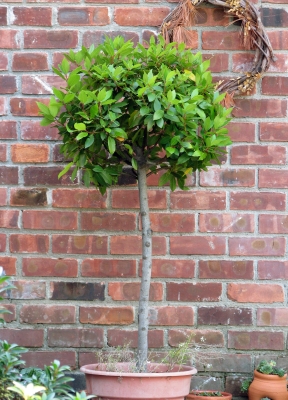
(A “standard” apple tree is one grafted to a rootstock that does not confer any dwarfing.)

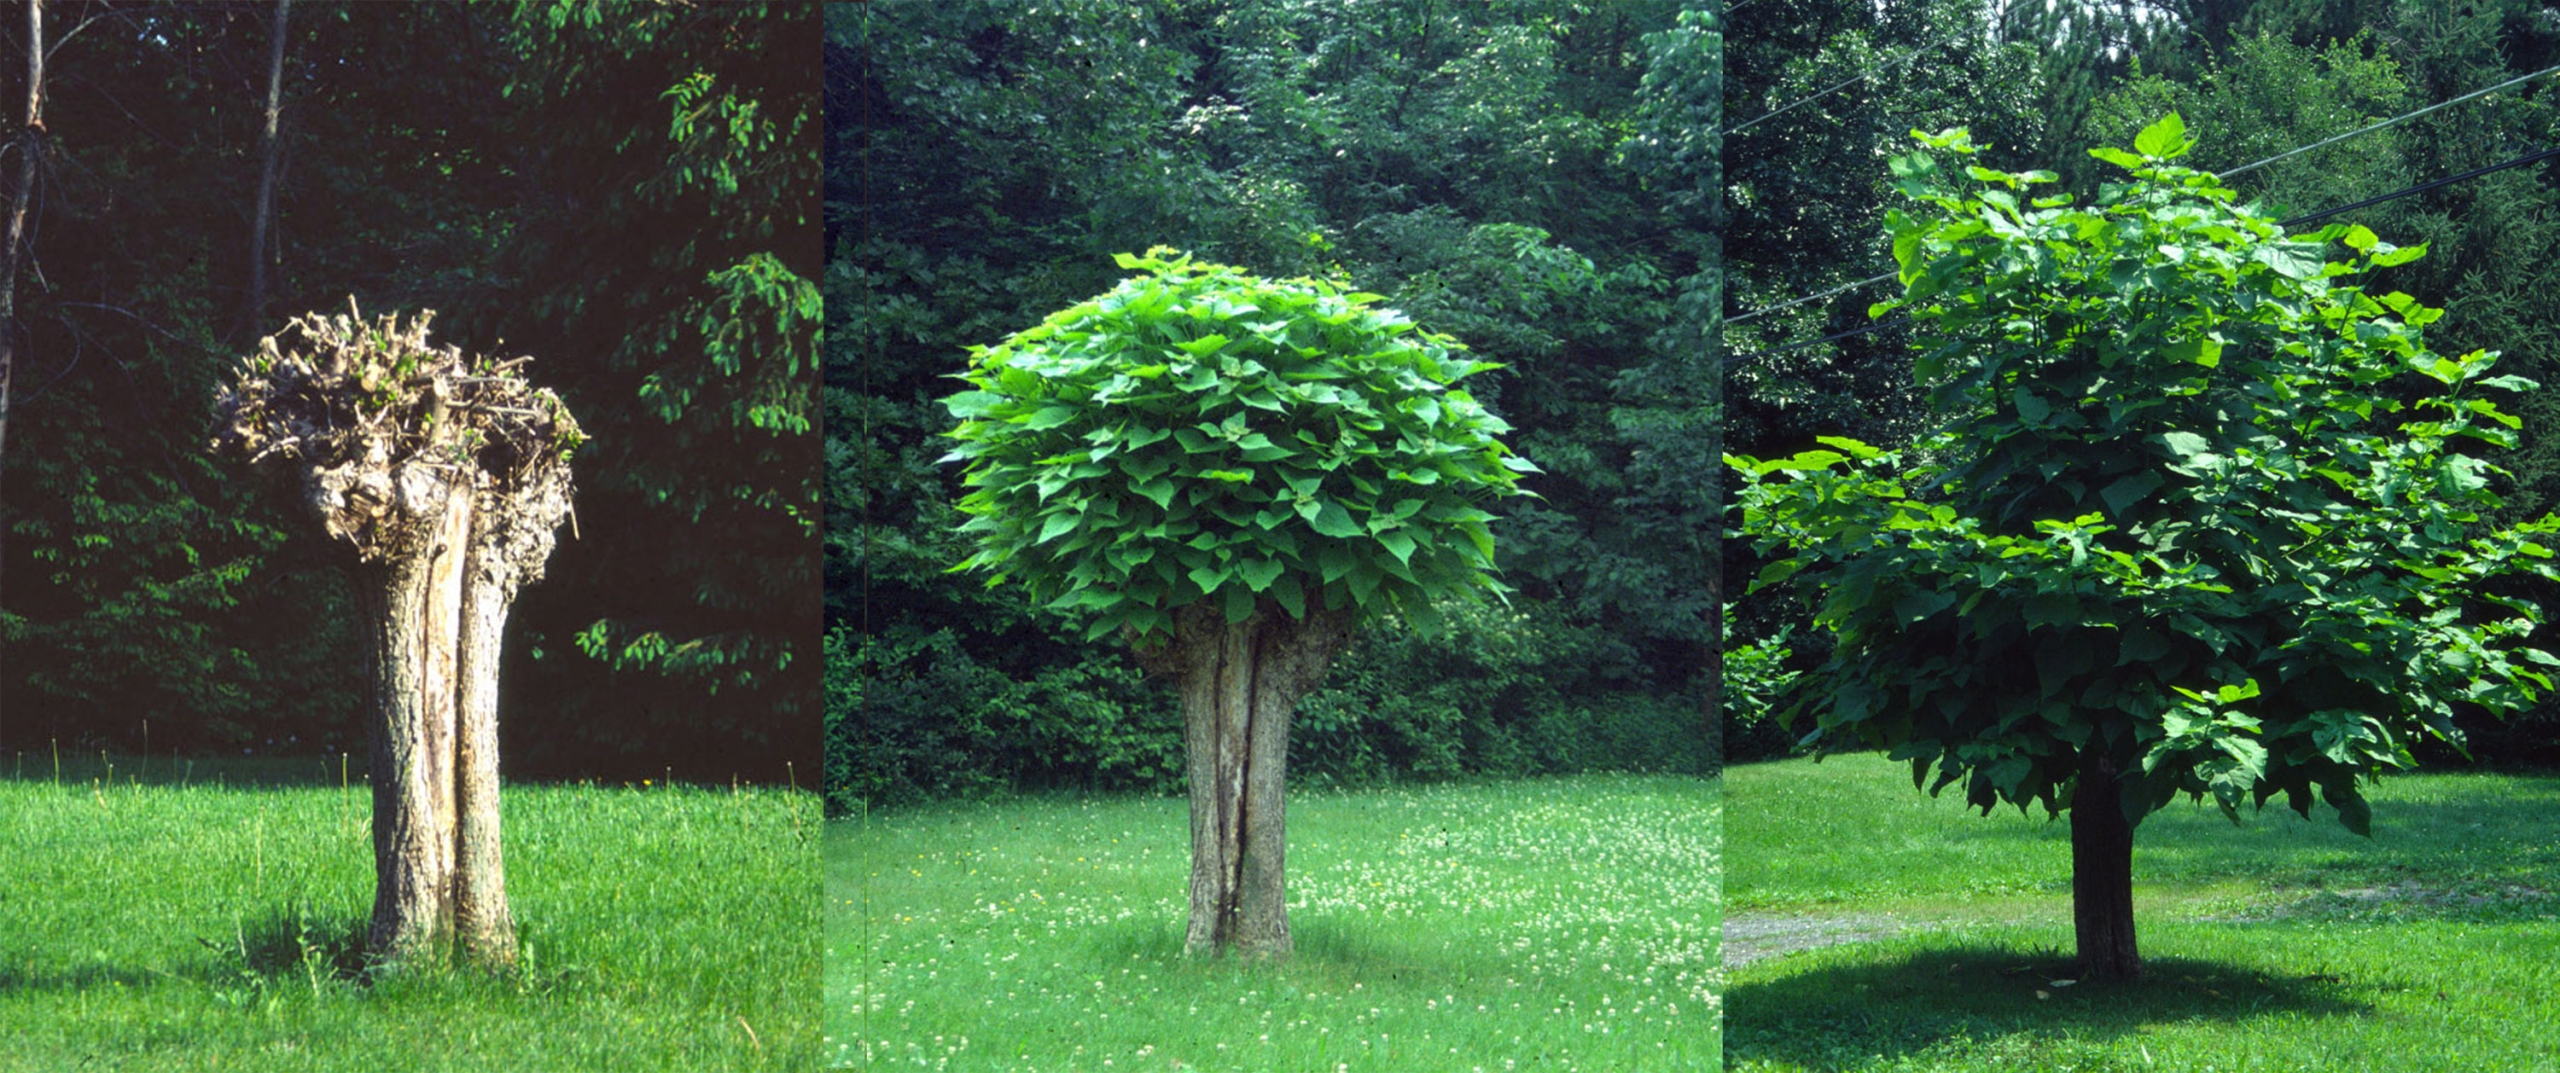
For training my lollipop-shaped bay tree, I allowed only a single stem to grow straight upward, and then pinched off any side shoots that developed. When the trunk reached three feet in height, I pinched out the tip to cause branches to form high on the stem. I kept this up, pinching branches and then their branches, to cause further branching, thus forming a dense head. (I devote a whole chapter to standards in my book The Pruning Book.)

Training a standard

Training a standard (rosemary, in this case)

Or, in an illustration (from The Pruning Book):Steps in making a standard

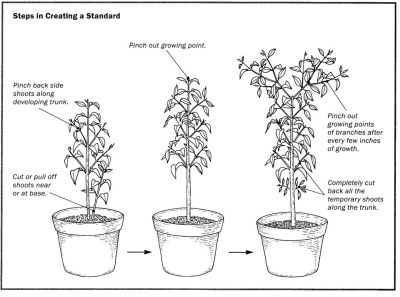
Ongoing care of the tree entails pruning and pinching to keep the mop head to size, and root pruning and repotting the plant every couple of years or so. The time to do any trimming to keep a plant in shape is mostly just as soon as the new shoots mature and stop growing in early summer.Pruning bay laurel

A few years ago, I decided that my tree was too tall and unwieldy; I wanted a shorter standard. Easy: I just lopped the whole plant to the ground and started again. With an established root system fueling new growth, I was able to develop the new lollipop quickly.Standard bay & rosemary

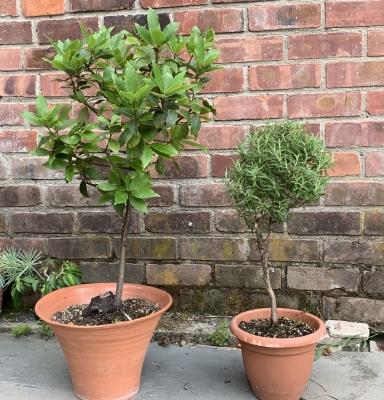
All this pinching and pruning yields fresh bay leaves, which find their way into the kitchen. The fresh leaf has a strong flavor, and one cookbook suggests (and I now confirm this) using one leaf for a dish to serve four people. The aroma of the fresh leaf is more than just strong; it actually has a different quality than that of the dried leaf. The fresh aroma is almost oily, to me somewhat reminiscent of olive oil — how California-ish!

FRUIT VS SHOOT

Note 1: I have some plants leftover from this past weekend’s  plant sale here at the farmden. Contact me by June 24, 2022 if you’re interested in purchasing to pick up any white currant, black currant, fig, or gooseberry plants (a number of varieties of the latter two).They’re all discounted at 25% off.

Note 2: My farmden is open for a Garden Conservancy Open Day on Saturday, June 18, 2022 from 2 p.m. to 5 p.m. Registration is required, here.  

Shoots versus Fruits

I’ve been playing around with the orientation of some of my trees’ branches to influence how they grow. Branches pointed skyward generally are inherently vigorous, giving rise to long shoots, especially from their topmost buds. At the other extreme are branches oriented horizontally. They’re generally weak-growing, and tend to produce fruit buds rather than vigorous shoots and leaves. The cool thing is that if you or I change branch orientation, it changes the growth and fruiting habit of that branch.

Bending and tying branches is a good way to balance shoot growth and fruiting, especially of apple and pear trees. Both types of growth are needed. The fruits for us to eat, and the shoots to “feed” the fruit and to provide places on which to hang the fruits. Shoot growth is also needed to periodically replace old wood.

Pear espalier
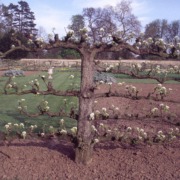
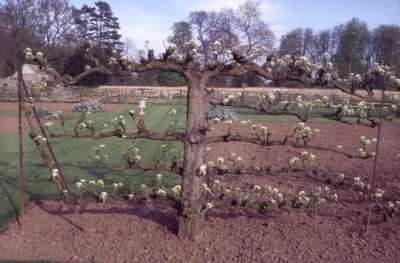
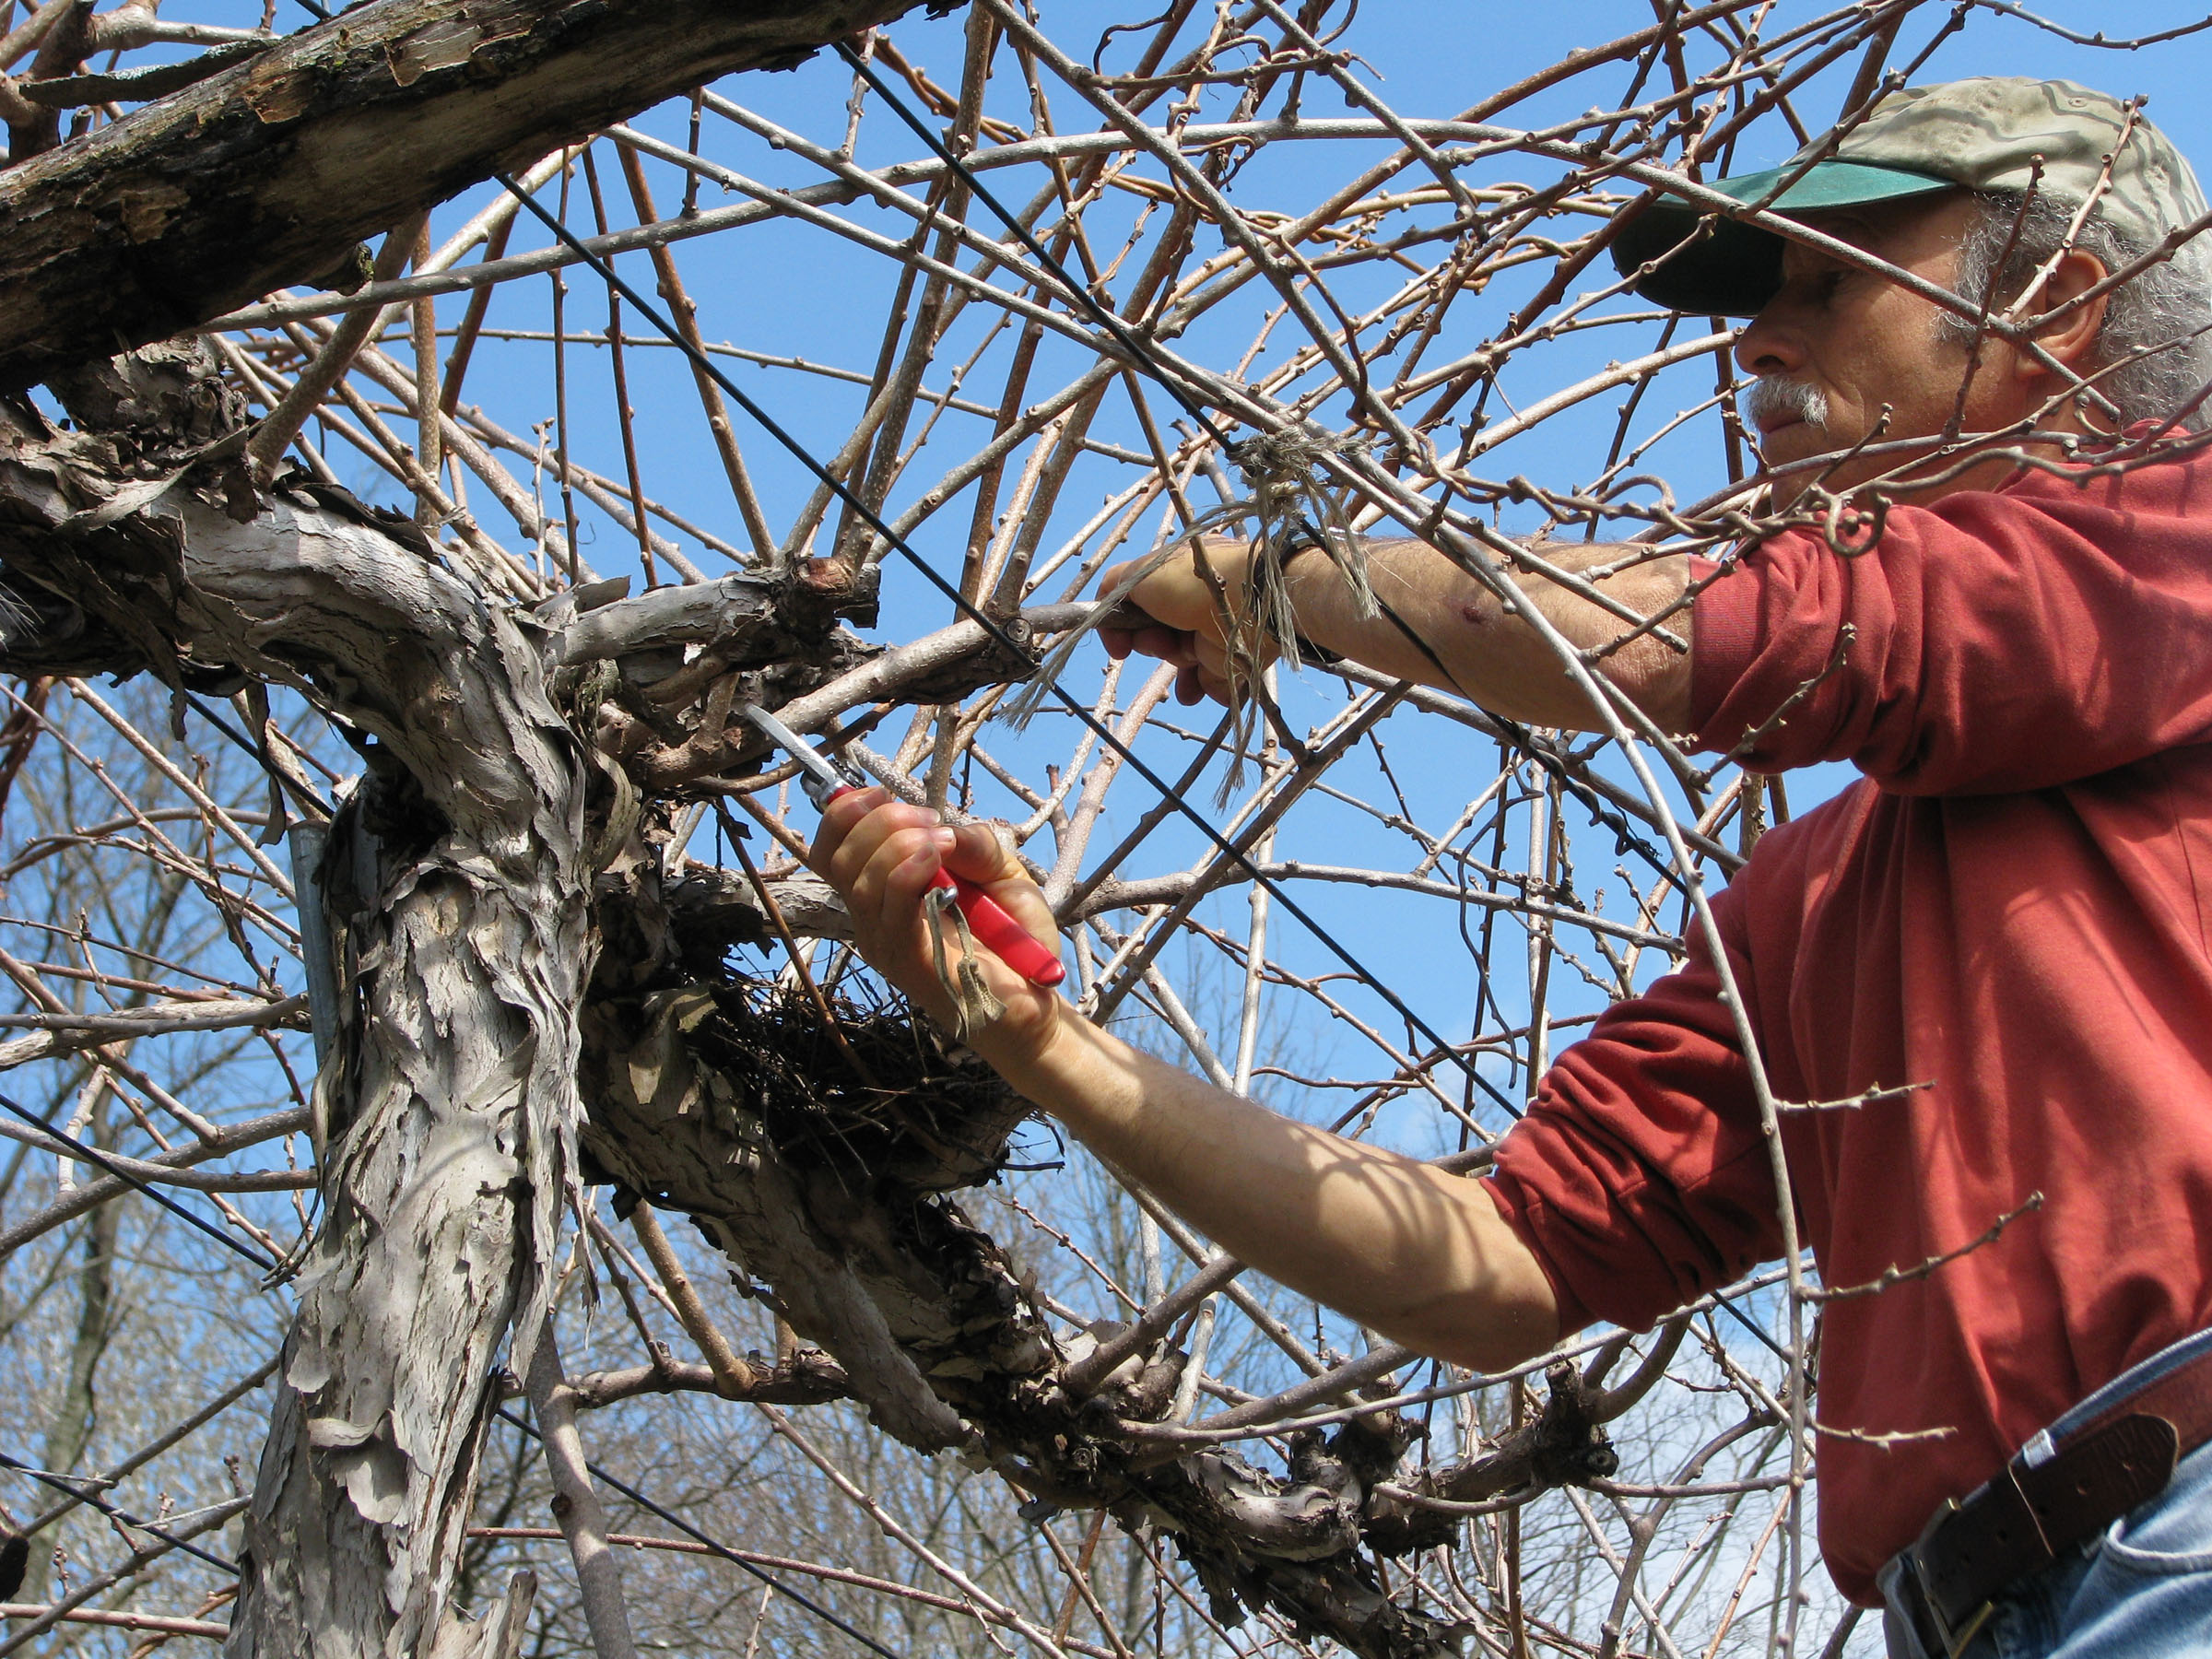
Branch bending to regulate growth and fruiting is especially evident with an espalier, which is a tree grown in an orderly, usually two dimensional form. Lurking behind the many forms, fanciful and otherwise, for espaliers is an appreciation for their effects on growth and fruiting.

Achieving Balance

Backyard apple and pear trees commonly put too much of their energy into shoot growth, a problem that can be exacerbated by overly enthusiastic pruning and over-fertilization. One way to coax an overly vigorous tree into bearing is by pulling upright branches downward, affixing them in that direction. This may seem an unnatural way to treat a plant, but it does help a tree to get started fruiting. Once fruiting begins, the weight of the fruit will keep branches down.Tied branches in British orchard

Sometimes fruit pulls a branch down so much that it’s too fruitful and needs invigoration. Asian pears are prone to bearing too heavily too early in their life, especially if grafted on dwarfing rootstocks; the result is a stunted tree. The cure is to drastically cut drooping branches back to more upward growing — and, hence, vigorous — side shoots. Or to stake branches into more upright positions.

Bending down branches spreads them, which, along with correct pruning, also lets all branches bathe in sunlight. With many upright growing branches, the interior of a tree becomes too shaded to produce fruit buds or even leaves. Well-trained cherry tree

Branches that are spread at an early age make wide angles with the trunk. That wide angle attachment becomes a strong juncture, one that will not break when eventually weighted down with fruit, as often occurs with branches having narrow crotch angles.

Practical Matters: How to Do It

On very young trees which are still forming their main branches around the trunk, I start spreading the new shoots when they are just a few inches long. After bending a shoot carefully so as not to break it, I hold it in that position by snapping a spring-type clothespin on the trunk with the tail of the clothespin holding the shoot down. training with clothespin
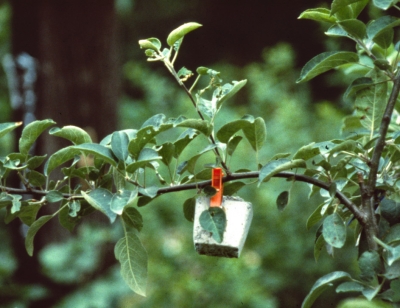
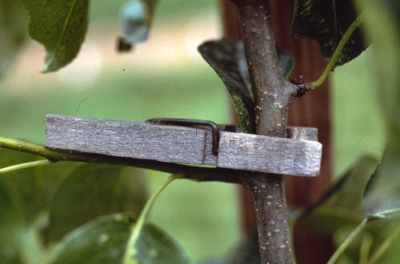
Another way to hold this wide angle is to press one end of a toothpick into the shoot and the other into the trunk, just enough to keep the toothpick in place.

For older branches, I use either a stiff wire or a length of wood with a brad driven in each end. (I’ve previously removed the brad’s head and sharpened what remains.) Wooden branch spreaderTying a string around a branch, and then to a weight on the ground or to the tree’s trunk is another way to pull a branch down. Or, you can affix a weight right to the branch. For instance, glue a clothespin to a rock, then clip it to the branch.Training with branch weight

After a few weeks, the ties or weights or clothespins can be removed. The branches will stay in place.

Ideally, re-orienting the branches of apple and pear trees achieves a favorable balance between shoots and fruits. To this end, strive for about a sixty degree angle to the trunk. I try to keep the branch straight as it is oriented to this angle. If the branch has a bow in it when pulled down, overly vigorous shoots are apt to grow from buds at the topmost part of the bow.

Don’t expect immediate payback for all this care and effort. A year or more might elapse before an apple or a pear tree forms fruit buds, and fruit buds form fruit buds the season prior to actual fruit production. It’s worth the effort in the long term.Dwarf-apple-harvest

REGIMENTING TOMATOES

What’s Better: Loosy Goosy or Soldier Straight?

I wonder how much our gardens reflect our personalities? Some gardeners clip their yew bushes “plumb and square;” other gardeners clip or shear away at their plants more haphazardly. Even in the vegetable patch, a temperament may be reflected in the way tomatoes are grown: Do the plants sprawl over the ground with abandon, are they contained within strings woven up and down the row, or are they neatly staked? (Woven tomatoes or those grown in wire cages are more or less sprawling plants, held aloft.)Staked tomatoes

Whatever your temperament, a good case can be made for staking tomatoes. Tomatoes on a staked plant are larger and ripen earlier than those on a sprawling plant. Good air circulation around leaves and fruits of upright plants lessens disease problems. And fruits held high above the ground also are free from dirt and slug bites. You’ll harvest less fruit from each staked plant, but since staking makes best use of the third dimension, up, staked plants can be set as close as eighteen inches apart. So staking gives the best yields per square foot — especially important in small gardens.

Flavor Picks

Tomato varieties suitable for staking are so-called “indeterminate” types, which form fruit clusters at intervals along their ever-elongating stems. “Determinate” varieties, in contrast, bearsfruits at the ends of their branches, so if a plant was pruned for staking would be reduced to a single short stem capped by a single cluster of fruits. Seed catalogues and packets usually indicate which varieties are suitable for staking.Planted tomatoes

Determinate varieties are bushy plants that need little regimenting. They also ripen their fruits within a shorter window of time.

So what’s not to like about determinate varieties? Flavor! With fewer leaves per fruit than indeterminate varieties, flavor suffers. That concentrated ripening period also can stress the plants, making them more prone to disease.

As you might guess, I grow only indeterminate varieties of tomatoes. Flavor is my main criterion in selecting a variety to grow.

Staking

When choosing a suitable stake for staking (indeterminate, of course) tomato plants, don’t be misled by the puniness of tomato transplants. A tomato stake needs to be be six to eight feet long and metal or at least one by two inches thick if made of wood. I use EMT (electrical metallic tubing) conduit, 5/8 inch diameter and 10 feet long, cut down to 7 feet. It’s easy to pound into the ground (okay, I’ll admit that here on the floodplain there are no rocks), easy to remove, and reusable for years and years.

Most books and other sources of information suggest “planting” your stake along with your tomato plant to avoid root damage later on. Not true. My established tomato plants never bat an eyelash (figuratively speaking) as I pound in metal stakes only a couple of inches from their stems. And there’s a good reason to wait until the plants are well-established; by then, chance of cold damage is reliably history. Early planted stakes would interfere with my trying to throw a protective blanket over a row of staked tomatoes should cold threaten.

With the base of a stake set a couple of inches from a plant and a 3 foot length of iron pipe, capped at one end and slid over the conduit’s free end, the stake pounds in easily with repeated lifting and forcefully lowering.Pounding in tomato stake

Indeterminate tomatoes are vines, but not vines that can climb by themselves. So they need to be tied to their stakes. Material for ties should be strong enough to hold the plants the whole season, and bulky enough so as not to cut into plants’ stems. Coarse twine or cotton rags, torn into strips, are good materials. I use sisal binder twine. 

The usual recommendation, when tying, is to first tie a knot around the stake tightly enough to prevent downward slipping, then use the free ends of the rag strip or twine to tie a loose loop around the plant’s stem. False! With every foot or so of growth, I tie a single loop loosely around stem and stake above a node; the string can’t slip down lower than the node.Tomato plant, tied

Pruning

Now for the pruning: Confine each plant to a single stem by removing all suckers, ideally before any are an inch long. A sucker is a shoot that grows from a bud originating at the juncture of a leaf and the main stem.tomato sucker

Go over your plants at least weekly, using your fingers to snap off each side shoot. (Cutting the shoots with a knife or pruning shear may transmit disease between plants as a blade touches cut surfaces.) Occasionally step back and refocus your eyes on the plant as a whole; I find that I sometimes overlook a sucker that has snuck up with two feet of growth I missed as I focussed on still small shoots just appearing from buds.

One final bit of pruning that some gardeners practice is to pinch out the growing tip of the plant when the stem reaches the top of the stake, then continue to remove any new leaves or flowers that form. This is a little chancy, since the effect depends on the maturity of a plant’s leaves and fruits. At worst, you reduce yield to a few clusters of fruit. But at best, your tomatoes are even earlier and larger. It may be worth a try on a couple of plants.

How do your tomatoes grow, up or sprawling. A case can be made for “up.” But you need the right variety, stake, and method of pruning. 

TEASING APART HYDRANGEAS

Good Answer

When someone asks me how they should prune their hydrangea, I give them the answer that most people don’t like to any question “It depends.” What else can I say? It DOES depend. One or more of a few species of hydrangeas commonly make their home in our yards, and you have to approach each, pruning shears or loppers in hand, differently.

Let me tease apart the answer by, first, taking a look a what hydrangea or hydrangeas we may be growing, and then how they grow and flower, which, in turn, speaks to when and where to start snipping away.Climbing hydrangea at Mohonk Mountain House

Mopheads and Lacecaps, and Oakleafs

If the hydrangea plant in question is a shrub bearing blue or pink flowers, it’s a so-called Bigleaf Hydrangea (Hydrangea macrophylla). Mopheads types, also called hortensias, bear softball to volleyball size clusters of florets. Lacecap types bear flat-topped cluster of small, hardly conspicuous florets surrounded by rims of showy, larger, 4-petalled florets.Mophead hydrangea

Whether mophead or lacecap, Bigleaf Hydrangeas flowers open from buds they set up the previous year. Those buds are big and fat, in contrast to the skinny buds that grow out to become shoots.

Prune Bigleaf Hydrangea stems as far as the fat buds while the plants are leafless (now, for instance). Right after bloom, cut the stems further back to near ground level.

Problem is that while the plants can stand up to bitter cold, the flower buds can’t, expiring at temperatures below about minus 5° Fahrenheit. Some varieties set their flower buds lower on the stem than do others. Their buds might more reliably stand up to winter cold if plants are mulched in late fall with some loose organic material like straw or arborists’ wood chips.

Pushing Bigleaf Hydrangea growing further north are some recently developed varieties that bloom on new, growing shoots. These new varieties — the first one of which was named Endless Summer — will bloom anywhere. Blossoms on new shoots unfurl later in the season than those on older wood, too late in some gardens (like mine, some years). Cutting back older shoots after they flower fuels a better show from the young, growing shoots. 

Oakleaf Hydrangea (H. quercifolia) is another hydrangea that is very cold hardy, except for it flower buds. Flowers sit on the ends of stems in elongated clusters, like cotton candy. Oakleaf Hydrangea can be pruned just like Bigleaf Hydrangea, except that it grows as a large shrub so need not be cut back so much.Oakleaf hydrangea

Lack of a flowery show from Oakleaf Hydrangea is no loss because a billowing mound or mounds of the oak-like leaves are attractive in their own right through summer, and also in fall, when the leaves turn rich, burgundy red. Even where winter cold would test the reliability of flowering, Oak Leaf Hydrangea is often planted solely for its form and its leaves.

A Beautiful Climber

Years ago, I planted a Climbing Hydrangea (H. animal petiolaris) at the base of the north wall of my home. It took a couple of years or more to get in gear, but now completely clothes that wall. Though leafless through winter, the peeling, light mahogany bark stands prettily against the brick red backdrop. Hydrangea animala barkSoon the stems will be draped in glossy, green leaves and, a little after that, white flowers that stand proud of the wall on short stalks and glow against their dark backdrop like a starry night.

This time of year my pruning consists of shortening shorten flower stalks that reach too far out from the wall and vigorous stems that keep trying to sneak around the wall to clothe the rest of the house. Twice in summer I prune stems again to restrain the plant to only the north wall.

Perhaps I’ll plant another Climbing Hydrangea at the base of my 90 foot tall Norway spruce that with age is thinning out. The hydrangea tolerates sun or shade, and can climb a tree without causing harm.

And, Easiest of All

Rounding out this romp through pruning hydrangeas are two of the easiest to prune plants of the species. The first, Smooth Hydrangea (H. arborescens), grows long shoots from ground level, each capped in early summer with half-foot-wide clusters of of white or pastel flowers. To prune, just lop all stems right to the ground in late winter or early spring.Smooth Hydrangea

And finally, we come to PeeGee, sometimes called Panicle, Hydrangea (H. paniculata grandiflora), growing like a small tree or large shrub. This one blossoms in late summer on new growth, so if it is going to be pruned, that needs to be done before growth begins. Hydrangea paniculataWith that said, Panicle Hydrangea develops a permanent trunk or trunks, making it difficult to reach high into its dense head for pruning. No matter, because the plant flowers quite well with little or no pruning.

Hydrangea is only one group of closely related plants where species differ in how they are pruned. Roses would be another example; climbing roses are pruned very differently from rambling roses, which are pruned very differently from . . . you get the picture. Clematis also. For more details about the individual pruning needs of these as well as lots of other trees, shrubs, vines, flowers, fruits, and houseplants, and special pruning techniques like pollarding, mowing and scything (yes, that’s pruning!), and espalier, take a look at my book The Pruning Book. It’s available through the usual sources or, signed, directly from me here.The Pruning Book

SHRUBS, I’M SHARPENING MY SHEARS AND LOPPERS

Shrubs are Shrubby

A shrub is a shrubby, woody plant. (Now, that’s profound.) Numerous stems originating at or near ground level are what make a plant shrubby. Usually, no one stem ever gets the upper hand over other stems. For most shrubs, you need to get out there with your pruners to snip and lop every year.

How to prune a shrub depends on when it flowers and on what age stems provide the most ornamental effect. Does the shrub flower early in the spring, or later in the summer? Does it flower on old stems, on those that grew last year, or on new shoots?

Tree peony bloom

Tree peony

And one more thing before we dive in: Here, I’m writing about pruning shrubs growing informally. Let’s shelve pruning hedges and, because they vary so much in their pruning needs, roses for another time.

Deciduous shrubs can be put into one of four categories according to the age of stems that flower or otherwise look their best. Here are some bare-bone guidelines for each of these categories. In my book, The Pruning Book, from which this is excerpted, I offer more detailed guidance with extensive lists of plants in each category (and, of course, details on pruning hedges, roses, and just about any other plant or pruning technique you can think of. Really.)

Old Looks Best

Deciduous shrubs whose old wood flowers or looks best. Included within this category are shrubs — witch hazel, rose-of-sharon, tee peony are examples — that naturally build up a permanent framework of branches. Rarely do they send up new suckers at or near ground level. These shrubs flower directly on older wood, or from shoots that grow from older wood.Witch hazel Grouping plants always entails a certain degree of arbitrariness, and because of their disinclination to sucker, a few plants in this category could also be considered “trees,” especially if deliberately trained to one or a few trunks..

These shrubs are the easiest shrubs to prune: mostly, just don’t!

Some Annual Pruning Helps

Deciduous shrubs that flower best on one-year-old wood. Because they all flower only on wood that grew the previous season, annual pruning is needed to stimulate new growth, each year, for the following year’s flowers.

Renewal prune each year, removing the very oldest stems to make way for younger, floriferous stems to step in and replace older stems. Cutting a few stems low in the shrubs is also less work than shearing, and creates a more graceful, fountain-like growth habit, and keeps the plant low, neat, and abundantly flowering.
Renewal pruning
Prune those shrubs that flower early in the season right after their blossoms fade. But now, or just before growth begins, is the time to prune those shrubs that flower from summer onward. Pruning early-flowering shrubs right after they bloom allows you to enjoy their blossoms, but still leaves enough time for shoots to grow and ripen wood sufficiently for next season’s blooms.

The one-year-old shoots on which flowers are borne may grow mainly from older stems up in the shrub, or else mostly from ground level. The location of these flowering shoots determines pruning technique, so I have subdivided this category into two groups, grouped plants accordingly, and follow with instructions for each. 

Shrubs such as lilac, forsythia, and mock orange flower best on one-year-old wood originating from older wood up in the plant.

Lilac flowering habit

Lilac flower budsPeer in at the base of the mature plant and you’ll notice wood of various ages growing up from ground level. Begin pruning by cutting away near ground level, some of the very oldest stems. Those oldest stems are also the tallest ones, so these first cuts quickly lower the plant.Plants blooming on 1-year old stems up in plant 

Each year also remove at ground level a portion of the youngest stems so they don’t crowd with age.

Abelia and kerria are among those shrubs that flower best on one-year-old wood originating at ground level; they need more drastic pruning. Every year cut away all wood more than one-year-old, either right to ground level or else to a vigorous branch originating low on the plant. You can tell the age of a stem by its thickness and, with many plants, by the color or texture of the bark. Kerria blossoms

Blossoms on New, Growing Stems

Deciduous shrubs whose current growth flowers or looks best: Here we have shrubs valued only for their new growth. And yes, in some cases we value the plant for the young stems themselves.

Red-osier dogwood stems in winter

Red-osier dogwood stems in winter

This group of shrubs, which includes red-osier dogwood (whose young, red stems “ignite” with winter cold), butterfly bush, New Jersey tea, and Hills-of-Snow hydrangea, is very easy to prune: simply lop the whole plant down to the ground just as buds are swelling. Butterfly bush


Time for Renovation?

  You perhaps have inherited, with your property, a neglected, old shrub offering you a tangled mass of stems, an awkward posture, and few flowers. Can this shrub be brought back to its former glory? Probably.

You have two options in renovating this shrub. The first is the drastic one: you merely lop the whole plant to within one foot of the ground just before growth begins for the season. The plant won’t be pretty for a few years but after that you’re on your way to a “new,” shrub, full of blossoms and with a graceful growth habit, a whole new plant from the ground up.

A second option is gradual renovation, removing a couple of the oldest stems each year over a period of four or five years. Although this takes more time, the plant will look decent throughout the recovery period. 

Rather than renovation, you might instead consider capitalizing on your overgrown shrub’s age and venerability by transforming the plant into a picturesque small tree. Not all shrubs make this transition gracefully; devil’s walkingstick, hawthorn, and hazelnut are among those that do. 

Select as trunks two or three of the oldest stems having pleasant form and growing from ground level to as high as the proposed crown of your tree-to-be. Remove all other growth from ground level to the proposed crown. 

Even easier is to let the deer prune for you, in which case the bottom of the crown will be as high as the deer care to reach.

Deer pruned yew

Deer pruned yew

TO PRUNE OR NOT TO PRUNE, THAT IS THE QUESTION

A Sharp Knife is not Enough

“Prune when the knife is sharp” goes the old saying. Wrong! (But don’t ever prune if the knife—or shears—is not sharp.) There are best times for pruning, and they depend more on the type of plant and the mode of training than on the sharpness of the knife.

Cat is ready to prune

Cat is ready to prune

As each growing season draws to a close in temperate climates, trees, shrubs, and vines lay away a certain amount of food in their above- and below-ground parts. This food keeps the plants alive through winter, when they can’t use sunlight to make food because of lack of leaves (on deciduous plants) or cold temperatures. This stored food also fuels the growth of the following season’s new shoots and leaves, which, as they mature, start manufacturing their own food and pumping the excess back into the plant for use in the coming winter.

A similar situation exists in some tropical and subtropical climates having alternating wet and dry, or cool and warm, seasons. Plants must wait out those quiet times drawing on their reserves.

Old apple tree, unpruned & pruned.jpg

Old apple tree, unpruned & pruned.jpg

When you prune a dormant plant, you remove buds that would have grown into shoots or flowers. Because pruning reapportions a plant’s food reserves amongst fewer buds, the fewer remaining shoots that grow each get more “to eat” than they otherwise would have and thus grow with increased vigor.

(For more details on above and what follows, see my book, The Pruning Book, available from the usual sources or directly from me, signed, at www.leereich.com.)

Summer or Winter, Growing or Dormant?

As the growing season progresses, response to pruning changes, because shoots of woody plants cease to draw on reserves and stems stop growing longer well before leaves fall in autumn. In fact, growth commonly screeches to a halt by midsummer. So the later in the growing season that you prune, the less inclined a woody plant is to regrow — the year of pruning, at least.

Traditional theory holds that summer pruning is more dwarfing than dormant pruning, but contemporary research puts this theory on shaky footing. True, if you shorten a stem while it is dormant — in February, for example — buds that remain will begin to grow into shoots by March and April, while if you cut back a shoot in midsummer, the plant might just sit tight, unresponsive. Ah, but what about the following spring? That’s when the summer-pruned shoot, according to this recent research, waits to respond. (Plants have an amazing capacity to act however they please no matter what we do to them.)

What are the practical implications of all this? First of all, if you want to coax buds along a stem to telescope out into shoots, prune that stem when it’s dormant.

Pollarded catalpa

Pollarded catalpa

On the other hand, summer is the time to remove a stem to let light in among the branches (to color up ripening apples or peaches, for example), or to remove a stem that is vigorous and in the wrong place. Watersprouts, which are vigorous, vertical shoots, are less likely to regrow if snapped off before they become woody at their bases.

Under certain conditions, summer pruning can be more dwarfing than dormant pruning, because regrowth following summer pruning can be pruned again. And again. Under certain conditions, summer pruning can also prompt the formation of flower buds rather than new shoots — just what you want for solidly clothing the limbs of a pear espalier with fruits or the branches of a wisteria vine with flowers.

Pear, before and after summer pruning detail

Pear, before and after summer pruning detail

Red currant espalier before & after summer pruning

Red currant espalier before & after summer pruning

Unfortunately, the response to summer pruning depends on the condition of the plant as well as the weather. A weak plant may be killed by summer pruning. A late summer wet spell, especially if it follows weeks of dry weather, might awaken buds that without pruning would have stayed dormant until the following spring. Also factor just how much growth you lop off a stem as well as temperatures in the days or weeks following pruning.

Whose Health?

Regrowth and flowering are the dramatic responses to pruning; you also must consider plant health when deciding when to prune. Although immediate regrowth rarely occurs after late summer or autumn pruning, cells right at the cut are stirred into activity to close off the wound. Active cells are liable to be injured by cold weather, which is a reason to avoid pruning in late summer or autumn except in climates with mild winters or with plants that are very hardy to cold.

Dormant pruning just before growth begins leaves a wound exposed for the minimum amount of time before healing begins. Some plants — peach and its relatives, for example — are so susceptible to infections at wounds that they are best pruned while in blossom. On the other hand, the correct time to prune a diseased or damaged branch is whenever you notice it.

Also consider your own health (your equanimity and your energy) when timing your pruning. Depending on the number of plants you have to prune, as well as other commitments, you may not be able to prune all your plants at each one’s optimum moment. I prune my gooseberries in autumn (they never suffer winter damage), my apples just after the most bitter winter cold has reliably move on, and my plums (a peach relative) while they are blossoming.

Sap oozes profusely from cut surfaces of maples, birches, grapes, and kiwis if they are pruned just as their buds are plumping up in spring. The way to avoid this loss of sap is to prune either in winter, when the plants are fully dormant, or in spring, after growth is underway. The sap loss actually does no harm to the plants, so rushing or delaying pruning on this account is not for your plant’s health, but so that you can rest easy.

MICHELANGELIC ASPIRATIONS

I Start with the Easiest

I spent an hour or so today working on my sculptures. Yes, they were out in the garden. No, they were not stone renderings of fish spouting water into a pond or of ethereal females sprinkling the ground with flower petals. These sculptures are quite large and, as you might guess, the are green, with leaves. 

Some of the sculptures have been completed; some are works in progress. The easiest of these sculptures are nothing more than short hedges, one of boxwood and the the other of yew. Each makes a cozy enclosure, the yew for my front stoop and the boxwood for a bed of Smooth (Hills-of-Snow) hydrangea, a hop vine climbing a trellis, and a Sweet Autumn clematis climbing a brick wall.

Yew at front stoopWith flat tops and nearly vertical sides, both hedges are quick and easy to prune. They both widen slightly from head to toe because, quoting from the “hedging” section of my book, The Pruning Book, “If the top is wider than the bottom, the bottom will become shaded. Over time, the shaded portions will die out, leaving gaps in the hedge.”

(Could these two hedges hardly qualify as “sculpture?” I contend that creating any three-dimensional object requiring aesthetic decisions as to shape and size qualifies as “sculpting.”) 

A hedge out in back of my home takes longer to prune because the hedge itself is longer as well as, in some parts, higher. This 50 foot row of privet bushes is waist height through most of its length except for the gentle upward sweep it takes as it approaches either end. After climbing 8 feet, the sweeps level out, continuing on to create the top of an arch beneath which is an opening through which I can walk, even drive my tractor.

Catty-corner to the swooping hedge (which, in its earlier stages, I was going to sculpt into a two-headed dragon) is another hedge with a pass-through. This hedge forms a high wall a few feet off the back wall of my workshop, and it’s pass-through iswide enough and, with its slight bump up above it, also high enough so that anything that fits through the barn door can also fit through the pass-through. 
Intersecting hedges
The plant that makes up this hedge is Tea crabapple (Malus hupihensis), an interesting plant not usually hedged. It produces seeds that are apomictic, a botanical quirk where, to quote from another of my books, The Ever Curious Gardener, the plant produces “seeds that are not the result of pollination, but that develop from the same kind of cells that make up the rest of the plant.” (All seedlings and the mother plant are clones of each other. These were extra seedlings from those I had grown for research use when I worked for Cornell University.)

Left to its own devices, a Tea crabapple would grow up to 40 feet high and produce fragrant, white blossoms and cherry-size crabapples. For decades, I’ve kept the row of seven of them only 15 feet long, 3 feet wide, and 9 feet high. They don’t mind except with all that pruning, flowers or fruit are rare.

Heads and Clouds

Now we come to the more difficult hedges, ones that are more sculptural. Both are yews, a plant that tolerates just about any kind of pruning. I have written about both hedges previously. Since I revisited them today with pruning and hedge shears, I thought it was time to revisit them on the page also.

The first is not a hedge, but a solitary, giant old yew bush that, at more than 40 years old, predates my tenure here. For most of that time, it was pruned to the shape of a 15 foot high and wide cone. More recently I’ve pared away at it to try to morph that cone into a giant head.

Problem is that the interior of a plant cone that size is dark, so the stems within lose their leaves. Some of them dry out and die back. As a result the yew head’s eye sockets and mouth, both of which were supposed to be green recesses are dark — and a bit foreboding.
Yew bush pruned to a head
Today’s pruning was geared to shearing the whole bush to keep it from growing too large, and shortening all the dead wood deep within the eye and mouth sockets. New sprouts should then appear within those once-shaded gaps. 

The other sculpting challenge started life very conventionally, as four yew hedges planted along the house wall. It was your typical “foundation” plants and planting. Years ago, for fun, I sculpted the hedge into a giant whale and, a few years later, a giant caterpillar. Easy.
Caterpillar yew
More recently, I decided to go more abstract and artistic, with “cloud pruning.” Or, as Jake Hobson more accurately terms it, in his informative and visually inspiring book The Art of Creative Pruning, “organic topiary.” He describes this pruning as creating forms that take “on a decidedly organic character, as though they were made of wax and exposed to the sun too long. Definition is lost, in favour of natural, flowing lines.” That’s my goal, thus far hinted at but unachieved. I find it difficult to unshackle the hedge from the three individual bushes that comprise it.
Organic topiary yew

If Only Michelangelo…

So much in gardening involves taking time to step back and admire your finished work. With these sculptures, even the simplest ones, it’s important to do so periodically while sculpting.

It’s all fun and very satisfying. If I make a mistake, I can just wait for the plant to grow back. Just think if Michelangelo could have stepped aside for a few weeks while his marble grew back for another round of being chipped away.

On the other hand, he would not have to chip away at the finished piece every few months through summer to keep it in shape. These sculptures need multiple prunings through the growing season to keep their shape.