
WINTER ‘SHROOMS, SUMMER DREAMS, & A WINNER
Mushrooms Think It’s Autumn Again
The 15 oak logs sitting in the shade of my giant Norway spruce tree more than earned their keep last year. Seven of them got inoculated with plugs of shiitake mushroom spawn in the spring of 2013; eight of the were inoculated in the spring of 2014. With little further effort on my part, reasonably good flushes of mushrooms appeared through spring and summer, then heavy flushes through fall until the mild weather turned frosty.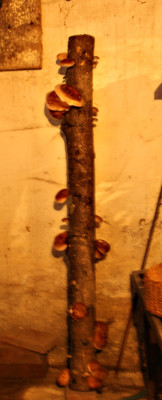
My friends Bill and Lisa, also shiitake growers, told me a few days ago how they’re still harvesting good crops, cold weather notwithstanding. They brought one of their logs indoors, where it stands in the sink of their laundry room. Great idea!
I don’t have a laundry room, but I do have a cool, dark, moist basement, i.e. mushroom heaven. So a few days ago I carried one of my logs down the narrow basement stairway and propped it against the wall in a dark corner near the sump pit. That nearby pit could catch excess water in case the log needed to be watered.
No watering was needed: A few days after taking up residence in the basement, fat, juicy shiitake mushrooms exploded from the plugs up and down the log — so many that we had enough to dry for future use.
I’ll leave the log down there to see if it flushes again. If nothing happens within a few weeks, I’ll carry it back under the spruce and replace it with another log from outside. The few weeks in the cool basement might be enough time for more mycelial growth in the log in preparation for another flush. And then, sitting for some time in cold weather beneath the spruce might be just what a shiitake log needs to shock it into another cycle of production.
Rotating the logs between the basement and beneath the spruce could keep us in fresh mushrooms all winter long.
Winter Green
Most years, by this time, piles of snow would make it difficult for me to get to those outdoor shiitake logs. Recent weather, and predictions for the coming months, makes me wonder if I should even keep using the word “winter.”
I’d sacrifice fresh shiitakes for a real winter with plenty of snow. (We have enough quart jars of dried shiitakes to last well into warm weather.) It’s nice to have that white stuff to ski on. Snow even fertilizes the ground (“poor man’s manure”) as well as insulates it against cold.
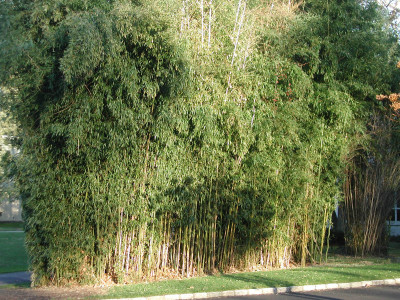
On the other hand, a mild winter has its appeal. Most winters, leaves and canes my yellow groove bamboo (Phyllostachys aureosulcata) are damaged — or, like last winter — killed back to the ground. The roots survive to re-sprout but the leaves turn brown and the new canes in spring are spindly. Some winters, like this winter probably, make for attractive (and useful) tall, thick canes dressed all winter long in green leaves.
Chester blackberry is another borderline hardy plant. It’s the hardiest of the thornless blackberries yet comes through most winter with many stems dried and browned — dead, that is. In the spring after our mild winters, stems are still green, foreshadowing a good crop of blackberries in late summer.
I’ve been waiting for a string of reliably milder winters to plant out my hardy orange plant (Citrus trifoliata). Yes, a citrus whose stems can just about survive to flower and fruit outdoors here, where winter temperatures normally plummet to minus 20°F or below. The fruit, sad to say, is only marginally palatable.
One more plus for a mild winter is the color green. The green of plants comes from chlorophyll, which is always decomposing, so must be continuously synthesized if the plant is to remain green. Synthesis requires warmth and sunlight, both at a premium during winters here. So most winters turn lawns muddy green or brown; even the green of evergreens, such as arborvitae, turn chalky green.
But not this winter — so far. Grass is still vibrant green, as are the arborvitaes and other evergreens.
My Favorites
My friend Sara asked me if I had yet ordered my seeds, and if I was getting anything especially interesting. Yes and hmmm.
As far as hmmm . . . I’ve tried a lot of very interesting plants over the years, too many of which — celtuce, garden huckleberry, vine peach, and white tomatoes, for example — were duds. So mostly, I restrain myself, devoting garden real estate to what I know either tastes or looks good, and grows well here in zone 5 or, more specifically, on my farmden. Some of my favorites include Shirofumi edamame, Blue Lake beans, Blacktail Mountain watermelon, Hakurei turnip, Sweet Italia and Italian Pepperoncini peppers, Golden Bantam sweet corn, Pennsylvania Dutch Butter Flavored and Pink Pearl popcorn, Lemon Gem marigold, and Shirley poppy.
I’m very finicky about what tomato varieties I plant, so won’t even mention them. Oh yes I will: Sungold, San Marzano, Paul Robeson, Brandywine, Belgian Giant, Amish Paste, Anna Russian, Valencia, Carmello, Cherokee Purple, and Nepal, to name a few.
And the Winner Is (drum roll) . . .
Thanks for all your comments, requested on last week’s post, about your soil care. Looks like you readers (or, at least, those of you who commented) are very savvy gardeners, enriching your soils with lots of organic materials. I chose one comment randomly fro the lot, the writer of which gets a free copy of my book Grow Fruit Naturally. Congratulations Selena.
For those of you who subscribe — or have attempted to subscribe to my weekly blog, a glitch is preventing you from getting email notifications. I just found out that the glitch has been glitching since back in September. I hope to get it fixed soon. Any suggestions? (The blog is in WordPress and subscriptions are with Feedburner, whatever that means). Stay tuned. If you want to just go to my blog site, new posts come out towards the end of every week.
TO SAVE OR NOT TO SAVE, & A FREE BOOK!
New Seeds Needed?
“Ring out the old, ring in the new.” But not all the “old,” when it comes to seeds for this year’s garden. I’m flipping through my plastic shoeboxes (I think that’s what the boxes are meant for) of vegetable and flower seeds, assessing what old seeds are worth keeping and what new seeds I need to order.
Seeds are living, albeit in a dormant state, and, as such, have a limited lifespan. The longevity of any seed depends, first of all on the kind of seed, its genetics. Most seed packets come dated; if not, I write the date received on the packet.
Few seeds have as short a viability as parsnips. (No matter to me; I don’t grow them.) More astounding is the longevity of some seeds, especially the current record-holder for longevity, Silene stenophylla seed, possibly 32,000 years old, found buried in a squirrel burrow in the Siberian tundra. At the other end of the spectrum are seeds that remain viable for even less time than parsnip. The record at that end is probably held by seeds in the family Tillandsioideae, related to pineapple, with a viability of 4-6 weeks. Swamp maple, Acer saccharinum, seeds retain their capacity to germinate for only about a week.
It’s not worth the risk to sow parsnip, spinach, or salsify seeds after they are more than one year old. Two years of sowings can be expected from packets of carrot, onion, okra, pepper, and sweet corn seed; three years from peas and beans, radishes, celery, and beets; and four or five years from cabbage, broccoli, brussels sprouts, radish, cucumbers, beet, endive, melons, eggplant, tomato, and lettuce.
Among flower seeds, the shortest-lived are delphiniums, aster, candytuft, and phlox. Packets of alyssum, Shasta daisy, calendula, sweet peas, poppies, and marigold can be re-used for two or three years before their seeds get too old.
Life Extension, for Seeds
As with humans, genetics and lifestyle determine actual longevity, lifestyle, in the case of seeds, being storage conditions. So although onion seeds remain potentially viable for 2 years, I replace the year old, dog-eared seed packets in shoeboxes in my garage with new packets each year.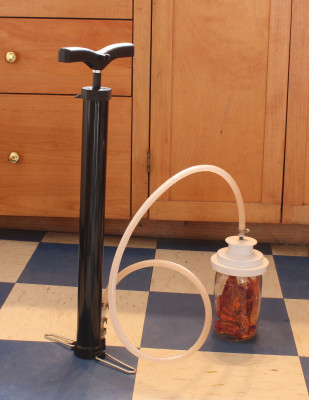
Conditions that slow biological and chemical reactions also slow aging of seeds, i.e. low temperature, low humidity, and low oxygen. All winter, my seeds find their low temperature and low humidity storage in my garage. Good for seeds. But come summer, my garage becomes warm and humid. Bad for seeds.
If my seed boxes could be kept well sealed, I could eke more sowings from a packet of seeds by lowering the humidity with a packet of silica desiccant.
Reducing oxygen levels has generally not been practical . . . until I came across plans for converting a bicycle pump into a vacuum pump (http://www.instructables.com/id/make-a-manual-vacuum-pump-for-under-$20-by-convert/). Going forward, my plan is to stuff some packets of seed into large-mouthed mason jars, then evacuate them with the reversed bicycle pump plugged into a “FoodSaver Wide-Mouth Jar Sealer.” I’d like to figure out some box I could make, modify, or buy in which I could more conveniently put my seeds, and then evacuate. Any suggestions?
I’ve already tried this on a number of mason jars of dried tomatoes, dried shiitakes, nuts, and beans. The vacuum is not very strong (0.74 atmospheres), but sucking out air also sucks out moisture. Some testing will determine just how it affects seed longevity.
Test It
So I don’t really know how viable my seeds are. One option is to order all new seeds each year. That could be very expensive. Another option is to guesstimate my seeds’ viabilities, taking into account their inherent longevity and storage conditions. That’s my approach, seasoned with yet another option: testing the viability of some of my seeds.
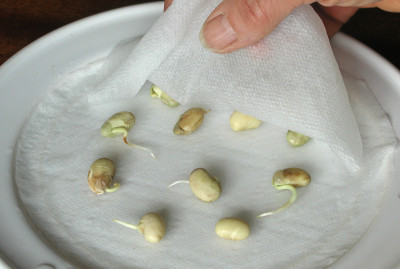
I test viability by counting out 10 to 20 seeds from each packet to be tested, and spreading the seeds between two moist rounds of filter paper on a plate. Enclosing the plate in a plastic bag to hold in moisture, and putting the bagged plate somewhere warm, preferably around 75 degrees, provides just about perfect conditions for germination. (Alternatively, place seeds on a damp paper towel, roll it up, bag it, and put it somewhere warm.)
After one to two weeks, germination occurs — if it is going to. Peeling apart the filter papers (or unrolling the paper towels) lets me count the number of seeds with little white root “tails”.
Seeds with low or no percentage germination got tossed into the compost pile. If the germination percentage isn’t too low, I’ll use the seeds and adjust the sowing rate accordingly.
A Freebie
A book giveaway, a copy of my book GROW FRUIT NATURALLY. Reply to this post telling us, if you grow vegetables, how you maintain soil fertility year after year, and how it’s working, or not, for you. Let us know what state you are in (as in NY, OH, CA, etc., rather than happiness, wistfulness, etc.). I’ll choose a winner randomly from all replies received by January 22nd.
MULCH, SOMETIMES BETTER LATE THAN EARLY
Cardoon Gets to Stay
I haven’t yet given up on cardoon — growing it. But eating it? I just about give up. It’s like eating humongous stalks of stringy celery having just a hint of artichoke flavor.
As an ornamental is how cardoon has made itself garden-worthy. Like most perennial plants, it grew only leaves this past season, its first season here. But what leaves they were! As I said, like “humongous stalks of celery.” Not much good for eating but nice to look at. The edges of the three-foot-high stalks were winged with undulating, pointed blades (each stalk is a leaf), and the whole plant is a very Mediterranean-looking olive-green.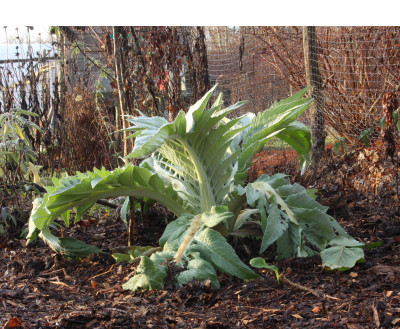
If all goes well, next year should provide an even better show, when flowers also appear. Cardoon is in the thistle family. It’s as if you injected our common (Canadian) thistle with steroids. In addition to those giant leaves, the flower stalks rise to 6 feet and are then topped by fat, spiky, cerulean balls, each a couple of inches across.
Cardoon not only looks Mediterranean; it is Mediterranean. As such, is not cold hardy this far north. Temperatures in the 20s do no harm to the top of the plant, but the top will die back when temperatures turn colder. The crown of the plant and the roots, shielded in the ground, tolerate even lower air temperatures. Eventually, though, our winter cold penetrates the ground to do them in.
But not if I soften that cold affront. Once temperatures turn colder, and stay reliably so, I’m going to lop back the tops of the plants, then pile on a thick layer of mulch, from a couple of large bags of leaves I stockpiled back in November. The reason to hold off until the soil turns colder is because in still-warm soil, the crown would have pushed out new growth beneath the mulch. That new growth would have died from lack of sun, or rotted.
Cardoon’s fleshy crown is especially prone to rotting, so I’ll lay a flat piece of plastic over the pile of mulch. That should shed rainwater while allowing some breathing room from the side.
Perhaps next year I’ll get to enjoy the flowers. Perhaps the stalks will be worth eating.
I Put The “Straw” In (On) Strawberry
Cardoon isn’t the only herbaceous perennial that needs protection from cold. Another is strawberry.
The crown of a strawberry plant is, in essence, a stem that has been telescoped down. Instead of a few inches from leaf to leaf along the stem, only a fraction of an inch separates a leaf from its next higher or lower neighbor. So instead of elongating a foot or two every year, like most stems, a strawberry crown elongates only a fraction of an inch each year.
Still, over time, that crown rises higher and higher up out of the ground, each year becoming more exposed to cold. Mulching prevents cold damage to strawberry in the same way as it does for cardoon. As with cardoon, the time to cover the plants is AFTER cold has penetrated the ground. When the soil has frozen about an inch deep is about the right time.
Strawberry crowns are not particularly prone to rotting, so there’s no need to lay a water shedding cover over the mulch. Or to cut back the leaves; strawberry leaves aren’t fleshy and don’t rise high above the ground.
Doin’ Some Dustin’
In addition to leafy mulches, already spread beneath other trees and shrubs, one other sign of creeping cold is the gray dust that has settled on parts of the meadow, beneath the pear trees, and around the currant bushes. There’s more to come, and it’s not snow. It’s ash, from the wood stove.
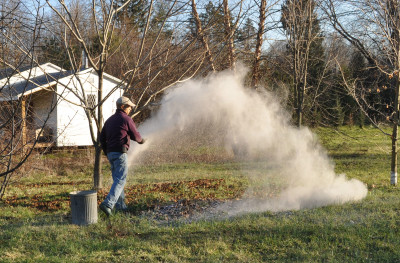 Wood ash is both a waste product and a resource, depending on how much you have and how much space you have to spread it. As a resource, it’s high in potassium, an essential nutrient for plants, and contains other essential elements. Wood ash decreases the acidity of soils which, around here, mostly increases naturally over time.
But too much potassium can be a bad thing. As can too little acidity; slightly acid soil is what’s ideal for most plants.
Since wood ash varies somewhat in its composition, it’s impossible to put a number on how much to spread. No more than 20 pounds per thousand square feet is reasonable, except on alkaline soils (pH greater than 7) or beneath acid-loving plants such as blueberry, azalea, and rhododendron, which should get none. I disperse it over the whole farmden — on the meadow and the lawn, beneath fruit and nut trees and bushes — to avoid concentrating it anywhere. I also save some to spread on icy walks and to sprinkle around plants if slugs become a problem.
