ABOUT PEPPERS
Better Late than Never
Cold has finally gotten the better of my pepper plants. Two below freezing nights a month ago started their demise, and two more during the last few nights finally finished them off for the season. Not the fruits, though, plenty of which are piled and spread out in trays and baskets in the kitchen.
Outdoors, fruits weathered the below freezing temperatures well. They’ve been shielded from the full brunt of cold by their canopies of increasingly floppy leaves. Also, fruits of plants are higher in sugars than are the leaves. Thinking back to high school chemistry, I recall that any solute, such as sugar, lowers the freezing point of the solution. So pepper fruit cells can tolerate more cold than pepper leaves.
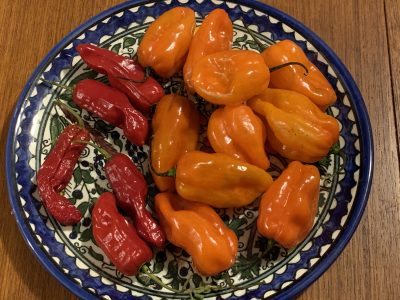
Even with the plants dead outside, the pepper season isn’t over here. The season has been greatly extended by harvesting and bringing indoors sound, green peppers showing any bit of red — or yellow if that’s the pepper’s ripe color. Sitting in trays and baskets in the kitchen, these mostly green peppers have been ripening, depending on when they were harvested and how long they’ve sat, to fully red or yellow color, when they are most flavorful (to me).
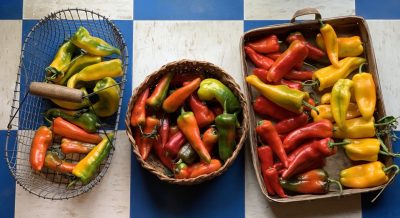
For some reason, perhaps the heat interfering with pollination, peppers started ripening later in the season than usual. The present and the past few week’s abundance of them makes up for the late start.
Thank You C2H4
For the peppers’ morphing from green to red or yellow, I have to thank, in large part, a simple gas made up of just two atoms of carbon and four atoms of hydrogen. It’s ethylene, a plant hormone. Most plant and animal hormones are much more complex molecules.
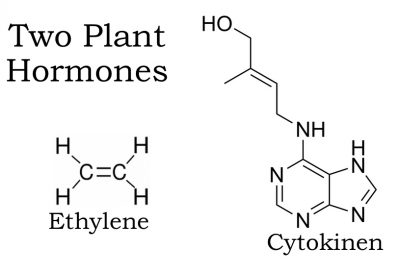
Ethylene is produced naturally in ripening fruits, and its very presence — even at concentrations as low as 0.001 percent — stimulates further ripening. The ethylene given off by ripe apples can be used to hurry along ripening of tomatoes, by placing an apple in a closed bag with the tomatoes.
Banana, apple, tomato, and avocado are among so-called climacteric fruits, which undergo a burst of respiration and ethylene production as ripening begins. These fruits, if picked sufficiently mature, can ripen following harvest.
Peppers, along with “figs, strawberries, and raspberries are examples of non- climacteric fruits, whose ripening proceeds more calmly. Non-climacteric fruits will not ripen after they’ve been harvested. They might soften and sweeten as complex carbohydrates break down into simple sugars, but such changes might be more indicative of incipient rot rather than ripening or flavor enhancement.” Or so they say. And, I admit, I’ve said; that quote is from my book The Ever Curious Gardener. (The rest of the section about ethylene in my book is correct.) They and I were wrong.
So, I’ve learned two things. First of all, pepper do ripen well after harvest, not only to a bright color but also to a delicious flavor. And second, further reading has revealed that hot peppers, but not sweet peppers, are, in fact, climacteric fruits.
What about semi-hot peppers? Or non-hot hot peppers? (Read on.)
Hot and Not
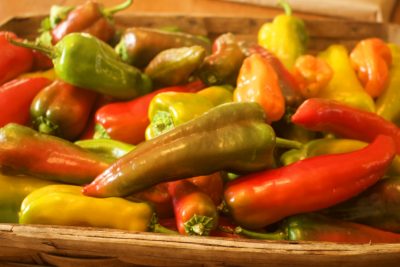
I did also grow some semi-hot peppers this season. Roulette is a variety billed as resembling “a traditional habanero pepper in every way (fruit shape, size and color, and plant type) with one exception – No Heat!” Roulette had an interesting flavor that I both liked and didn’t like (mostly liked), and occasional ones did have some heat to them, but that might have been due to their proximity to . . .
Red Ember is billed as an early ripening hot pepper with “just enough pungency for interest.” It definitely caught my attention when I bit into one! Call me a wimp, but I thought it was fiery hot.
Peppers, Red Ember and Roulette
In my previously mentioned book, The Ever Curious Gardener, I also explored flavor in fruits and vegetables and, briefly, hotness in hot peppers. “Studies have been done with peppers, focusing specifically on their hotness, which, to muddy the waters, stems from not one, but from a whole group of compounds, capsaicinoids, mostly capsaicin and dihydrocapsain. Hotness in peppers was found to depend on the variety, the environment, and the interaction between variety and environment, with smaller fruited peppers less influenced by vagaries of the environment. Usually, but not always, a pepper will have more bite if plants are grown with warmer nights, with colder days, with just a little too much or too little water, or with fertility imbalances; increased elevation elicits the fiercest bite. Basically, with any sort of stress.”
Uncommonly hot temperatures this summer may very well have turned up the heat in Red Ember and put some heat in Roulette.
GRAPE and NUTS
Long-term Grapes
About a month ago, I picked a bunch of grapes as I was walking around the farmden with a friend, and handed it to him to taste. “Wow,” he exclaimed, eyes lighting up, “that really has taste.” That was the variety Brianna, one of many I grow that are otherwise not well-known, surely not to anyone who doesn’t grow grapes. My friend and I went on to agree that store-bought grapes are, “at best, nothing more than little sacks of sugary water.”
All that’s history now. Over the past month, most of the remaining grapes have either been harvested, eaten by birds or insects, or rotted, although a few very tasty berries can be salvaged here and there from some ugly bunches still hanging.
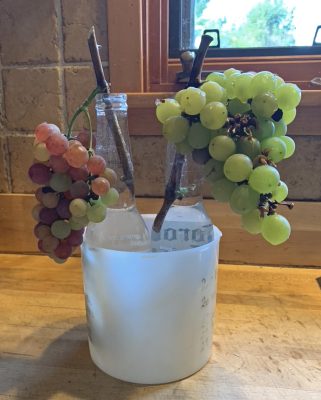
But are those grape-ful days gone yet? Years ago I read about how, over a century ago in France, fresh grapes were sometimes preserved by cutting off bunches along with a length of stem, the bottom of which was slid into a narrow-mouthed, water filled bottle. These bottles were then placed in a rack on shelves in cold storage which, where outdoor temperatures rarely dipped below freezing, was nothing more than a slightly insulated, outdoor room.
Grapes, fresh picked
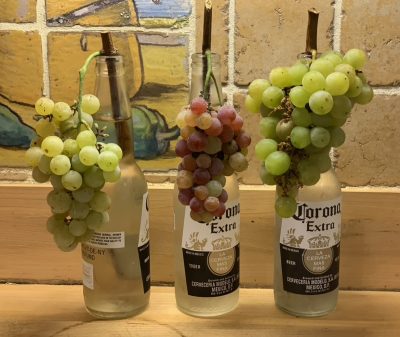
A month ago, I emulated those French grape growers of yore, in this case using Corona beer bottles, three of them, three grape varieties, and my refrigerator — very decorative looking.
Grapes, after 1 month storage
For a modern version, another bunch of grapes went into the refrigerator in a sealed freezer bag. 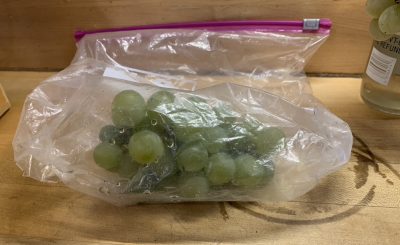 If any of this worked out, the plan was to use either the old-fashioned or modern method with a whole bunch of bunches in my walk-in, insulated and with some cooling or heating, as needed, fruit and vegetable storage room.
Back in the olden days, storing fresh grapes was not so rare even on this side of the Atlantic. Professor Frank Waugh, in his 1901 book Fruit Harvesting Storing, Marketing, wrote “An acquaintance of mine from the grape-growing district wrote me the other day (March 12th), ‘A neighbor of mine has one hundred tons of Catawbas still in storage.’” Probably not as single bunches on stems in bottles of water!
Anyway . . . drum roll . . . yesterday it was time to taste my stored grapes. One variety, Glenora, didn’t hold up well. The other two, Lorelei and Brianna, were very good. “Bottled” bunches were very slightly shriveled, but tasted quite good. Perhaps they would do better in the more humid atmosphere of the walk-in cold storage room. The bagged bunch, Brianna, was plump and also tasty.
Admittedly, none of the stored bunches had the crisp texture or fresh flavor of the few berries hanging on ugly bunches still outside. But all were better than any fresh grapes I can buy.
Walnuts at the Car Wash
Storage of nuts, also abundant this time of year, is more straightforward. You pick them up from the ground, let them cure in a cool place away from squirrels, then crack and eat them at your leisure.
With black walnuts, the green husks must be removed and the nuts within cleaned up. Leaving the husks to soften and darken a little makes them very easy, although tedious, to remove. Of the many suggested methods, twisting them off with two rubber-gloved hands seems most effective.
As far as cleaning up the hulled nuts, an old fashioned washing machined, earmarked only for this purpose, would work well. I don’t have one, so came up with an effective alternative.
After spreading out all the husked nuts into eight black plastic vegetable harvest boxes, I loaded them in the back of my truck. And then it was off to the car wash. A couple of rounds with the high pressure water spray did the trick. It was a messy job that I was prepared for with rain coat and pants, boots, hat, and face shield. The truck needed a washing anyway.
Spreading out the trays on the deck exposed for a few days to bright sunlight had them all clean and dry. Squirrels would normally be a threat but the deck is also where Sammy and Daisy, my dogs, spend much of their days.

Previous generation watchdogs, Leila and Scooter, on deck
Finally, the nuts were put into five half-bushel baskets for cracking beginning towards the end of December, which is about when last year’s nuts will be finished up.
Harvest Tragedy
I was never that hopeful for English walnuts here (also called Persian or White walnuts). This species is not all that cold-hardy, their blossoms are susceptible to late frosts, which are common here on the farmden, their leaves are susceptible to anthracnose disease, and the only place I had for them was near the road, along the squirrel highway (telephone, cable, and electric wires).
Still, I couldn’t resist, back in 2006, an offer of seeds for some “hardy” varieties. I planted two groups of three trees each, planning to cull out any weaker ones in each group.
All the trees grew well, and I eagerly awaited blossoms which, finally, this year, appeared in abundance. That abundance was followed by an abundance of nuts, and everything looked healthy. Then disaster, in the form of squirrels, struck. Every single nut was stripped from the trees.
Well, not every single nut. One nut was left, which I harvested, easily popped out of its husk, and let sit — cure — on the kitchen table for a couple of weeks. Then, with great fanfare, it was cracked open and eaten.
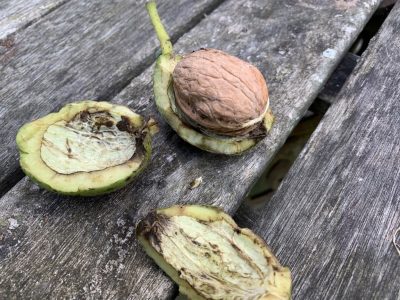
This year’s English walnut harvest
As luck would have it, I also had a bag of store-bought English walnuts with which to compare in taste. No contest. Store-bought tasted rancid in comparison.
Next year, in enough time before the nuts start to ripen, I plan to spray all the trees with a hot pepper spray.
Any other suggestions would be most welcome.
COMPOSTING, A DIDACTIC & A PERSONAL VIEW
Start With The Carbs
A bit of chemistry might be good for your compost. Just a bit. Actually, we mostly need to deal with only two familiar elements of the 100 plus known ones. These two elements are carbon and nitrogen, and they are the ones for which the “bugs” that do the work of making compost are most hungry.
“Work” is too strong a word, though, because these composting bugs do nothing more than eat. Nonetheless, a balanced diet — one balanced mostly with respect to carbon and nitrogen — does these bugs, the composting microorganisms, good.
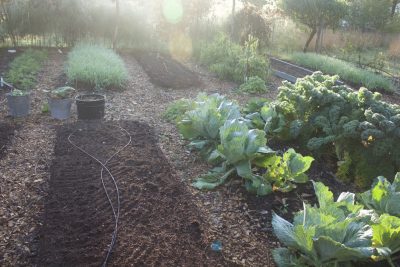
This time of year, the microorganisms’ smorgasbord is set with an especially wide array and abundance of carbon-rich foods. You can identify these foods because they are old plants or plant parts. As such, they are mostly brown and mostly dry. Autumn leaves, for example. Other carbon-rich foods include wood chips, straw, sawdust, hay, and even paper, made — after all — from wood pulp or other old, dry plant material.
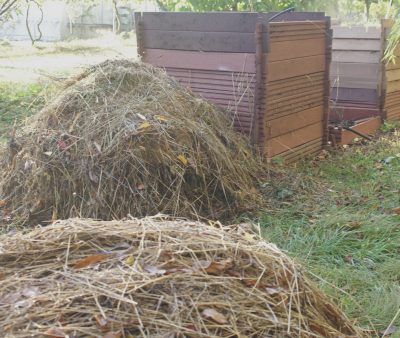
By far the bulk of high carbon — carbohydrate — foods for my compost organisms this time of year is hay that I scythe from odd corners here and there in my meadow. (Most of the meadow gets mowed by tractor once a year.) The hay is a mix of a wide variety of plants, mostly various species of grasses and goldenrods, but also, depending on where I cut, loosestrife, asters, New York ironweed, Joe Pye weed, and others. That varied mix is good for a compost pile; those microorganisms, like us, thrive on a varied diet which provides a slew of macro- and micronutrients which then end up in the finished compost and then my vegetables.
Next, Some Proteins
Just as we humans cannot live on bread and pasta alone (carbon-rich foods), so it is with composting microorganisms. So let’s now peruse the smorgasbord for some nitrogen-rich fare. This would include green stuff: young, succulent plants and plant parts. There’s not a whole lot of this stuff around this time of year, but there is some, including grass clippings, kitchen scraps, and microbial fare such as old, spent tomato, broccoli, pepper and other garden plants.
My scythed hay also provides some nitrogen-rich food — early in the season when its lush and green and only a foot or two high. But it has to be used in moderation because there’s not a whole lot of carbon-rich foods early in the season. Except that is, for the previous autumn’s fallen leaves and arborist wood chips that I stockpile. I also make some haystacks to save late-season hay for use in winter and early in the growing season.
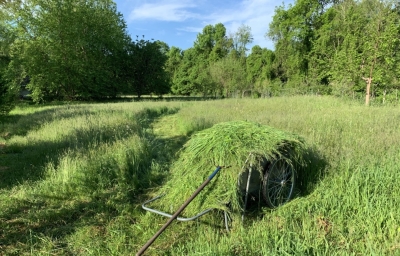
Early season scythings
When there’s insufficient nitrogen foods to balance out all the carbon foods you could now find for your compost, it’s time for dietary supplements. Nitrogen-rich supplements for the compost pile include manures and nitrogen fertilizers. Manures usually also add some carbon food, in the form of the straw, wood shavings, or whatever else the animal was bedded in.
No need to get out the chemistry set to analyze how rich a food is in carbon or nitrogen so that you can get them in exact balance (which, if you must know, is a ratio of 20:1). Just keep in mind that the younger the plant part, the richer it is in nitrogen. Also that rabbit manure is richer in nitrogen than is chicken manure, which is richer than, going down the line, sheep, horse, duck, cow, and, finally, pig manure. Nitrogen fertilizers are very concentrated sources of nitrogen.
If I need to supplement the compost diet with extra nitrogen, from fertilizer, I use something that acts organically in the soil, such as soybean meal, which is readily available from feed stores. Its nitrogen is released as various microorganisms feed on it.
Pile It In, and Monitor
So pile anything and everything that was once or is living into your compost bin, balancing carbon-rich foods with nitrogen-rich ones. After garden and backyard cleanup is finished for the season, the scale tips the other way as vegetable scraps become the most significant additions to your compost pile. Balance the food value of this nitrogen-rich material with an occasional cover of wood chips or hay from a pile you keep handy next to your compost bin.
The most important thing in making compost is a good bin. A “good” bin will keep scavengers at bay, be a barrier to weed seeds that might waft into the finished compost, is convenient to fill and empty, and maintains moisture and warmth within. It also keeps everything neat, looking like a compost pile rather than a garbage pile.
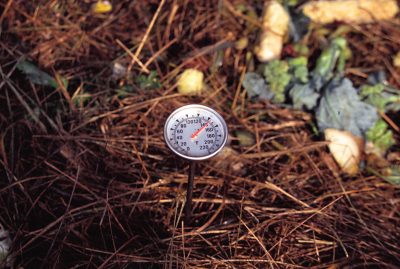
If you want to see how you’re doing as a compost “bug” dietician, monitor the goings on within your pile with a long-probed thermometer and your nose. If the materials are moist and outdoor temperatures not frigid, the well-fed pile will be decidedly warm — 120 degrees F., or more. Lack of heat reflects an excess of carbon-rich foods or insufficient water; odors are the result of excess nitrogen or too much water.
I take care of my pile’s water needs in two ways. First, when I build the pile I add materials of various texture so that the mix drains well — but not too well so that it can’t cling to sufficient moisture. A lot of water is needed to really wet the innards of pile. Add a lot of material to a compost pile at one sitting and you’d have to stand there, hose in hand, for a long time to really wet it. I’m not that patient, so the second way I take care of the pile’s watering needs is to hook up a small, static sprinkler to a hose along with a valve for adjusting the width of the spray to only cover the top of the pile. About 20 minutes of watering does the trick. (I periodically check moisture deep within the pile with a long-probed moisture meter.)
Keeping records of what you add to your compost pile and how it responds helps you remember what you did right and wrong. But “wrong” is too strong a word, because the material you put in your compost bin
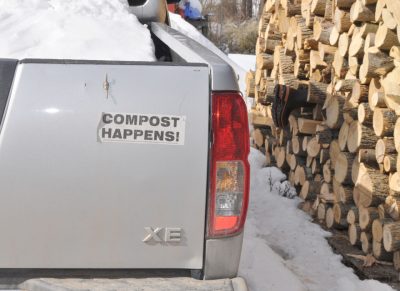
will always turn to compost. As my bumper sticker reads, “COMPOST HAPPENS,” even if the process takes longer or becomes “aromatic” along the way.
For me, making and spreading compost is as rewarding and enjoyable as is gardening per se.
(For more about making compost, using it most effectively, and buying compost, see my book Weedless Gardening.)