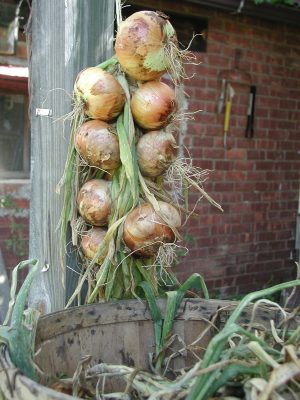
ALL ABOUT ONIONS

An Ode

Onions, how do I plant thee? Let me count the ways. I plant thee just once for years of harvests if thou are the perennial potato or Egyptian onion. If thou are the pungent, but long-keeping, American-type onion, I sow thy seeds in the garden in the spring. And if I were to choose like most gardeners, I would plant thee in spring as those small bulbs called onion “sets.” (Apologies to E.B. Browning)

New Old Ways with Onions

Early March brings us to yet another way of growing onions: sowing the seeds indoors in midwinter. This was the “New Onion Culture” of a hundred and fifty years ago, and, according to a writer of the day, “by it the American grower is enabled to produce bulbs in every way the equal of those large sweet onions which are imported from Spain and other foreign countries.” This is the way to grow the so-called European-type onions.
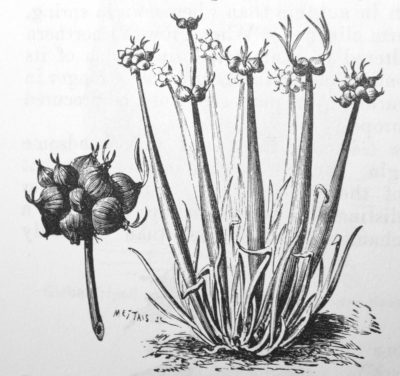
Walking onions

Walking onions

What’s wrong with growing perennial onions, American-type onions, and onion sets? Neither perennial nor American-type onions have the sweet flavor of the famous Vidalia onion, a European type. And onions for sets are generally limited only to the two varieties marketed, Stuttgart and Ebenezer, whose important quality is that they make good sets. A few seeds companies sell sets of a better variety, Forum. In addition to variety, quality of sets is important: too large and they become useless as they send up seedstalks.

The New Onion Culture is a way to grow the large, sweet, mild European onions, such as Sweet Spanish.

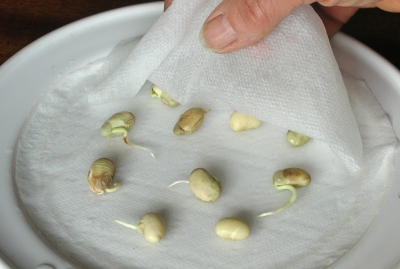
The “Method” is as follows: About 10 weeks before the last hard freeze, fill a seed flat with potting soil and use a plant marker to make furrows 1/2-inch deep and one inch apart. Drop about seven seeds per inch into the furrows and then cover the seeds with soil. Fresh seed, less than a year old is best. Water the flat, then keep it moist and warm and covered with of pane of glass. The onions should sprout in a week or two.

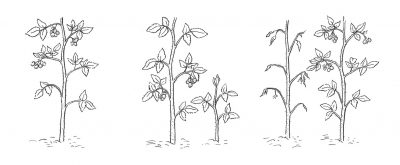
Once the onions sprout, remove the plastic or glass and give the seedlings plenty of light. Put the flat either within a few inches of fluorescent lights, on a very sunny windowsill, or in a greenhouse. Each time the seedlings grow to six inches height, clip them back to four inches. The trimmings, incidentally, are very tasty. This indoor stage of plant growing can be bypassed by purchasing onion transplants (not sets), which are sold mail-order in bundles of twenty-five.

Get ready for transplanting a few weeks before the predicted last freeze date. Choose a garden spot where the soil is weed-free, well-drained, and bathed in sunlight. Onions demand high fertility; my plants go into a bed that was dressed with an inch depth of compost last fall. Give the onion seedlings their final haircut, tease their roots apart, then set them in a furrow, or individual holes dibbled with a 3/4-inch dowel. Plant seedlings two to four inches apart, two inches if you want small bulbs, four inches if you want big bulbs. 
Onion growing cycle
This may sound like a lot of trouble to grow onions. But for me, midwinter onion sowing inaugurates the new gardening season. The onion is an apt inaugural candidate; it responds to “high culture” starting with careful sowing in fertile soil and moving on to good weed control, timely watering, and, after harvest, correct curing after harvest. 

Besides providing this midwinter ritual, onions raised according to the New Onion Culture do have superb flavor.

(The above was adapted from my book A Northeast Gardener’s Year.)

And Still Newer Ways

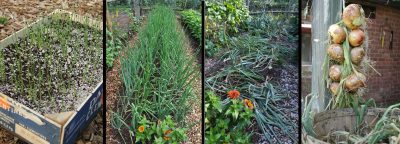
And now for the “Newer Onion Culture”: American-type onions have the advantage of being better for long-term storage, and newer varieties also have very good flavor. My current favorites are Copra, Patterson, and New York Early. They also are “long day” onions, setting bulbs when the sun shines for 15 to 16 hours daily. “Short day” varieties, which are adapted to the South, would bulb up too soon around here, producing puny bulbs.

There’s more to the “Newer Onion Culture.” A couple of years ago, a local farmer, Jay, of Four Winds Farm, told me he gets good results by just planting seeds in furrows right out in the field.

And even more. Instead of planting 7 seeds per inch indoors in furrows in early March, sow them in flats of plastic “cells” with 4 seeds per cell (each cell is about an inch square). Onions seedlings in cellsWhen transplanting out in the garden, plant each cell with its seedlings intact, spacing them further apart than you would with individual transplants so their roots get adequate water and nutrition. As vegetable growing maven Eliot Coleman wrote in Four-Season Harvest, “the onions growing together push each other aside gently.”

Back to my original query: “Onions, how do I plant thee.” Many ways. I’ll do four out of the six ways this season.
Onion braid

Pruning, Flowers

Much of Pruning is About Renewal

Why am I spending so much time pruning these days? To keep plants manageable and healthy, of course. But also so that flowering and fruiting trees, shrubs, and vines keep on flowering and fruiting. “Renewal pruning” is what does this.

Pruning apple spur

Pruning apple spur

As plant stems age, they — like all living things — become decrepit, no longer able to perform well. But any plant’s show or productivity can be kept up if stems that are too old are periodically lopped back, which promotes growth of new, young, fecund stems. That’s all there is to renewal pruning.

Ah, but the devil is in the details. One important detail is how old is “too old.” That depends on the flowering and fruiting habit of the plant.

Near one extreme would be pear trees. Along pear stems grow stubby growths, called “spurs,” which bear the tree’s flowers and fruits.

Young pear spur

Young pear spur

Older pear spur

Older pear spur


These stubby growths grow only an inch or less each year.  Over time, spurs branch and these small branches, in turn, branch to create what look like miniature trees perched along the tree’s stems.

A pear’s individual spur can remain vibrant for about a decade, so little pruning is needed annually. But eventually, even a spur grows old and decrepit. I renewal prune my pears by cutting back some of the stubby parts of a spur system to coax out younger stubby growths or even by lopping back a whole stem on which they sit, stimulating new stem growth on which will develop new spurs.

Near the other extreme in pruning would be an everbearing raspberry plant, which bears flowers and fruits on young shoots arising from ground level. Those bearing stems are very short lived. One way to prune an everbearing raspberry plant would be to lop all stems to the ground each winter. Having borne, those stems are aging rapidly, and pruning stimulates a flush of new, bearing stems that will come up from ground level in spring.

Everbearing raspberry growth habit

Everbearing raspberry growth habit

(Not to muddy the waters, but everbearing raspberry stems actually bear late in their first summer of growth, then again in midsummer the following year, so stems could be left one more season to bear that second crop. After that, though, the two-year-old stems need to be cut back. They die after their second year anyway.)

Pear and everbearing raspberry represent two extremes in bearing habit and, hence, method of renewal pruning. Other plants lie somewhere on the spectrum between these extremes. Where? It depends, as I wrote, on their particular bearing habit. For instance, blueberry stems are most productive on stems up to 6 years old, gooseberries on stems 2 and 3 years old, and grapes and peaches on stems one year old. So I cut away stems older than 6 years old from my blueberry bushes, stems older than 3 years old from my gooseberry bushes, and stems older than a year old from my grape vines and peach trees.

For other plants grown for either their flowers or their fruits, find out how to renewal prune them by watching how they bear for a season or more, or get the information from a book (such as my book, The Pruning Book).

A Workshop

If you’re interested in delving deeper into pruning, I will be holding a pruning workshop here on my farmden in New Paltz, NY on March 28, 2020. For more information about this workshop, please go to https://leereich.com/workshops.

Not Forgetting the Flowers

Flowers are at a premium this time of year. Here on my farmden, the only flowers blooming outdoors are winter aconite and snowdrops.

Winter aconite

Winter aconite

(Typically, my ‘Arnold’s Promise’ witch hazel would be bursting into bloom about now but a few years ago I performed dramatic renewal pruning to reduce the size of the plant. No special technique was involved other than lopping the whole plant to ground level. Witch hazel’s stems bear flowers for many, many years, so don’t need regular pruning; it does take a few years, though before stems are old enough to begin bearing.)

Indoors, plants sense the lengthening days of brightening sunlight. African violets have been blooming for a couple of weeks and will go on doing so for weeks to come.

African violet

The same goes for the Odontoglossum pulchellum orchid, whose stems are weighed down with small waxy white, fragrant flowers.

One surprise was a butterfly bush that was in a large pot that I had brought indoors for winter. This plant enjoys bright sun and hot days, neither of which it receives indoors — it has, nonetheless, managed to cough forth, so far, a singe blue blossom. I stick my nose into the flowers, close my eyes, and inhale, and it’s midsummer.

Butterfly bush flowe

Butterfly bush, indoors

Most dramatic are the humongous, fire engine red bloom of an amaryllis plant. It is gaudy, but appreciated anyway.

My favorites are the white blossoms now opening on Meyer lemon. The blossoms aren’t all that showy but their fragrance is heady and heavenly. No need even to get my nose up close.

I did catch one other bit of welcome color outdoors: my first sighting of bluebirds. The day is gray but the bluebird, to quote Thoreau, was “carrying the [blue] sky on its back.“

AMUSING MUSINGS

(The following is excerpted from The Ever Curious Gardener: Using a Little Natural Science for a Much Better Garden, available here.)

Write the Name Right!

With little pressing, gardenwise, this time of year, why not muse about plant names — their common names and their sometimes intimidating-looking botanical names? Take the tree commonly named dawn redwood for example. ”Dawn redwood” admittedly reads more easily than this tree’s botanical name, Metasequoia glyptostroboides.

Wait! don’t stop reading! Instead, speak the Latin name aloud slowly: me-ta-see-KYOY-a GLYP-to-stro-boy-dees. It’s delightful, tonal poetry vocalized by a smooth dance of the lips, the tongue, and the upper pallete. 
dawn redwood
Sensual pleasure aside, botanical names have a practical side. That woolly-leaved plant that sends up a candelabra of creamy yellow flowers each summer has a hundred or so common names. I call it mullein but other names include Aaron’s rod, Adam’s flannel, bullock’s lungwort, and velvet plant. This plant has only one botanical name, though, Verbascum thapsus. 
Mullein
Each plant gets only one botanical name, and that name is recognized worldwide. A botanical name has two parts, both based on Latin. The first word in the binomial is the genus; each genus is subdivided into one or more species, the second word of the binomial. This system of plant classification was originally set forth in Species Plantarum, a book written in 1753 by Carl von Linne (usually known by the latinized form of his name, Linnaeus.)

I have a pet peeve about botanical names that finds root in a challenge issued way back in high school English class. Mr. Mehegan gave us detailed information on the correct way to list bibliographic references at the ends of our term papers: punctuation, underlining, capitalization, ordering. Then he predicted (correctly) that no one would list all their references exactly right. Now it irks me when rules are not followed in writing plant names.

Rules for plant nomenclature are simpler than Mr. Mehegan’s rules for referencing. Genus and the species names are always underlined or italicized. Genus is always capitalized; species is not, unless it commemorates a person. A species is never written by itself; if the genus is obvious, it may precede the species in abbreviated form.

The Name is Loaded with Information

With correct botanical information under my belt, if I want a packet of marigold seeds, I could ask for Tagetes minuta whether I am in Andorra or Zanzibar.Marigolds In the case of plants like petunia, chrysanthemum, rhododendron, and fuchsia, at least part of the botanical name is the same as the common name in English. In some cases, using the botanical name might be the only way I could be assured of getting the plant I really want. If I wanted to plant bluebells, Hyacinthoides, and searched and asked for it by its common name, I could end with plants in the Mertensia, Muscari, Campanula, or Eustoma genus.

When I’ve planted lilies, I didn’t want to pick from a grab bag of about 80 different species of Lilium; I wanted to plant—and did plant—the sweetly fragrant Lilium candidum (which actually is the only lily with the common name Madonna Lily). I also wasn’t interested at that time in planting daylily (Hemerocallis spp.) or lily of the valley (Convallaria majalis), neither of which are true lilies. Neither is even in the Lily Family, let alone the Lilium genus!
Lily
A botanical name can tell a story about a plant: its discovery, its origin, its form. Adalbert Emil Redcliffe Le Tanneux von Saint Paul-Illaire discovered what became known as African violet growing amongst the lush vegetation in the mountain jungles of East Africa; in his honor the plant was given the botanical moniker Saintpaulia ionantha. Juniperus virginiana is a juniper native to eastern North America; Juniperus chinensis hails from China. Tulip tree, Liriodendron tulipfera, has a particularly descriptive name. Liriodendron was the ancient name for this plant, meaning “lily tree.” And tulipfera means “tulip bearing.” Tulip tree’s flowers do, indeed, resemble tulips, as long as you don’t look too closely. Tulip is a member of the Lily family. Tulip tree is in the Magnolia family.

African violet

African violet

Family Matters

Botanical names can tell about plant relationships. The apparent similarity between peaches, plums, and apricots is confirmed in the similarity of their names, Prunus persica, Prunus domestica, and Prunus armeniaca, respectively.

Knowing kinship can help decide what grafts might be successful. Grafts between the same genus and species almost always spell success. Success is even possible between different species of the same genus, which is why I once grafted a couple of branches from my sweet cherry tree (Prunus avium) onto my tart cherry tree (Prunus cerasus). The sweet cherry didn’t bear reliably enough to warrant living here as a whole tree. Emulating George Washington, I chopped the (sweet) cherry tree down following a successful graft.

In some cases, a species might be subdivided into botanical varieties. For instance, cabbage and its close relatives all are Brassica oleracea. But cabbage itself is the botanical variety capitata (meaning head), Brussels sprouts are gemmifera (little gems), broccoli is botrytis (cluster-like), and kale is acephala (without a head). The correct way to write broccoli is Brassica oleracea var. capitata.

If you’re put off by botanical names for plants, take heart because the situation used to be more awkward. Before the days of Linneaus, baby’s-breath was the Latin mouthful Lychnis alpina linifolia multiflora perampla radice. Catnip was known as Nepeta floribus interrupte spicatis pedunculatis. (Both are mellifluous but too long for a name.) Thanks to Linneaus that the scientific names of these two plants now are the manageable and descriptive Gypsophila elegans to Nepeta cataria, respectively.
Cat and catnip

Keep on Composting

One Problem in Cold Weather

I don’t let cold weather put the brakes on my composting, at least my role in it. For the bacteria, fungi, and other workers in my compost pile, it’s another story. Come cold temperatures, and their work come screeching to a halt or near halt (which depends on the degree of cold, the size of the pile, the mix of ingredients, and moisture).

But that’s no reason for me to abandon composting.

The main problem, as I see it, with composting in winter is not the workers not working. Pile up food scraps another organic materials winter, and composting will re-convene when warm weather arrives again in spring. The problem is that those food scraps offer a smorgasbord of tasty, easy calories for rodents. Which is not good.

(Lest you’re feeling fuzzy and warm to these furry creatures, a short list of what they could bring along to you would include hantavirus, leptospirosis, lymphocytic chorio-meningitis, rat-bite fever, salmonellosis, and tularemia, all of which are as bad as they sound. And that’s only a partial list.)

I take a multi-pronged approach, then, to keeping rodents at bay yet carrying on with my role in composting.

Population Control

My first line of defense is to keep rodent populations in check.

The top layer of the compost pile is not the only place where rodents might find a meal. In autumn, I clean up any rodent treats that might be lying around such as ears of corn, old squash and tomato fruits, and baskets of filberts or black walnuts. As appropriate, they go either onto the compost pile or into animal-proof storage.
Compost with fresh materials
Sammy, Daisy, and Gracie also help out. They are, respectively, a dog and a dog and a spayed cat, who spend most of their time outdoors. (I know, I know about the problem with cats and birds. But I’m trying to strike a balance. A few less birds weighed against soaring rodent populations seems reasonable. And anyway, Darwinian selection may be going on here for birds that are increasingly learning to avoid Gracie. At least, not to get too graphic, judging from the “gifts” Gracie brings back to show off.)

Dogs on porch

Dogs at “work”

I support the work of Sammy, Daisy, and Gracie by doing some trapping on my own, mostly of rabbits and squirrels because they can damage or kill plants, and pilfer my food. Black rat snakes, which sometimes go so far as to lay their eggs in my compost pile, also help out.

Mouse damage

Mouse damage

Rabbit damage to branches

Rabbit damage to branches

Exclusion

My second line of defense is to keep rodents out of my compost pile. A number of heavy-duty plastic or metal, animal-resistant compost bins are available for sale, and all work pretty well — as they should, since any pile of organic materials will eventually turn to compost. Their usual limitation is that they many lack sufficient volume for a critical mass if you want to make hot compost.

I made my own compost bin, actually bins. Having two or more allows compost to mellow in one bin while the other one or ones are still cooking. My bins are rodent-proofish. They are so, first of all, by my setting them up in flat ground upon which I first lay down a large enough piece of 1/4 inch or 1/2 inch mesh hardware cloth to keep the critters from tunneling up from below.
Commpost bin board
The bin itself is made of notched, fake wood (such as used for decking). As the notched pieces slide together, the tolerances were designed to be close enough to deny rodents access. Ah, but “there’s many a slip ‘twixt the cup and the lip;” my carpentry skills fell a little short of making all those notches small enough, which would be less than 1/2 inch, to allow entry by even a mouse. Still, the bins work pretty well.

I detail the material I used and the construction of the bins at https://leereich.com/2019/06/my-compost-for-a-bin.html.

Scavenger Friends

Rodents are wily creatures, and I expect that they could somehow jump and climb their way up the bins to the top of the pile where the freshest delicacies have been most recently placed. Originally, I planned to make rodent-proof covers to the compost bins, but they never got out of the early planning stage.
Dog and chickens on compost pile
Turns out that my dogs are very good jumpers, and also very fond of kitchen scraps. My ducks are adequate fliers/climbers, and likewise show interest in this department. So the plan here is to deposit compostables from the kitchen onto the compost-pile-in-progress each morning, when ducks and dogs are out and about. They clean up all of the most desirable and calorie-laden stuff, leaving little or nothing for any rodents who, excepting squirrels, are mostly nocturnal.
Dogs on compost pile
Note: As I re-read what I’ve written I realize that I could be accused of not being pc for a number of details stated. Sorry. But composting itself is very pc, and reality often involves striking balances to get the most desirable results.

To Shred or Not To Shred, That is the Question

Organic Matters

My friend Margaret Roach (https://awaytogarden.com) is a top-notch gardener but not much of a tool maven. She recently said she considers me, and I quote, “the master of all tools and the king of compost” when she asked for my thoughts on compost shredders. (I blushed, but perhaps she was just softening me up for questioning. In fact, her tractor is better than mine.)

Of course I have thoughts about compost shredders.
Me, in my garden in 1970s
Climb with me into my time machine and let’s travel back to the early 1970s, to Madison, Wisconsin, where you’ll find me working in my first garden. Like any good organic gardener, early on I appreciated the many benefits of organic materials in the garden, an appreciation bolstered by my having recently began my studies as a graduate student in soil science.

I was hauling all the organic materials I could lay hands on into my 700 square foot vegetable garden. From near where I parked on the agriculture part of campus I could load up large plastic garbage cans with chicken or horse manure for my compost piles. 

Also for my compost piles, and for mulch, was tall grass mowed by road crews along a major roadway, easily scooped up with my pitchfork and packed into those garbage pails. Nowadays, gathering such mowings would be difficult because the flail mowers now used chop everything up rather than lay down the long stalks of yesteryears’ sickle bar mowers. Gathering roadside mowings may also now be illegal. And, in retrospect, those mowings were (and still are) probably contaminated with lead and other heavy metals from nearby traffic.

Garden, Madison, 1970s

Garden, Madison, 1970s

Anyway, I now have my own one acre field which I scythe and brush hog for mulch and feeding compost piles.

Bulk and Speed

But I digress . . . Margaret was asking about compost shredders.

One benefit of organic materials in gardening is their bulk; they are mostly carbon, hydrogen, and oxygen, which, over time, ends up as carbon dioxide and water. That decomposition is a good thing because it represents the feeding of soil life and, as decomposition proceeds, plant nutrients are slowly released into the soil.

A downside of all that bulk is that it takes up a lot of space. The decomposition rate is influenced by the materials’ ratios of carbon to nitrogen, inhibitors such as lignin, and particle size. A given volume of smaller particles has greater surface area, accessible to being nibbled away by microbes, than does that same volume of larger particles. Like perhaps many beginning gardeners, I was in a rush to have better soil than the sticky clay I was dealing with.

Enter garden shredders. I headed down to the local Sears Roebuck and Company and purchased a new, gasoline-powered shredder. Back in the garden, I set it up and in little time was reducing large volumes of leaves to smaller volumes of shreds.

That activity probably lasted about 20 minutes before two thoughts entered my head. First, one reason I was gardening was because it was — or could be — good for the environment. I could grow vegetables more sustainably that most farmers of the day, and the vegetables would not have to be transported to me. Shredding seemed, then, a waste of energy. Second, the chugging of the engine didn’t seem to jive with a bucolic activity such as gardening. Fortunately, the shredder could be returned; I packed it up and got my money back. (Unless powered by solar, wind, or some other renewable energy source, and electric shredder also spews carbon dioxide et al. It just does so elsewhere.)

And anyway, there’s no particular need, generally, to speed up the composting process. If you need some finished compost immediately because of poor planning or a beginning garden, there are plenty of places where you can purchase good quality compost. Build a couple or more piles of your own, manage them well, and you’ll have “black gold” always ready in due time.

Solar Enters the Picture

I do still occasionally use a compost shredder — but it’s very quiet and it’s solar powered.
Chopping compost with machete
Also very inexpensive because it’s nothing more than a machete. If I’m piling very rough material such as corn or kale stalks, or very airy material such as old tomato or pepper plants, or large fruits such as overgrown zucchinis onto my compost pile, I’ll chop them with a machete as I add them. (It’s also therapeutic: If everyone spent some time chopping their compost ingredients, as needed, with a machete, the world would perhaps be a more peaceful place.)
Adding material to compost pile
The bottom line is that there’s no reason that you must shred any material for composting. That is, unless it’s absolutely necessary to speed things up or reduce their volume. Is it really necessary? Usually not.

Rosemary Tips

Secrets to Survival

I’ve killed plenty of rosemary plants over the years, typically in late winter. At least that’s when I’d discover that they were dead. Casually brushing against the plant would bring dried leaves raining to the floor.
Potted rosemary tree in winter
Problem is that rosemary has naturally stiff leaves. They don’t wilt to broadcast that the plant is thirsty. And then it’s too late; the plant tells you it’s dead as it’s leaves flicker down.

Perhaps like you, I knew that rosemary is native to the Mediterranean region. The picture in my mind is of the plants thriving on a sun-drenched, dry, rocky hillside in poor soil. True enough, except below ground the roots are reaching deep or wide for water. Which my potted plants can’t do.

Following this latter realization — duh! — I haven’t lost a rosemary plant in years. The secret to keeping a potted rosemary plant happy is to keep it well watered, never letting the potting mix dry out. If in doubt, water.

Rosemary roots also need to breathe, and the way that is assured is by adding plenty of perlite to the potting mix. My mix is 1/4 by volume each of perlite, garden soil, compost, and peat moss. The latter two ingredients help retain moisture while, at the same time, provide for aeration.

Making a Rosemary Tree

I mentioned last week that I grow my rosemary plants as miniature trees, a form also known as “standards.” Here’s how I make mine.

(“Standard” does seem like an odd word to describe such a plant until you realize that the “stand” in “standard” does indeed mean just that. “Standard” comes from the Old English words standan, meaning to stand, rather than flop around, and ord, meaning a place. Further muddying the horticultural waters, in fruit growing a “standard” is a full size tree, as opposed to a dwarf tree.)

The easiest way to set a rosemary plant on the road to standard-dom is to begin with a small plant. Rosemary comes in upright or creeping varieties. Upright varieties, such as Majorca Pink and Salem, are naturally inclined to “stand,” but creeping varieties are also easily coaxed in this direction.

Single out a vigorous and upright growing stem as the standard’s future trunk. In the case of a creeping variety, just select any healthy stem and stake it upright to a dowel or thin shoot of bamboo. Shorten all side shoots to direct the plant’s energy into that trunk-to-be.
First 4 steps in training rosemary standard
The goal, in the weeks ahead, is to promote elongation and thickening of the trunk-to-be. To that end, keep cutting away any new stems sprouting from the base of the plant. Keep pinching back to just a few leaves any side shoots. Doing so keeps them subordinate but lets them help thicken the trunk.

Once the trunk reaches full height, goals change: time to stop growth and create a bushy head. But how high is “full height?” It’s all for show, and what looks good depends on how big a head you are going to give the plant and how big a pot the plant will eventually call home. Generally, a head two to three times the height and just slightly more than the width of the pot looks good. Stop growth at the desired height by pinching out the tip of the trunk, a simple operation that awakens growth of buds down along the trunk.
Second four steps in training rosemary tree
Create the bushy head by repeatedly pinching — and thus inducing more branching — all growth that sprouts from the top few inches of the trunk. Now define that head more clearly by completely removing all stems and leaves further down the trunk.

All these prunings need not be wasted, of course. They could be used as flavoring or as cuttings to make yet more plants.

(Creating standards and other methods of pruning all plants is covered in more detail in my book, The Pruning Book, available from the usual sources or, signed by me if you wish, here.)

On Going Rosemary Tree Care

Over time, the bushy head grows larger and larger — too large if left unfettered. So pinch back growing tips regularly, which you’ll probably be doing anyway as you enjoy the rosemary added to tomato sauce or chopped and sprinkled on fish. Unless you’re crazy for rosemary, that amount of pruning won’t be enough to contain the ever expanding head.

And below ground, roots eventually fill their flowerpot. Then they will need more room and access to more nutrients. So once a year, in spring, I tip my plant out of its pot, shear off some roots and soil around the edge of the root ball, then put it back in the pot with new potting mix in the space opened up.
Repotting a standard
Right after I repot the plant, I also give it its annual haircut, shearing the head an inch or so back all over with a pruning or grass shears. Water well and watch the plant fill out with new growth.

All those shearings could, of course, be dried for future use. But why do that? You now have plenty of fresh rosemary, year ‘round. Just don’t neglect watering.
Rosemary standard

I Think My Vegetables are Nutritious

Nutrient Declines in Fruits and Vegetables

Growing vegetables is really quite simple. You put the seeds or transplants into sunny ground, you water and weed, and then you harvest your bounty. For that small effort, you can put on your plate food that is organically, sustainably, and (very) locally grown. Perhaps even richer in nutrients than food you can buy.
Healthy, healthful, vegetables
Studies over the past 15 or so years have documented a general decline in nutrients in our fruits and vegetables. Some people contend that our soils have been mined for their nutrients, worn out from poor farming, and therefore no longer able to provide us with nutritious food. The cure, according to these “experts,” is to sprinkle mineral-rich rock powders on the soil to replenish and rebalance that which has been lost. It all sounds very logical.

You might have sensed a big “but” looming. Here it is: But . . . further studies have pinned that nutrient decline on a dilution effect from increased yields. Pump up production with nitrogen fertilizer and water, or by breeding for increased yields, and nutrient concentrations decline; it’s as simple as that.

The final nail in the “worn out soil” coffin comes from side-by-side plantings of low- and high-yielding varieties of specific vegetables. The higher yielding varieties end up with lower concentrations of minerals and protein. The problem, then, if there is one, can be blamed on breeding and farming practices aimed at producing more bulk.

But . . . 

I’m not concerned with nutrient decline in my own garden. First of all, I’ve chosen the varieties I grow — Blue Lake beans, Cherokee Purple tomatoes, Lincoln peas, Early Jersey Wakefield cabbage, Ashmead’s Kernel apple, and Fallgold raspberry, as examples — with

one thing in mind: flavor! Peas in pod
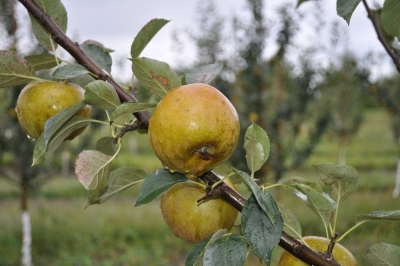
It just so happens that the most flavorful fruit and vegetable varieties are ones that have been around a long time. Yields may not be heavy, but these varieties are rich in flavor. (And perhaps nutrients. Anyway,

Ashmead's Kernel apple

Ashmead’s Kernel apple

if something doesn’t taste that good, I’m not going to eat much of it, so it’s irrelevant how high it is in nutrients.)

I’m also not concerned with nutrient decline because I don’t push yields to the max with repeated applications of soluble, nitrogen-rich fertilizers. My soil management is simple: One inch of compost per year spread on top of the ground of permanent vegetable beds; compost, wood chips, hay, and/or leaves around my fruit plants. As these organic materials decompose, nitrogen and other essential nutrients are bled slowly into the soil only in response to warm temperatures and moisture, the same environment that spurs plant growth.
Spreading compost
That compost is not serving up only nitrogen to my plants, or even just the big three nutrients, nitrogen, phosphorus, and potassium. Into my compost goes orange peels from Florida, avocado skins from California, and other kitchen waste, garden trimmings, some weedy hay, and, occasionally, horse manure. So the ground gets a wide variety of organic materials that, in turn, feed the compost and, in turn, feed the soil and the plants a wide spectrum of nutrients. And just to make sure that my soil lacks nothing, I occasionally sprinkle some powdered kelp around.

Herbs for Flavor, in Winter, Not Nutrition

Even if herbs were rich in nutrients, their nutritional contribution to our diets would be minimal because of the relatively small amounts actually eaten. But the small amounts needed to pizazz up a tomato sauce or frittata in winter also make herbs ideal for growing indoors in winter. A little goes a long way. 

The basic problem is that many cooking herbs are Mediterranean plants that, of course, thrive best in Mediterranean conditions, with bright hot sun beating down on them. So the expectations and the reality of a windowsill herb garden often diverge. Forget about growing basil or oregano in January.

With that said, I nominate two herbs perfect for indoor growing in winter. The first is bay laurel. This plant, a small tree trained as a “standard,” has spent the last 29(!) winters near a sunny window. A freshly plucked leaf brings to soups and stews a flavor only hinted at by the dried leaf; to me, in addition to its distinctive flavor I sense an oleaginous quality hinting of olive oil.

Bay laurel tree

Bay laurel

The second herb, rosemary, is my favorite for indoor growing. Rosemary tolerates being trained as a standard or fanciful topiary; it looks equally good left to its own devices to grow as a relaxed, small shrub.  (Mine are trained as standards.) Pinching off a few stem tips

Small, indoor rosemary "tree"

Small, indoor rosemary “tree”

with leaves not only puts some warm, Mediterranean sunshine into tomato sauce but also encourages growth of side shoots to keep the plant dense with shoots and leaves.


Once spring warmth has settled in around here, the bay laurel and rosemary will move outside to bask in the full force of Hudson Valley sunshine. 

What Midwinter, Spring-like Weather Will Do

My Garden’s A Mess!

After some really frigid weather a month ago followed by more or less seasonal cold, temperatures did a loop de loop and we’ve had a couple of days in the high ‘60s. Very unseasonal, to say the least, and perhaps another indication of global warming, but welcome nonetheless. Those temperatures, coupled with brightening sunshine, made me want to get my hands in some dirt.

A large, second-story bedroom window overlooks my main vegetable garden. The weather made me see it in a different perspective — it looked messy. 

I pride myself on putting everything in order each fall so that (quoting from Charles Dudley Warner’s 1886 My summer in the Garden) “The closing scenes are not necessarily funereal . . . A garden should be got ready for winter . . . neat and trim. . . in complete order so that its last days shall not present a scene of melancholy ruin and decay.”

Messy garden, January

Not a pretty picture

Endive, dead in January

Endive, dead in January

Although I had mostly cleaned up spent vegetables and dressed the beds with an inch-deep layer of compost, early wintry weather put an end to that. Now, what I saw outside was too much “melancholy ruin and decay” from a few beds of late cabbages and their kin and tunneled beds of endive. The wilted, dried, browned leaves of unharvested endive lay flat, covering those beds.

Spring-like temperatures offered me the opportunity to get my hands in the dirt. I grabbed my hori-hori knife and gathered up frozen or dessicated leaves and plants for carting over to the compost pile. What a shock to even find some signs of life still out there in the beds: some arugula, some kale plants, and a couple of plants of baby pak choy and michili Chinese cabbage.
Michili chinese cabbagePak choy in garden, January
Coldest temperatures (minus 20 degrees F. here) typically arrive in late January. Those temperatures will do in these plants. Except for mâche, of course, which was also still alive in the garden, spry and green as if temperatures had never already dropped near zero, and which always survives winter.

Mache, in garden in January

Mache, in garden in January

Garden after cleanup

Garden after cleanup

First Seeds

That spring-like weather also gave me the urge to sow some seeds. These would be the first of the year, a seed flat of lettuce and baby pak choy to mature in early spring in the greenhouse. For some irrational reason, I’m never that confident that those tiny specks are actually going to sprout, even though I’ve done this successfully for decades.

Perhaps my lack of faith comes from my first experiences sowing seeds. That was many years ago when, as a graduate student, I lived in a motel room that had been converted into an apartment and began my first garden as an adult. I sowed all sorts of vegetable and herb seeds in peat pots that I set in trays on a shelf on a wall near a window.

All those seedlings died — and that was my abrupt introduction to “damping off,” a disease that attacks seeds and newly emerged seedlings. Imagine the disappointment of a beginning gardener (me) watching seedling stems pinch in at he soil line and topple over — the telltale symptom of damping off disease.
Damping off, cabbage

First Disease

I soon learned that damping off was not uncommon, even among experienced gardeners. The disease is caused by any one of a few soil dwelling fungi that raise their ugly head (figuratively) given the right conditions (for them). One obvious way to try to avoid the problem is to sterilize the potting media.

Most commercial potting mixes are sterile, as were the peat pots I was using. The problem is that the culpable microbes are everywhere, waiting to attack when conditions are just right, conditions that I unknowingly provided in my motel room. The peat pots were excessively moist; the air stood still; and little light entered the room — perfect for damping off development.

Nowadays, my seedlings rarely experience damping off. The plants get off to a good start at temperatures they enjoy, bathe in light in my greenhouse or sunny windows (or, in the past, cozied up very close to fluorescent bulbs), and a fan keeps the air moving. I also add sufficient perlite to my potting mixes so that excess water drains feely down and out of the mix. A thin layer of well-draining material, such as sand or calcined montmorillonite clay (kitty litter) can also help.

Years ago, soothing brews of chamomile tea would also come to the rescue — for the seedlings, not for me. That tea hasn’t been needed for a long time. I also don’t pasteurize or sterilize my potting mixes. Beneficial microbes, from the compost in my mix, and good growing conditions have thankfully made damping off nothing more than a distant memory for me.

Catalog and Weather Watchin’

Armchair Gardening

Pretty much the only “gardening” I’m doing now is thumbing through the seed catalogs arriving in dribs and drabs in my mailbox. I’ve ordered and received what I thought I’ll need, but you never know; maybe there something else interesting out there to grow.

Among the most fun of these catalogs, and strictly for the plant-crazed, is “The 2020 Ethnobotanical Catalog of Seeds,” which used to be called Hudson’s Seed Catalog. The catalog originates in the Santa Cruz mountains of California (once home to Ken Kesey) but offers seed from all corners of the world. Only recently have they come online, at www.jlhudsonseeds.net.
Hudson catalog
I’ve ordered from this catalog for decades, each winter pleasurably and slowly wading through the almost 100 black-and-white pages of small print listings of botanical names and descriptions. For this first run through the catalog, I sit poised with red pen, ready to make a star next to any seed listing that looks particularly interesting. After I go through the whole catalog once, I’ll re-examine all those starred listings and select which seeds to actually order and grow.

Judging from what I’ve so far starred, I seem this year to be drawn to scented plants. Achlys triphylla, also known as vanilla-leaf or sweet-leaf, is one such plant: “Dense spikes of tiny flowers held above the trifoliate fan-shaped leaves. Moist woods from B.C. to California. The sweetly fragrant leaves were highly valued by settlers, who hung bunches in their houses. Sow 1/4″ deep in rich woodland soil, and keep moist. Slow to germinate.”

Another is Adenophora lilifolia, also known as ladybells. This one is described as “sweet-scented light blue 1/2″ wide bell-shaped nodding flowers borne profusely in summer. Very hardy perennial to 1-1/2 to 3 feet, with round, heart-shaped basal leaves. Eurasia. Cultivated in Japan for the thick, edible roots. Germinates in 2 weeks.” For only $2.50 a seed packet, oodles of each of these plants can be growing in and perfuming my backyard this summer.

  It’s not just visions of fragrant, comely, or tasty plants that make this catalog fun to read. Berkheya purpurea is native to Africa, with a common name Zulu warrior. How many plants conjure up an image like that!? The plant seems to me less warrior-like, with flowers that are large, silvery-blue to lavender daisies with dark centers. Interesting, but I don’t need another daisy for now. 

Short quotes interspersed throughout the catalog set the tone and are food for further thought. Here’s one from Thomas Jefferson: “It does me no injury for my neighbor to say there are 20 gods or no God. It neither picks my pocket nor breaks my leg.” Or, going back 17 centuries, to Aesop: “Any excuse will serve a tyrant.” And then forward, to General Douglas MacArthur: “ If you win, you stand only to lose. War contains the germs of double suicide.” Or, to another American general, Dwight Eisenhower: “Things are more like they are today than they have ever been before.”

  So far, I’ve only gotten as far as “D” in the seed listings. There’s still time.

Where’s Winter?

Aren’t temperatures supposed to get colder and colder and colder until the end of this month, and then get warmer and warmer and warmer? That’s how temperatures generally trend in coastal regions, near large bodies of water, and in western Europe. Not so here in the Hudson Valley and over most of continental North America.
Current winter scene
In my garden, the low was 3 degrees in early December and the high was 59 degrees a couple of weeks ago. Such fluctuations are not that uncommon over much of continental U.S. If you don’t like winter, you welcome those balmy winter days; if you like winter and/or like plants, those balmy days make you shudder.

  Plants that can take our cold weather like the weather to stay cold all winter. Each time temperatures warm, especially after we’ve had a spell of cool weather, these plants start to awaken slightly from their winter slumber. The closer to spring and the warmer the weather, the more they awaken. Problem is that the more awake a plant is, the more likely damage, even for a cold-hardy plant, from subsequent frigid weather.

  All this makes a good case for growing native plants. They’re more used to our mercurial weather and know better than to let a winter warm spell entice them out of their slumber.

  However, many cultivated plants are not native. I like to grow fruits, and any fits of warm weather in weeks to come are going to make me nervous about the apples, plums, hardy kiwis, and pears, all non-native and sometimes awakening early enough to be damaged by subsequent cold.

Blueberries, pawpaws, persimmons, raspberries, and mulberries should be fine. Let’s hope for steadily cold weather and plenty of snow for the rest of winter.

Past winter garden scene

Older winter scene

SEED TIME

Late this Year

This year I’m late, but not too late, with my seed orders. Usually, I get them in by a couple of weeks ago.

The only seeds that I’ll soon be planting are those of lettuce, arugula, mustard, and dwarf pak choy. They’ll fill any bare spaces soon to be opening up where winter greens have been harvested. No rush, though, because I have seeds left over from last and previous years of these vegetables, and they keep well if stored under good conditions.
Greenhouse greens
I’ve usually sowed onion seeds early also, in flats in the greenhouse in order to give plants enough time to become large transplants. Large transplants translates to large plants out in the garden before long days force them to shift from growing leaves to, instead, swelling their bulbs. More leaves before that shift makes for larger bulbs.

Last year, because of poor onion germination in the flats, I ended up getting fresh seeds and sowing them directly in the garden in early spring. Keeping the bed moist promoted quick germination and, by August, the bulbs stood up well, size-wise, to those from seeds sown in the greenhouse in past Februarys.

Seed Longevity

Onion and leek seeds don’t keep very well. Viable seeds are living, albeit dormant, embryonic plants which do not live forever. Conditions that slow biological and chemical reactions, such as low temperature, low humidity, and low oxygen, also slow the aging of seeds.

Seeds differ in how long they remain viable. Except under the very best storage conditions, it’s not worth the risk to sow onion, parsnip, or salsify seeds after they are more than a year old. Two years of sowings can be expected from seed packets of carrot and sweet corn; three years from peas and beans, peppers, radishes, and beets; and four or five years from cabbage, broccoli, Brussels sprouts, cucumbers, melons, and lettuce. 
Chart of vegetable seed longevity
Among flower seeds, the shortest-lived are delphinium, aster, candytuft, and phlox. In general, though, most annual flower seeds are good for one to three years, and most perennial flower seeds for two to four years. 

In a frugal mood, I might do a germination test for a definitive measure of whether an old seed packet is worth saving. Counting out 10 to 20 seeds from each packet to be tested, I spread them between two moist paper towels on a plate. Another plate inverted over the first plate seals in moisture and the whole setup then goes where the temperature is warm, around 75 degrees.

After one to two weeks, I peel apart the paper towels and count the number of seeds with little white root “tails”. If the percentage is low, the seed packet from which the seeds came gets tossed into the compost pile. (I don’t give them away!). Or, I might use the seeds and adjust their sowing rate accordingly. 
Seed testing
No one knows exactly what happens within a seed to make it lose its viability. Besides lack of germination, old seeds undergo a slight change of color, lose their luster, and show decreased resistance to fungal infections. There’s more leakage of substances from dead seeds than from young, fresh seeds, so perhaps aging influences the integrity of the cell membranes. Or, since old seeds are less metabolically active than young seeds, the old seeds leak metabolites that they cannot use.

Finally, Get My Orders In

Today I dug out my shoeboxes of seeds from the unheated workshop and noted what was missing and what was too old.

Needed still are yet undetermined, good varieties of Brussels sprouts, celeriac, semi-hot pepper, and melon. (Any suggestions for good varieties?) Also one or more packets of Bartolo cabbage, Blues Michili cabbage, Shintokiwa cucumber, Golden Bantam 8-row sweet corn, Blacktail Mountain watermelon, Carmen pepper, Mammoth sunflower, and Empress of India nasturtium.
Ordering seeds
And, of course, some tomato varieties need replenishment: Sungold, Anna Russian, Nepal, Carmello, San Marzano, and Amish Paste. They will join Belgian Giant, Pink Brandywine, Paul Robeson, and Blue Beech out in the garden.

A colorful and flavorful growing season is in the offing.