
How Pesky And Interesting
Snowflakes? No.
Gardening never ceases to be interesting, even if the current object of interest is a pest. Not just any pest, but a NEW pest! And not just for me.
I was alerted to this pest when pulling a few weeds near my Brussels sprouts plants. Brushing against their leaves brought a cloud of what looked like fine snowflakes. They were, in fact, whiteflies, tiny (1.5 mm) fluttering insects, immediately recognizable to me from their common occurrence on houseplants.
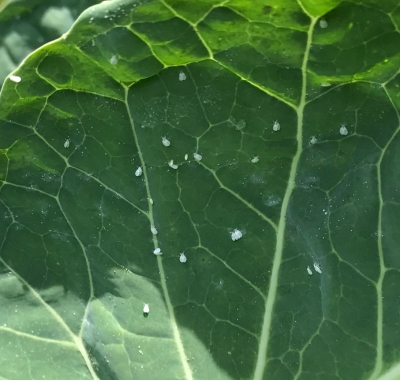
Cabbage whitefly
Whiteflies rarely show up on outdoor plants; in my experience, never. Easy enough to discover on the web, my whiteflies are appropriately named cabbage whiteflies (Aleyrodes protella). This native of Europe first turned up in the U.S. in 1993, but is rare in the Hudson Valley. It’s fond of all cabbages relatives, with a preference for kale. Not in my garden, though; kale, sharing the bed with the Brussels sprouts, is hardly attacked.
The attack seems mild, most evident, besides the snow clouds, as some black, sooty mold on the plants. Sooty mold is a fungus that feeds on the sweet exudate the insect drips on the plant. It’s only on the surface of the leaf so is harmless unless it becomes so dense that the leaf is shaded.
Cabbage whitefly isn’t easily controlled with chemical pesticides. I’m not worried, though, because the level of damage doesn’t warrant my lifting a finger against them.
If some control is needed before the season ends, sprays of either insecticidal soap or horticultural oils are effective — and won’t disrupt the whiteflies’ natural insect and fungal enemies, of which there are plenty. Cleaning up the bed at the end of the season also helps, for next year. Yellow-colored cards coated with something sticky, like Tangletrap, also could offer some control. For now, though, I’m just watching them flit about each time I draw near.
Peach Harvest
The peach crop got harvested a few days ago, all two of them. The tree is small, but not that small; it could have supported a couple of gallons of peaches.
This was a good season for peaches. Unfortunately, my farmden is not a good site for fruit. Insect pests can move in from the woods only 50 feet from the trees, and the low lying ground acts like a basin into which cold air can collect. That cold air brings late frosts (not this year), and moister air in which fungal diseases fester. Those are my excuses for my two-peach harvest.
On the other hand, my investment in the tree has been minimal. The tree grew from a peach pit. Sow an apple seed and the tree might take 10 years before it yields its first fruit. And then, after that long wait, the chance of that fruit tasting good is only about one in 10,000.
Sow a peach seed, and the tree might bear in 4 years. The fruit on that tree is likely to taste quite good, perhaps great. Peaches are self-pollinating, so there’s no foreign genes introduced into the resulting pit. Not so for apples, which don’t bear fruit unless pollinated by a different variety.
My peaches, by the way, tasted great. And, with gracefully drooping leaves that retain their shiny green color all season long, the tree is very attractive. I am hoping for a larger crop next year.
Ladybugs to the Rescue
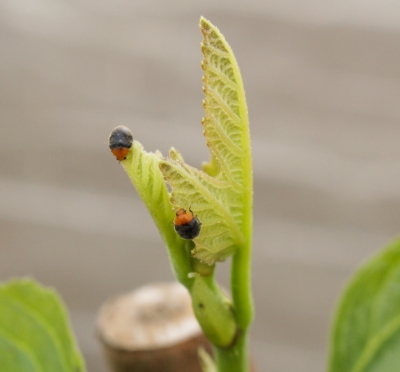
Aha. Checked back with the whiteflies on the Brussels sprouts, and what do I see? Some ladybugs dining, moving up and down the leaves. The young larvae are likewise at work along with their parents.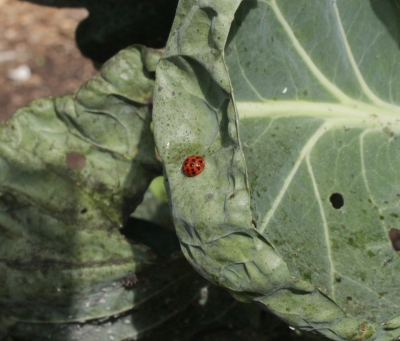
(The “lady” in ladybug is, by the way, the virgin Mary. The German word for them, Marienkafer, translates also as Marybeetle.)
Among the many species of ladybug, all in the family Coccinellidae, are some that specialize in devouring mites, others specialize in mildews, still others on mealybugs (I mentioned last week purchasing and using them for fig mealybugs), some for scale insects, and so on. Some members of the family feed on plants: squash beetles and Mexican bean beetles, for instance.
I don’t know which species of ladybug is at work on my Brussels sprouts, but I’m happy to have them.
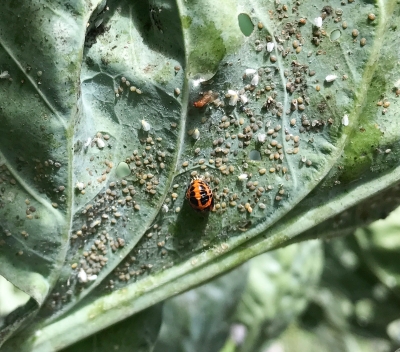
Cabbage whitefly & ladybug larvae
It Ain’t Over ‘Til It’s Over, and Pears
Whoosh!
Whew! How quickly this growing season seems to have scooted by. I am putting the last plants of the season into the vegetable garden today. These were transplants of Shuko and Prize Choy bok choy, and Blue napa cabbage. I’m eyeing some lettuce transplants, and if I decide that they’re sufficiently large to transplant, they’ll share a bed with the cabbages.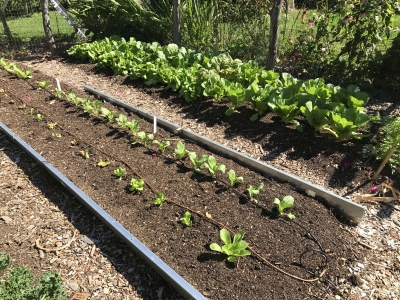
Reconsidering, the end of the gardening season isn’t really drawing nigh. The cabbages won’t be large enough to make a real contribution to a stir fry or a batch of kim chi for at least another month. And then, with cool weather and shorter days slowing growth, the plants will just sit there in the garden, doing fine, patiently awaiting harvest.
Other plants awaiting harvest into autumn from plantings over the past few weeks are Hakurei turnips, crunchy, sweet, and spicy fresh in salads, daikon and Watermelon radishes, for salads or kim chi, and, also for salads, lettuce, spinach, arugula, and mustard greens. The last salad stuff will be endive, sown back in early July, and transplanted in early August in a bed previously home to the first planting of bush beans.
The season’s various plantings mesh together nicely. Those bok choy and napa cabbages went into a bed just cleared from the first planting of sweet corn. The bed previously planted with of lettuce, arugula, and spinach seed followed on the heels of onions sown indoors in February, transplanted into the bed in May, and harvested a few weeks ago.
A Whole New Garden, Now
In addition to good timing, the autumn garden — which is like having a whole other garden, except it’s in the same place as the summer garden — demands good soil. That soil has to support this whole other wave of plants.
Through summer, I looked upon any weeds I encountered as potential factories for making more weeds, via spreading seeds and/or roots. Left alone, that weed and its progeny would rob food and water meant for my cabbages and lettuces, and shade my plants into submission.
With that in mind, when I cleared the beds of spent corn or bean plants, I pulled out every weed in addition to the spent vegetable plants. I tried to get roots and all for each weed, which isn’t that difficult if you keep up weeding all summer.
After clearing a bed of weeds and vegetable plants, down went a carpet of compost.  A one to two inches deep layer smothers most weeds sprouting from seeds as well as provides nourishment for multiple waves of vegetable plants — for a whole year! (Also provides food and habitat for beneficial soil organisms, protects the surface from washing, and increases the soil’s ability to hold on to both air and moisture.)
So the season hasn’t scooted by; the autumn season is just beginning. There’s still some room for reflecting on the season up to this point. Most notable has been this year’s pear crop.
Pears: Easy To Grow, Hard To Harvest (Correctly)
Among the common tree fruits, pears are the easiest to grow. They’re a bit slow to come into production but are often free of significant pest problems. They’re also pretty trees, all season long, especially the Asian pears.
It’s not all smooth sailing from planting to flowering to harvest to eating for European pears, which includes Bartlett, Bosc, Anjou, and other pears with which most people are most familiar. The problem is knowing when to harvest them. Pears ripen from the inside out, so need to be harvested when mature (whenever that is), then ripened in a (preferably cool) room indoors. Left hanging on the tree too long, and the fruit tastes sleepy, at best, or has turned mushy; harvested too soon and the fruit never loses a grassy flavor. (Asian pears are easy to harvest. When they taste good right off the tree, they’re ripe and ready.)
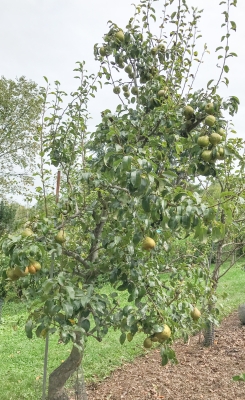
Frederick Clapp pear tree
Appearance of the fruit, calendar date, and ease of separation from the stem when lifted with a twist are all indicators of ripeness. I’m finding that few fruits dropping from a tree are a good sign that it’s time, or almost time, to harvest.
Pears, A Book
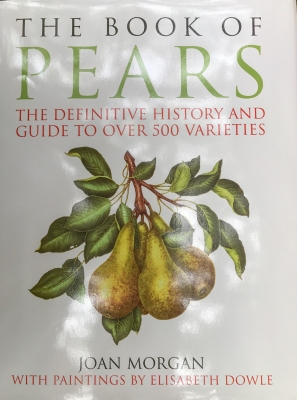
As luck would have it, a beautiful new book, The Book of Pears, by Joan Morgan, arrived in the mail just as pear harvest was beginning (with the variety of Harrow Delight). Replete with old and new illustrations depicting the history of pear cultivation, a large portion of the book offers intimate descriptions and history of many varieties. Beurrée d’Amanlis, for instance, which I grow, originated in a small village in Brittany, but became popular after 1826, when Louis Noisette, a Paris nurseryman, received some fruit from his son, director of the Nantes Botanic Garden.
The book devotes a little space to growing and cooking the fruit. I, of course, immediately looked to see what Ms. Morgan has to say about harvest: “ . . . the next challenge is when to harvest the crop . . . Once they begin to drop from the tree it is time to harvest . . . Experience with your own trees will tell you when to pick.” How true. I’ve grown the variety Magness longest, and usually can pick them to ripen off the tree to perfection. And perfection for Magness means biting into one of the best tasting of all pears.
The Destroyer To The Rescue
Predatory Helpers
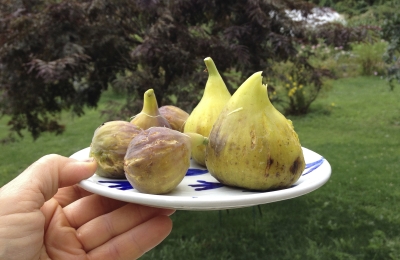
Some of the figs — the varieties Rabbi Samuel, Brown Turkey, and San Piero — started ripening last week. With their ripening, I am now in a position to claim victory over the mealybugs that have invaded my greenhouse fig-dom for the past few years.
 Mealybugs look, unassumingly, like tiny tufts of white cotton, but beneath their benign exteriors are hungry insect. They injects their needle-like probiscis into stems, fruits, and leaves, and suck life from the plants, or at least, weaken the plants and make the fruits hardly edible.
Over the years I’ve battled the mealybugs at close quarters. I’ve scrubbed down the dormant plants with a tooth brush dipped in alcohol (after the plants were pruned heavily for winter). I’ve tried repeated sprays with horticultural oil. I put sticky bands around the trunks to slow traffic of ants, which “farm” the mealybugs. And I’ve rubbed them to death with my fingers when I came across them on the stems. All to no avail. The mealybugs always made serious inroads into the harvest.
Mealybugs finally have been quelled this season thanks to another insect, the aptly named “mealybug destroyer” (Cryptolaemus montrouzieri), available from www.insectary.com. To soldier along with the mealybug destroyer, I also ordered some green lacewing (Chrysoperla rufilabris) eggs. Besides attacking the mealybugs, the lacewings prey on aphids, seizing the aphids in their large jaws, injecting a paralyzing venom into them, and then sucking out their body fluids. With good reason, lacewings are also called aphid lions.
Mealybug destroyer
I ordered the first batch of predators in early summer. After recently noticing a buildup of mealybugs again, I ordered another batch. The mealybug destroyer and aphid lion populations may have plummeted after they ate all the bad guys, or they may have found their way to greener pastures via the many openings in the greenhouse.
The smallest amount of either pest that could be purchased could have policed a greenhouse much larger than mine, so the predators were relatively expensive: about $80 per shipment, with shipping. Still, I estimate the potential ripening of about 160 figs, which brings their cost to $1 per fig. Not bad for a dead ripe, juicy, ambrosial fruit that, with each bite, transports me back thousands of years to the Fertile Crescent, where figs originated.
Help From The Queen
A visitor to my greenhouse might have thought it looked weedy this summer. Tall flower stalks of Queen Anne’s lace grew with abandon, cilantro flowered and then their seed heads flopped down willy nilly, lettuce grew bitter as the plants bolted, and mustard greens shot up stalks capped with yellow flowers. There was reason for this wild wantonness.
The purpose of all these flowers was to encourage the adult mealybug destroyers and aphid lions to stick around. Flowers of plants in the Carrot Family, such as Queen Ann’s Lace and cilantro, the Daisy Family, such as lettuce, and the Mustard Family, such as, of course, mustard, provide nectar and pollen that the predators enjoy.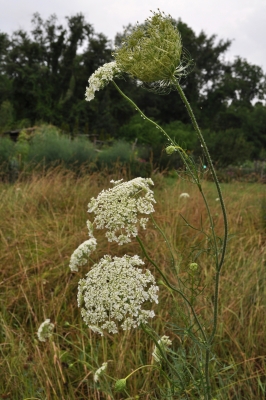 The Carrot Family Helps Out
I also encouraged beneficial insects outdoors, in my vegetable gardens, by growing or, at least, letting grow, some of these same plants.
Add to that list dill, another member of the Carrot Family, which I always let flower and set seed in the garden. Those seeds become next year’s dill plants with no extra effort on my part except to weed out excess self-sown seedlings.
For some reason, dill did not self-seed in the garden the past two years, so this year I bought and planted seed. “Planted” might be too specialized a term for what I did. In fact, I just tore open the packet of seeds, poured them into my hand, and waved my hand as I let the seeds fly. Like magic, seeds sprouted a few weeks later.
This season’s dill not only encouraged beneficial insects and provided some ferny leaves and seed heads for flavoring, but also provided beauty. The variety was ‘Fernleaf,’ which grows dwarf, compact plants that also are slower to make flower heads. Perhaps it was the compactness of the flat heads of greenish yellow flowers or the denser backdrop of green leaves, but the plants captured my attention every time I walked by them. Still do, because they’re still blooming.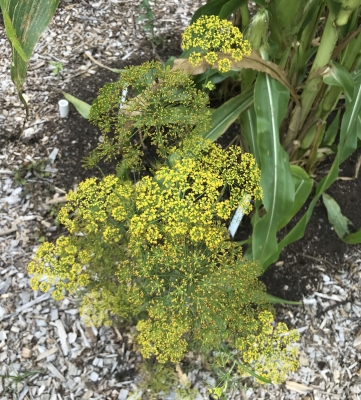
Queen Anne’s Lace also appeared in my garden with no extra effort on my part. Not only from self-seeding, as a weed. But also from an occasional rogue carrot seed from those I planted. Queen Anne’s Lace and carrot are the same genus and species, carrots having been selected and bred to make fatter, juicier, tastier, and orange-er (or, these days, purple-er) roots.
Here, at least, this season was particularly welcoming of QueenAnne’s Lace. The meadow next to the vegetable gardens has been dotted white with an abundance of their flowering heads.
