NUTS, SOME GOOD, SOME BAD, AND NEW(!) PLANTS
/2 Comments/in Flowers, Fruit, Gardening, Planning/by Lee Reich
A Good Harvest, But . . .
The black walnut harvest was abundant this past fall. Back in October, we gathered about a dozen 5-gallon buckets of of unhusked nuts, and, after husking, cleaning and drying them, set them in the cool, dry, squirrel-proof loft of our garage/barn (gabarn?).
The nuts are now sufficiently cured and ready for cracking. Two tools have made quicker, easier, pain-free, and more effective the once difficult and thumb-threatening job needing a concrete floor and a hammer. The Master Nutcracker makes elegant use of cogs and levers. For any nutmeats still gripped in a piece of shell, a “diagonal cutting plier” nips the shell piece to create a fault line that opens to drop out a piece of nutmeat, or to twists off a piece not fully cracked.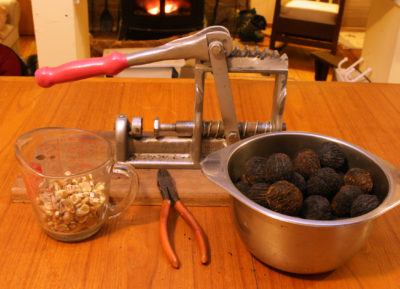
This year’s harvest was from two trees. Most was gathered from the ground beneath a decades-old tree. That tree grows on what, in spring, is periodically waterfront property when the swale that it borders fills with rushing water. The other tree sprouted in well-drained soil a few years ago at the edge of woods along the north edge of our property. Now with an 8-inch diameter trunk, it began yielding nuts in earnest only a few years ago.
The opening day of nut-cracking season has highlighted the difference in nuts. Nuts from the younger tree not only are significantly larger, but they’re all well-filled with nutmeats that come out in large pieces. The old tree has yielded too many nutmeats that are dark brown and shriveled, or totally dried out, black, shriveled, and inedible.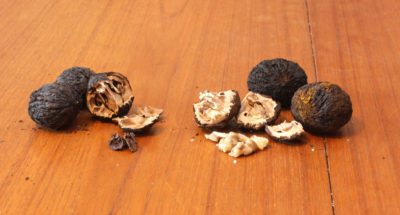
Genetics could be at play. Although both trees are black walnuts, each is a distinct individual within the species. Water might also figure in. Periodic flooding in the spring might leave too many of the old tree’s roots gasping for air at critical moments in nut development. Perhaps the old tree is still recovering from being swamped in water a few feet up its trunk during hurricane Irene back in 2011.
Perhaps it’s age. Probably not. Black walnuts are long-lived trees and I assume their fecundity goes hand in hand with their longevity.
Up to a few years ago, the large, old tree bore regular and reliable nuts that were plump with nutmeats.
Winter Dreaming
You’d think, after gardening for so many years with sufficient room for planting, that I would have by now grown every plant I could possibly want. Not so!
Cleaning up my desk, I recently came across a pile of papers clipped together, my pile of “plants to grow.” Over the years, whenever I see a plant of interest in a magazine or newspaper, I’ve torn out the page to add to the collection. The same goes for plants I might come across on the web or in conversation.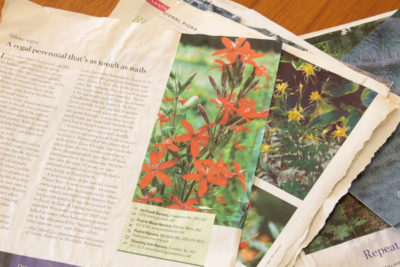
Swelling over the years, the pile has become intimidating. Daring to look at it would force me to decide whether such and such still worth growing and, if so, where to plant it. If an ornamental plant, where to incorporate it harmoniously into the landscape? If an edible, where best to site it for convenience in care and harvest? And do I have time to care for yet another plant? If there’s a plant offering both good eating and good looks, how to . . . well, you get the picture.
Perhaps the approach should be the same that some guy with too large a collection of shoes or some gal with too large a collection of cars might take: Vow to get rid of one for each new one collected. Or not.
Now Really, What To Plant Next Year
Okay, I’ve segregated the pile of “plants to grow” into two piles, one for plants to order this coming spring, and one for plants to keep on the back burner.
At the top of my list are three daphnes. I already grow Carol Mackie (Daphne × burkwoodii) for its fragrance and white-picoteed leave; the new daphnes can share a bed with her. Briggs’ Moonlight (D. × burkwoodii) has the reverse leaves, white with a green-picotee — a nice foil for Carol Mackie. Joining them will be Summer Ice (D. x transatlantica), which has just a thin line of white on its leaf edges. Also February Daphne (D. x mezereum), this one for its rosy-purple flowers that open in early spring on leafless shoots. All these daphnes are attractive but their main draw, for me, is the flowers’ jasmine-like perfume. They will make sitting on the nearby deck an olfactory delight from early spring right through summer.
How can I resist a plant called roof iris (Iris tectorum), both for its flowers and low fountains of foliage? It tolerates cold or dry conditions, and grows in sun or shade, so would be a perfect addition in name, needs, and appearance for MY green roof.
Another perennial slated for entrance next year is royal catchfly (Silene regia), a native of American prairies with fire engine red flowers. My plan is to grow them from seed to get enough seedlings to plant in part of MY meadow.
That’s all for the coming year. What, no fruits, one of my specialties? No, I have all I need. Hmmm . . . what about quince?
MY PONYTAIL GROWS, AND SEEDS ENTICE
/5 Comments/in Gardening, Houseplants, Vegetables/by Lee ReichI Grow A Ponytail
A friend gave me a ponytail palm (Beaucarnea recurvata) decades ago, and up to this summer it looked something like a palm tree sitting atop a large onion. Or a long-leafed dracena plant whose stem, near ground level, had swollen almost to the size of a bowling ball. The plant looked very interesting, but not particularly attractive, and the sharp edges of its long, strappy leaves were grabbing at me every time I walked by too closely.
So last summer, I was going to toss the plant in the compost pile; instead, I lopped off its top to about 3 feet in height. What remained was nothing more than what looked like a tan bowling ball halfway immersed in a pot of soil with a inch-thick, bare stem tapering skyward from its upper side.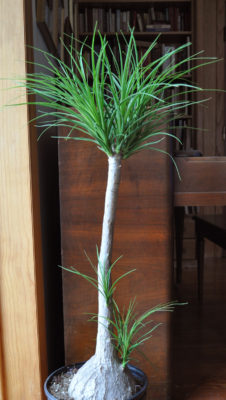
After pruning, I ignored the plant just as I had done for the past few decades. Ponytail palm doesn’t crave attention. As testimonial to the ability of the bulbous trunk to store water, the plant went months between waterings. What’s more, it’s been growing in the same pot with the same potting soil for all these years, no small accomplishment with the bulbous base of the plant, rather than potting soil, occupying much of volume within the pot. And fertilization? A rare event.
Now for the good part: Since being decapitated, the ponytail palm has sprouted tufts of leaves in various places. A few new sprouts appeared near the top of the plant, just as most plants would do when the top bud or portion of a stem is cut back. A tuft also appeared lower down along the stem. And seemingly out of nowhere, a couple of tufts of leaves sprung from the rounded surface of the swollen bulb.
Over time, each of those tufts of leaves is going to elongate into a stem capped by a tuft of leaves.
The plant is more verdant and very attractive now, and I should be able to direct its growth to remain so. If not, I can lop back one or more ponytails and start again.
Ponytail, Down The Road
Ponytail palm is quite a dramatic site in its native, tropical haunts. There, the plant’s stem keeps elongating, lifting its mophead of scrappy leaves higher and higher. Tufts of leaves might sprout lower down along the stem, or from the base, just as did my decapitated plant. And the bulbous base — it keeps growing fatter and fatter.

Ponytail palm in Puerto Rico
In Puerto Rico, I’ve seen ponytail palms the were three feet across as ground level. My plant will get a new pot as soon as it bursts out of its old one. But eventually . . . ?
Seeds! Restrain Me
Years ago, the routine was that seed catalogues would arrive in the mail sometime after January and all of us gardeners would place our orders to receive seeds a couple of months later. Now, I have catalogs that have already been sitting on my kitchen table for a few weeks, with orders waiting to be finalized. And not primitively finalized, with pen and paper, but seamlessly, on the internet.
Seed companies realized that the early bird gets the worm: We gardeners, once cold weather has set in, are likely to get seduced by any reference to fresh tomatoes, so are most likely to order from the first catalogs we see. All this is for the better, for me, at least, because my efforts to limit down time in the garden mean that I need to have seeds in hand and ready to sow that much sooner. I could sow lettuce seeds today, for harvest in the greenhouse. Onion and leek seeds get sown in seed flats at the beginning of February, lettuce for transplants to be planted outdoors, follows soon after that, along with pansies and snapdragons, and the march continues from then on right through September.
One thing that has not changed over the years is that I’m still enticed and thankful for what we gardeners have at our fingertips. From just a phone call, a few dollars, or a few computer keystrokes, plants from all over the world end up in my garden. How can I resist trying Ruby Mist Love Grass, Cajun Jewel Okra, and Blazing Stars this year, along with such old standbys as Buttercrunch lettuce, Blue Lake beans, and Lemon Gem marigolds?
CATS ON A COOL, GREEN ROOF
/3 Comments/in Design, Gardening, Soil, Uncategorized/by Lee ReichNot Green Enough
I’m looking up at my green roof, my evergreen roof, and it’s not green enough. Literally. I had expected that by now the roof would be solid green. It’s not.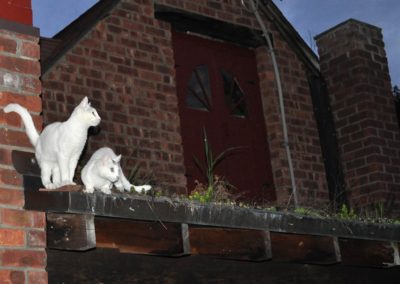
The green of this roof was supposed to come from the plants growing on it. Because conditions up on the roof are very harsh, the plants I chose were tough ones, hens-and-chicks (Sempervivum spp.). Hens-and-chicks look like little cabbage heads of stubby, succulent leaves. Baby plants push out from around the mother plants, grow, and make more babies, and so on, ad infinitum. Or so I hoped.
The roof only has a couple of inches of “soil” on it and covers a porch, so has no heated space or insulation beneath it. If winter temperatures plummet to 10 degrees below zero, not uncommon here, temperatures within that thin layer of soil also plummet to 10 degrees below zero. If summer temperatures hit 95° in the shade, the soil, which is shaded at one end, also hits 95° — and more in the sunny end. The roof never gets watered, except by natural rainfall.
The hens-and-chicks have established and survived and spread. But not enough. By now, I expected the roof be packed solid with hens-and-chicks, with excess plants spilling decoratively over the front edge. But too much soil still shows. Part of the green problem is that hens-and-chicks are not all that green; the leaves are more pale blue-gray.
Enter Angelina
So I’ve been taking steps to green up the roof.
The first step has been introducing a companion plant for the hens-and-chicks. The plant, which I believe is ‘Angelina’ rocky stonecrop (Sedum rupestre), has been magically appearing here and there in and around my rock walls. Well, not magically. As with other succulents, ‘Angelina’ easily grows into whole new plants wherever any piece of stem or leaf merely drops onto the soil. Over the past few years, whenever I’m so inclined, I grab a few pieces of ‘Angelina’ and toss them up on the roof. They’ve rooted and spread, parading up there as forest-green patches.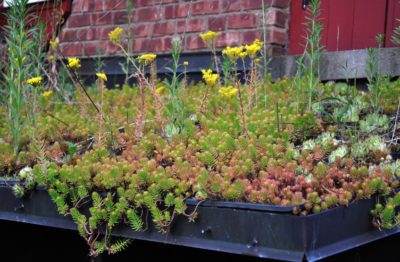
I periodically get more serious with ‘Angelina’. “More serious” means filling some cell-type seedling flats with a “soil” of equal parts moist peat and perlite, and poking inch-long pieces of leafy ‘Angelina’ stems into the mix. After a winter in the greenhouse or a sunny window, those cuttings are rooted enough to plug into holes I dibble into the soil on the roof among the hens-and-chicks. The roof is a little more than 100 square feet. Each plant could potentially fill up a square foot in a couple of seasons, so 100 cuttings of this plant would do the trick and take up only a couple of square feet of space in their holding cells.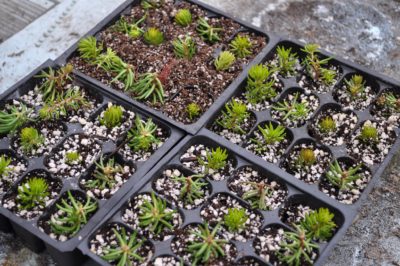
Another step to making the rooftop greener is to beef up the “soil.” The soil is actually a mix of equal parts peat and calcined montmorillonite clay (a.k.a. kitty litter, unused). The mix is heavy enough not to blow away, and the peat is relatively resistant to decomposition. Some shovelfuls of this mix periodically tossed up on the roof replace what’s washed away or settled.
The mix is lean in nutrients so, come spring, I could also beef up the rooftop with some fertilizer. Not much, though, because succulents are light feeders and too much fertility would encourage weeds.
Is Green Better Than . . . ?
I don’t get it. Green roofs are so “in” these days, for their green appearance and for their environmental green-ness. Sure, green roofs insulate rooms below from heat and cold. And green roofs capture and evaporate some rainwater rather than let it run down gutter pipes and into sewers or streams. The air above green roofs stays cooler than that above conventional roofs, so heat islands aren’t created.
But are the above good enough reasons to put plants on a roof? After all, good insulation also insulates, a lot better than soil and with a lot less weight. And how much water could a roof of succulent plants — plants known for their low water usage — evaporate?
Much as I love plants, I’d rather see solar panels on roofs. My green roof is for looks (and not sunny enough for solar panels).
And A Bow To The Weeds
My green roof is a testimonial to the tenacity of plants. Despite the leanness of the soil mix and its being initially pretty much weed-free, some weeds have colonized the roof. And they survive, despite the harsh growing conditions up there.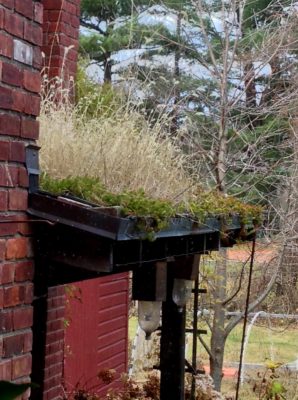
The weeds that came in weren’t succulents, but grasses and perennials such as foxtail grass and goldenrod. Every time I look up at the roof, I am awed at how these and other plants not only got there, but how they manage to survive there year after year.
Weeding up there would seem such a travesty — and be very difficult.

