
GOOD FENCES (& GATES) MAKE GOOD . . .
Aging in Place
Friends and other visitors here always admired the gate and arbor at the entrance to my vegetable garden more than I ever did. Built from cedar branches, it did have rustic charm. But to my eye, the wood looked too flimsy. And it was. Joints eventually loosened and as the gate sagged with age it had to be muscled open and shut.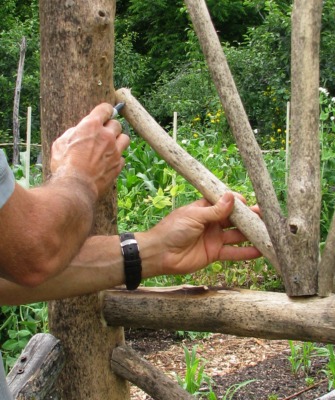
I rebuilt that gate and arbor, highlighting an important point in constructing rustic garden structures: match strength of the structure to its intended use.
I built my new gate and arbor, like their predecessor, from natural limbs. Locally gathered wood makes any rustic structure harmonize well with its surroundings. Leaving most of the wood in its natural state — branches often intact, their twists and bends highlighted in the finished structure — completes the equation for a gate just a short step removed from Mother Nature.
The type of wood used figures into any rustic structure’s strength, longevity, and beauty. Rot resistance is mandatory. My original gate and arbor were red cedar (Juniperus virginiana), whose heartwood is rot resistant. But gate-sized wood of cedar, 3 to 6 inches in diameter, has little heartwood, which is one reason that old gate too soon became too decrepit.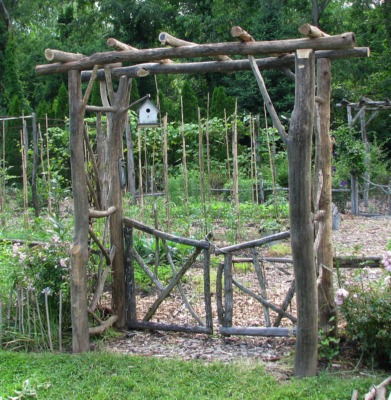
My new gate was made from black locust (Robinia pseudoacacia), another native tree that is very rot resistant. Fortunately, black locust grows wild along one edge of my property. And fortunately again, cut locust down and new sprouts appear; within about a decade, those sprouts grow fat enough to be harvested again for more gates or fence posts or arbors.
Many other woods also have qualities sought for building rustic garden structures.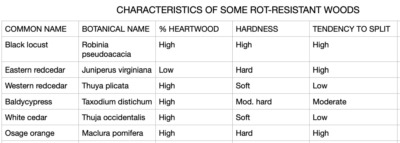
Spring is a good time to look for wood because that’s when the bark strips most easily. I used a draw knife but a heavy knife could also do the job. Bark left intact would provide home for insects and, more important, would make for poor joints as bark included in the joinery rots away. (The bark is not rot resistant.) Gathering extra wood allowed for mistakes and afforded many possibilities of joining pieces together in a manner that would be both functional and beautiful.
Functional Puzzling
For my new gate and arbor, I laid out on flat ground various combinations of limbs approximately as they might look on the finished project. Important considerations in building the gate were relatively straight vertical members at each side and along the bottom of the gate. 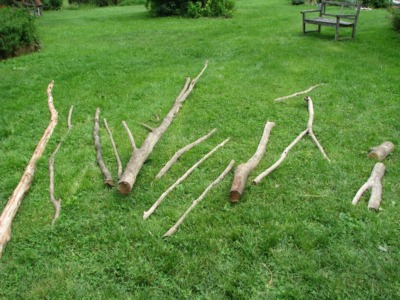
For maximum strength, I wanted a sturdy top branch to sweep down from a higher point at the hinge end of the gate to a lower point at the opposite end. The heaviness of locust wood puts a lot of stress on a five-foot wide gate, so I also selected a smaller limb to add diagonal strength in the opposite direction. Once I arrived at what looked pleasing and sufficiently strong, I cut the pieces to length.
The strongest and the best looking way that two natural limbs can join together is naturally, the way they were joined on the tree. Even when Nature accommodates, though, plenty of “artificial” joinery is also needed in any rustic structure. The butt, lap, and mortise and tenon joints used for rustic structures are the same as those used with finished lumber.
As with joinery of finished lumber, the greater the surface contact between the two pieces of wood being joined, the stronger the joint. I held wood together by either bolts and nuts, or by screws, predrilling holes for the screws large enough to prevent splitting but small enough to provide good holding power.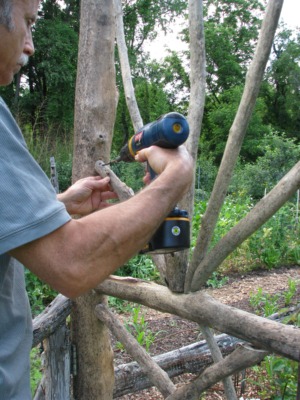
Finishing Touches
My gates and fence are meant to keep animals — from large deer to my bantam chickens — out of my vegetable garden. A rustic gate presents relatively large, gaping holes, so I stapled the same material I used for fencing — 2×4 welded wire — right onto the gate. Stapling that fencing to the gate also gave it added lateral strength.
Every rustic structure has its finishing touches. I never found the steel hinges on my original gate very attractive (although no one else seemed to notice them). For my new hinges, I first drilled a 5/8 inch hole in the bottom of the vertical gate piece nearest the arbor, then settled the gate into the hole atop a lag screw hinge screwed into the arbor at one end.
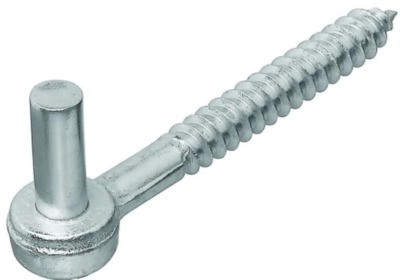
Lag screw hinge
The top of the gate was held similarly, with a half-inch bolt dropped between two screw-in eye bolds and then a hole in the top of that vertical piece of wood. Some oil in this hole would prevent water from seeping in and causing rot.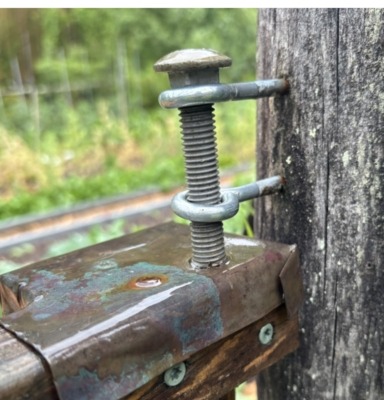
The new gate opened and closed with just a nudge from my pinky.
Full disclosure: A number of years after building my locust gates, they also were getting a little floppy, probably because of wood shrinkage. I was pressed for time and needed to keep animals at bay, so built new gates out of 2×2 and 2×4 lumber. Those gates have weathered well, both in strength and in color. Some day I may replace them but for now they still open and close with the nudge of my pinky.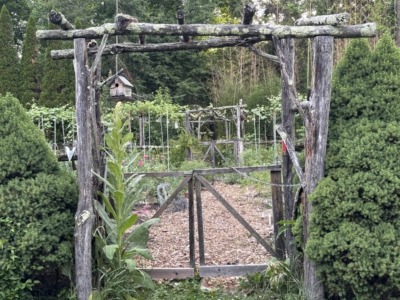


This is awesome Lee! And just in time because my own garden gates are falling apart. Thanks for sharing the tips about hinges. Did you put the posts in with cement or is the locust rot resistant enough to put right into the ground. And have you ever experimented with finishes or treatments like yakisugi?
Best regards
I just dug out holes and dropped the posts into the ground. If the posts are large enough,, I would guess that they’re good for 20 years or more. Yakisugi should be effective at prolonging the life of the posts because elemental carbon (from charring) is very resistant to decay. I am soon putting more posts into the ground and will try that. Thanks.