
BEST GARDEN EVER, DROUGHT NOTWITHSTANDING
Go Drip!
This summer has been one of the hottest and driest ever — and it’s been one of the best ever in the vegetable garden. Baskets of red, ripe tomatoes and peppers sit on the kitchen floor awaiting metamorphosis into sauces and salsas, dehydration, or just plain being eaten.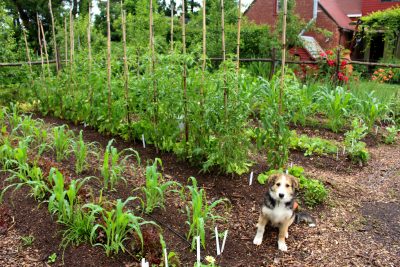
What about water? My garden plants are plump with water thanks to drip irrigation. In addition to benefits to the plant, drip is also good for the environment, typically using only about 40 percent of the amount of water used by sprinkling. That’s because the more pinpointed water avoids wasting water in paths and other places it’s not needed. Also because little water is lost to evaporation.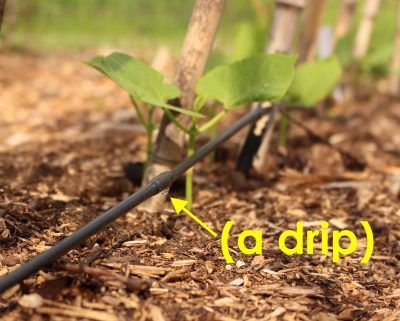
The “drip” in drip irrigation tells you that water is applied at a very slow rate, which is especially appealing to those of us whose water comes from a well. With drip, the well has plenty of time to recharge between waterings.
Drip is also better for plants. Leaves stay dry, lessening the chance for disease. And rather than flooding the ground, which a sprinkler does at each watering, drip keep soil moisture within that happy window when larger pores remain filled with air, and water is held within smaller pores so that roots can both breathe and draw in water. (This is one reason for the more efficient water use of drip irrigation.)
Drip irrigation is also better for you and me. In April I bring out and attach my timer to the spigot and I’m pretty much ready to go. 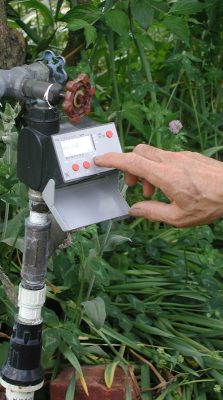 The rest of the setup remains out in the garden year ‘round. I turn it on and pretty much forget about watering until late October, when I bring the timer back to where it won’t freeze.
The Components
But I’m getting ahead of myself. Let’s get into the weeds (which also will be less with drip irrigation). No need to be intimidated by the prospect of “setting up a drip irrigation system.” If you enjoy(ed) Tinker Toys or Legos, setting it up will be fun and easy; if not, it may not be fun but it still will be easy.
The bare bones of a drip system starts with inexpensive, black plastic tubing — the “main line” — which brings the water from your hose spigot out to your garden. Now for the elegant part: water is distributed throughout your garden through “emitters.” These holes are are more than just holes. They are engineered orifices designed to drip water at a specified rate and to avoid clogging. (Contrast this with “soaker hoses” whose holes’ output varies depending on the elevation along the line, the distance from the water source, and the incoming pressure. Those holes also can become clogged with roots or debris.)
For larger plants or wide spacings, you punch holes in the main line where individual emitters can be plugged in near each plant.
For a bed of lettuce or carrots or other closely spaced plants, you instead plug emitter tubing, which comes with emitters at specified spacings, into the main line. You can choose from various emitter spacings, from 6 to 18 inches, as well as drip rate, starting at 1/2 gallon per hour.
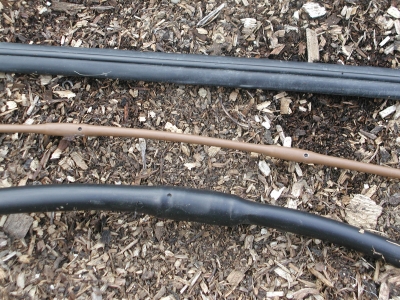
3 kinds of emitter tubing
If there’s anything that’s confusing about drip irrigation, it’s the number of choices you’ve got to make. In addition to the aforementioned, there are types of emitters, types of connector to get mainline around sharp bends or up into a raised beds, diameter of main line (more distance or more emitters want wider tubing, etc.). And then there are kits, which I suggest against because you’ll end up with some components you don’t need and lacking some components you do need.
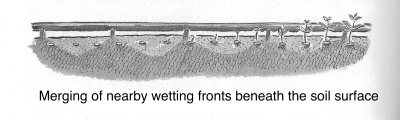
Drip emitters need not be right next to your plants because the wetting front from each emitter spreads out within the soil and, if emitters are close enough, will overlap.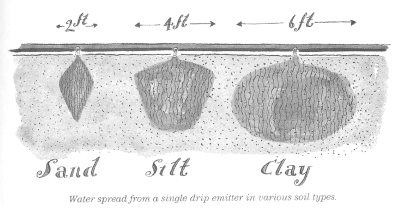
 My vegetable beds are 3 feet wide and I run two lines of emitter tubing down the length of each bed. The emitters on the tubing are spaced 6 inches apart, each dripping one-half gallon per hour of water.
Other components for your drip system would include a pressure reducer and a filter which follow the timer, which is attached to a spigot. These three components are the only ones that need to be brought indoors for winter. Also hold-downs to keep lines in place, various gizmos for closing off ends of lines, and neat little valves in case you want to be able to turn individual lines on or off.
My suggestion is to plan your system by drawing it all out on paper over a diagram of your garden layout. I also suggest that you buy components from an online source specializing in drip irrigation, such as dripdepot.com, dripirrigation.com, theurbanfarmstore.com, or dripworks.com. They have tutorials and live phone help. If you need further help designing your system, hire someone with expertise in drip (such as guess who?).
When Do You Turn It On, and For How Long
So you have all the main lines and emitters laid out, wending their way back to the filter, pressure reducer, and timer. When do you water? Ideally, drip irrigation drips water into the ground at about the rate at which plants use water, which goes on all day long. In my book Weedless Gardening I devote a whole section to drip irrigation, even offering a formula to computer water timing. Ignore it (just the formula, not the rest of the drip information); it’s overly complicated.
Large plants use more water than small plants, and all plants use more water on hot, sunny, windy days. I simplify everything by having my timer let the water run every day for about 30 minutes. Since plants use water throughout the day, I try to space out that 30 minutes throughout the day. I once had a timer that could turn the water on and off 6 times a day, so water flowed at 8 AM, 10 PM, 12 noon, etc. My present timer only has four options per day, so the water runs at 8 AM, 11 AM, 2 PM, and 5 PM.
If we’re in a rainy period, I’ll manually turn of the system, putting a Post-It on my bathroom mirror to remind me the drip is off so I don’t forget to turn it back on.
The whole system is pretty foolproof . . . but that shouldn’t stop you from checking the lines every once in a while to make sure all systems are “go.” This year I was especially diligent in checking the lines, which is another reason for the present cornucopia of vegetables.
As fate would have it, the first rain here in weeks — a good inch-and-a-half soaking — fell here right after I finished drafting this blog post. I fell like a rainmaker.
Nonetheless, even in a season of normal rainfall, drip irrigation can improve plant growth. Normal rainfall is an average, not an hour by hour satisfying of plants’ thirst.

I’m so excited to come across your blog! I bought your “Weedless Gardening” book years ago and used your method on and off, intermittently with tilling. Then my tiller died, and I haven’t looked back. My tomato plants do so incredibly well, despite the blight, because they develop such healthy root systems through mulching. I’m excited about this reminder about drip irrigation. The last few summers have seen large amounts of rainfall in the Midwest, so I’ve not watered my garden in 4 years. But we all know that could change.
I look forward to following your blog.
Thank you, thank you. Also, as I wrote in the blog post, even good rainfall does not always fall in the right amount at the right time. Drip does!
We plan to put drip in this fall. THANKS for your pictures and advice. Will let you know how it goes. We live in Highland Park, IL. The warmer temps are good for us since we live near Lake Michigan and it is frequently “cooler near the lake”. The longer times of dry between hard rains had me watering way more than I care to do this year. It will be nice also when we go away for several days. Won’t have to worry about the garden when on vacation so much.
But don’t forget to periodically check the drip to make sure everything is A-OK.