
OF MAPLES AND REDS
Where’d the Red Go?
Sugar maples (Acer saccharum) are now doing just what I expected of them. But not exactly what I want them to do. Here in New York’s mid-Hudson Valley, at least, this autumn’s leaf show is not quite up to snuff. And it’s also later than in the past. It used to peak here in the middle of October; nowadays, with climate change, the peak has been pushed forward to about now.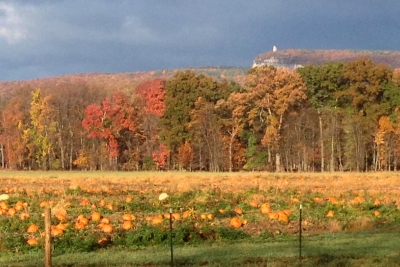
Back to the color: This year the local sugar maples are mostly only yellow, lacking the oranges and the reds that, along with some yellow, really ramp up the blaze of landscapes and forests. Let’s blame that more subdued show on the weather. To know why, let’s backtrack to summer when, quoting from a section in my recent book The Ever Curious Gardener, Using a Little Natural Science for a Much Better Garden:
Green is from chlorophyll, most welcome in spring and through summer, but not what interests me in fall. Chlorophyll must be continually synthesized for a leaf to stay green. The shorter days and lowering sun of waning summer are what trigger leaves to stop producing it, unmasking other pigments lurking there.
Leaves’ yellow and orange colors are aways present, thanks to carotenoid pigments, which help chlorophyll do its job of harvesting sunlight to convert into plant energy. I offer thanks to carotenoids for the warm, yellow glow they give to gingko, aspen, hickory, and birch leaves.
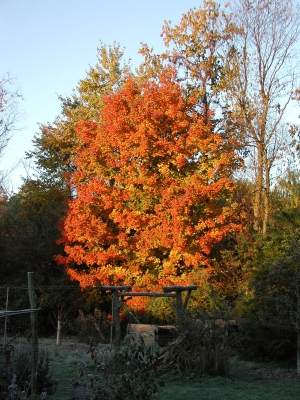
Sugar maple (not this year)
Tannins are another pigment, actually metabolic wastes, that, all summer, are hidden by chlorophyll. Their contribution to the fall palette are the season’s subdued browns, notable in some oaks and enriching the yellow of beeches.
Because leaves harbor carotenoids and tannins all summer long, nothing particular about autumn weather should either intensify or subdue their autumn show. The only glitch could be an early, hard freeze that occurs while leaves are still chock full of chlorophyll. In that case, cell workings come abruptly to a halt and all we’re left with is frozen, green leaves that eventually drop without any fanfare.
Autumn color also spills out reds and purples, most evident in red maples and some sugar maples, scarlet oak, sourwood, blueberry, and winged euonymous. Those reds and purples come from yet another pigment, anthocyanins. Except for trees like ‘Purple Fountain’ beech and ‘Royal Purple’ smokebush, whose leaves unfold dusky red right from the get go in spring, and remain so all season long, in most leaves anthocyanins do not begin to develop until autumn.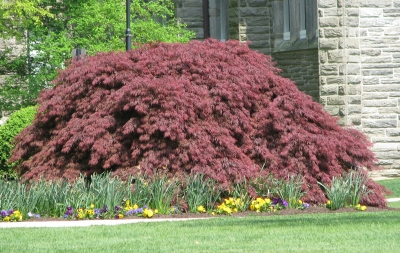
Anthocyanin formation requires sugars so anything that I or the weather does to promote sugar accumulation in autumn will increase anthocyanin levels in leaves. The weather’s role is to offer warm, sunny days to maximize photosynthesis, and cool, but not frigid, nights to minimize nighttime burning up of accumulated sugars. A cloudy, rainy autumn means less red because less anthocyanin is formed, and any that does form is diluted.
As I write this, it’s cloudy and rainy, as it has been so many days this autumn.
Other Reds
I was recently visiting my daughter in Pennsylvania. As we looked around her neighborhood I admired the rich, red, autumn color of the trees lining the streets. Red?! How can that be? What about what I wrote about this autumn’s weather and anthocyanin and red leaves in autumn?
Ah, but science takes care of that, too. Those trees in the Pennsylvania landscape weren’t sugar maples; they were a variety of Freeman maple (Acer × freemanii). Freeman maples are natural and deliberate hybrids of silver maples (Acer saccharinum) and red maples (Acer rubrum), the silver maple contributing fast growth to the hybrids and the red maples contributing strong branches and red leaf color in autumn. 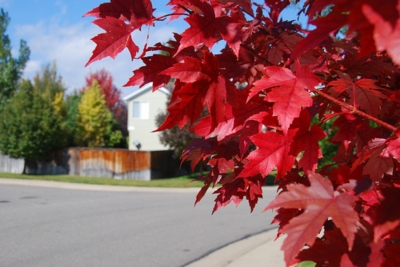
Trees vary, both as to species and locations, in the amounts of pigments found at various times in their leaves. Red maples, as the name implies, have significant amounts of anthocyanins. In these trees, this anthocyanin is present not only in autumn as the chlorophyll fades, but throughout the growing season. Depending on the amount and kind of anthocyanin, its redness would be more or less masked by chlorophyll during the growing season. Some varieties of red maple, and many varieties of Japanese maple, are red or purplish all summer long.
The million dollar question is why a tree would have anthocyanin in its leaves all season long. Various theories have been floated. Anthocyanins do offer protection against excess sunlight, which is why young leaves emerge reddish on some plants.

Seedling red maples
(This characteristic does not correlate with the degree of red in leaves in autumn.) It’s also possible that anthocyanins could ward off pests.
Whatever the reason, red or orange or yellow leaves, I’m not complaining. Autumn is still a beautiful season here in the Hudson Valley.
HARDWOOD CUTTINGS: NOT HARD (TO DO SUCCESSFULLY)
Pros for Hardwood Cuttings
Years ago, I had just one plant of Belaruskaja black currant. Now I have about a dozen plants of this delicious variety, and plenty of black currants for eating. Do you have a favorite tree, shrub, or vine that you would like more of.
Hardwood cuttings are a simple way to multiply plants. This type of cutting is nothing more than a woody shoot that is cut from a plant and stuck into the soil some time after the shoot has dropped its leaves in the fall, but before it grows a new set of leaves in the spring. In the weeks that follow planting, if all goes well, some roots may develop and, come spring, this apparently lifeless piece of stem grows shoots and more roots, and is well on its way to bona fide plantdom.
(Be very careful, though. Multiplying plants can become an addiction. I speak from experience.)
Easy to root
Success with hardwood cuttings depends on both your skills and the plant chosen. Not every woody plant is amenable to increase by hardwood cuttings. You can expect close to one hundred percent “take” with plants such as grape, currant, gooseberry, privet, spiraea, mulberry, honeysuckle, and willow. But this method generally is unsuccessful in making new apple, pear, maple, or oak trees.
Because they lack leaves, hardwood cuttings are less perishable than “softwood cuttings,” the leafy stem cuttings that are taken while plants are in active growth.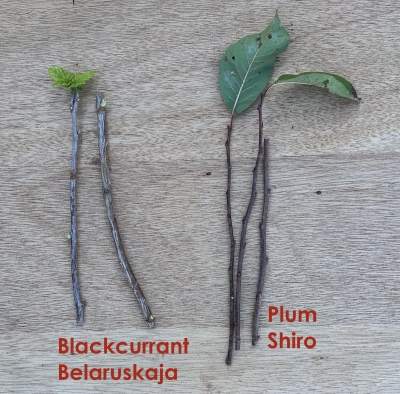
If you’re a novice and want to make your thumbs feel greener early on, try your hand with hardwood cuttings of willow, a plant I have seen take root from branches inadvertently left on top of the ground through the winter. Most other plants demand a little more finesse to ensure success with hardwood cuttings.
Gathering Wood
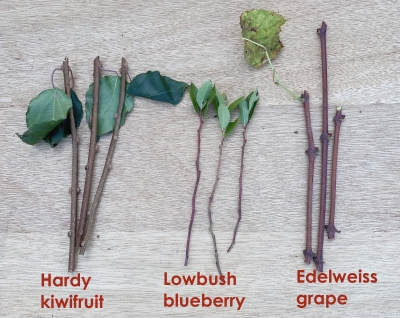
All right, so you have a woody plant you want to multiply by hardwood cuttings. Step back and look at the plant before you take wood for cuttings. Look for some young shoots, those that grew this past season; snip them off for cuttings. The shoots most likely to root are those of moderate vigor, not too fat and not too thin for the particular species.
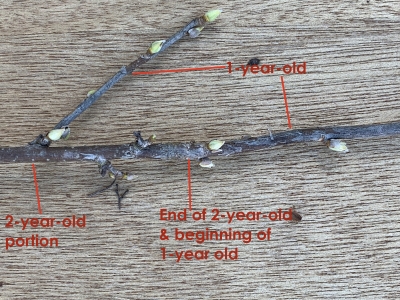
Black currant, 1 and 2-year old stems
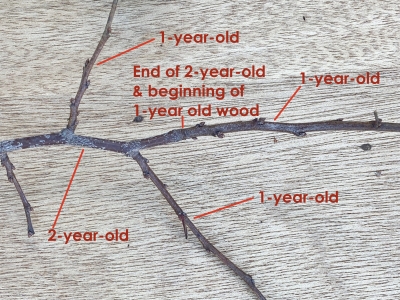
Plum, 2 and 1-year old wood
Once you have one or more shoots “of moderate vigor” in hand, cut them down to a manageable length of eight inches or so. Look for the nodes on each branch; these are the points where leaves were attached. Make the cut for the top of each cutting just above a node, and the cut for the bottom of each cutting just below a different node.
Make sure the upper end of the cutting, which is the point that was furthest from the root, is planted pointing upwards. The plant “remembers” this orientation and responds accordingly, growing roots from the bottom and shoots from the top of each cutting. (Although it’s not impossible to root upside down cuttings, there’s just less chance of success.) Professional propagators cut the bottoms off squarely and the tops at an angle so that the ends don’t get mixed up during planting.
Success Comes With . . .
Plant the cuttings in your garden where the soil is not sodden. Without good drainage the cuttings will rot, rather than root. Make a slit with your shovel, slide in a cutting until only the top bud is exposed, then firm the soil. The rooted plants should be ready for transplanting to their permanent homes by next fall.
Cuttings can be set in the ground for rooting either immediately or stored through the winter for setting out in early spring. I’ve had better success with fall, rather than spring, planting. In the spring, the cuttings often are overanxious to begin growth and the top growth is well underway before the roots have begun. The shoots soon realize that there are no roots to sustain them, then flop over and die.
With cuttings planted in the fall, roots have the opportunity to develop from now until the soil freezes. In the fall, soil temperatures drop more slowly than air temperatures so there’s still some time, depending on your location, before the soil freezes solid. New shoots, on the other hand, won’t grow until next spring, after they feel they have been exposed to a winter’s worth of cold. (This is a natural protection mechanism that prevents plants from resuming growth during a warm spell in January.) Come spring, the shoots that grow from the tops of the cuttings will already have at least the beginnings of roots to bring sustenance.
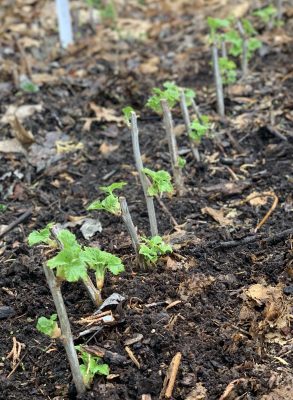
Blackcurrant cuttings in spring
Mulch fall-planted cutting so that alternate freezing and thawing of the soil doesn’t heave them out of the ground.
Cuttings could even be planted in pots with a well-drained potting soil, as long as the pots are kept cool (30-45°F) long enough for the shoots to “feel” winter, so they can grow shoots in spring.
If you’d rather plant in the spring, the cuttings need to be kept cool and moist through the winter. The traditional method of storage is to bundle the cuttings together and bury them upside down in a well drained soil. Why upside down? Because the bottoms of the cuttings then will be first to feel the warming effects of spring sunlight beating upon the ground, while the shoot buds are held in check buried deeper in cold ground.
A refrigerator can substitute for the traditional burying. Seal the cuttings in a plastic bag, wrap the bag in a wet paper towel, and then seal the whole thing in yet another plastic bag. Plant as early in spring as soil conditions permit.
Pay attention to what works and what doesn’t, figure out why, and you’re on your way to propagation addiction. Next worry is what to do with all your plants.
WHAT I LEARNED ABOUT BRUSSELS SPROUTS
Sprout Success
Years ago, a friend referred to Brussels sprouts as “little green balls of death;” that never exactly increased the gustatory appeal of this vegetable for me. The same could be said for “a little boiled to death,” a too common way of preparing the vegetable, and perhaps that’s what the friend had actually said.
Still, I’m always up for a horticultural challenge, even if I had never had success with Brussels sprouts. What does “lack of success” mean with Brussels sprouts? Dime-size sprouts.
Sit tight. This season my Brussels sprouts are a roaring success, and I’m going to impart to you what I learned about growing this sometimes maligned vegetable. Or, at least, what I did differently this year, which was a few things, so I’m not sure whether one or more of them was responsible for my achievement. It could even have been the weather, which I had no hand in.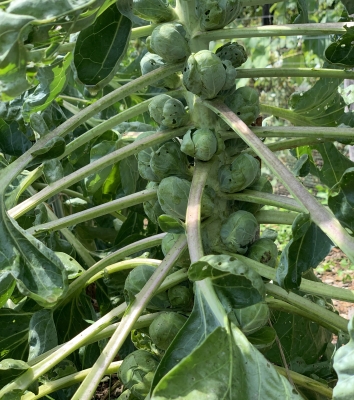
Brussels sprouts is a very long season vegetable, so seeds need to be sown in spring for a fall harvest. Check. I planted mine back indoors in March for transplanting in May. They could have been sown a little later, at some sacrifice of yield.
A big difference in what I did this year was that the seeds that I sowed were those of a new variety, Catskill. Although a new variety for me, Catskill is actually an old variety, first introduced in 1941 by Arthur White, of Arkport, New York. It’s billed as yielding especially large sprouts (yes) on compact stalks (nope). In previous years I grew Gustus, Hestia, and Prince Marvel, and all were duds for me.
The Catskill mountains are only an hour’s drive away from my farmden, which perhaps explains my success with the same-named variety. But, as they often say (quietly) in advertising, “your results may differ.” My suggestion is to try a few varieties until you find one that does well wherever you garden or farmden.
Brussels sprouts requires a rich, near neutral soil high in organic matter. Check. My Brussels sprouts beds have always received, as do my other vegetable beds, an annual dressing of a one-inch depth of compost. Decomposition of compost enriches the soil with a variety of nutrients, including nitrogen.
Still, another big difference in what I did this year was to give my plants an extra oomph with, in addition to the compost, a sprinkling (1 pound per 100 square feet) of soybean meal, an organic source of nitrogen.
In anticipation or hope of large plants, each Brussels sprouts plant was afforded plenty of elbow room this year, with plants two-and-a-half feet apart down the middle of the three-foot-wide bed. They were flanked on each side by a single row of early carrots which, I figured, would be harvested and out of the way by the time the Brussels sprouts plants were spreading their wings (leaves).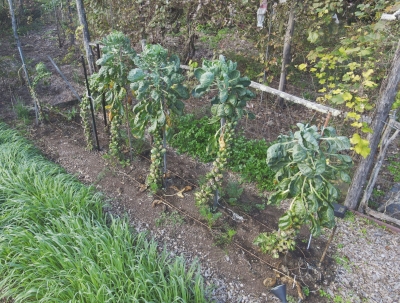
My previous efforts with Brussels sprouts always resulted in three-foot-high plants that, early in their youth, flopped to the ground. Only after a plant’s supine stem had created a firm base would the end of its growing stem curve more or less upward, according to original plan. That youthful waywardness wasted and muddied lowermost sprouts, with the sprawling plant demanding even more space, which was a problem in my intensively-planted garden.
This year each plant had the companionship of a sturdy metal pole right from the get-go. Loops of string around the stalks and the stakes kept up with the plants’ upward mobility.
Pest Alert
Finally, and very important, is pest control, specifically of any one of the few leaf-eating caterpillars, colloquially called cabbage worms, which are the offspring of of those cheery, white moths that flutter among the plants on sunny days. The caterpillars also attack broccoli, cabbage, and cauliflower, all relatives in the cabbage family (Brassicaceae).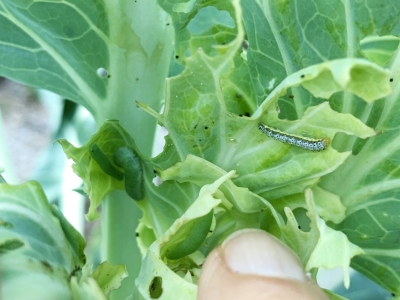
A very effective and nontoxic to most creatures (including to you and to me) control is spraying with Bacillus thuringienses, a naturally-occurring bacterium extracted from the soil. This material is more easily remembered under the name Bt, packaged up under such commercial names as Thuricide, Dipel, and Monterey B.t.
I checked the plants frequently through the growing season, at first just crushing any caterpillars I found and, only when the damage was getting severe, resorting to the spray. Cabbageworms, like any pest, can develop resistance to most pesticides, more likely the more that is used.
GMO. No
As an aside, that potential resistance of a pest to Bt is a problem with crops developed as genetically modified organisms wit Bt toxins. Almost all commercial corn and cotton have been genetically engineered in this way; the genetic material has also been incorporated into cotton, potato, rice, eggplant, canola, tomato, broccoli, collards, chickpea, spinach, soybean, tobacco, and cauliflower.
The problem arises because a field of plants expressing the Bt toxins is akin to that whole field being sprayed with Bt all season long. There is evidence of the development of resistance to Bt by insect pests of the genetically modified crop plants.
