
EVERYTHING’S EASY, FOR NOW
An Easy Orchid
Orchids are one group of plants I’ve regularly sidestepped. It seemed to me that if you grew orchids, you became crazed over orchids, to the exclusion of other plants. You then fill your home with as many of the over 20,000 species as you can cram onto your windowsills. I feared being led down that path.
My sidestepping took a turn into orchid-land 25 years ago when a local orchid enthusiast gave me a plant of Odontoglossum pulchellum, which I today learned has also been called lily-of-the-valley orchid. But more importantly today, the plant is in bloom. Blossoms from this plant are no rare occurrence; it’s bloomed every year for about the past 20 years, some years around now and other years waiting until February to unfold.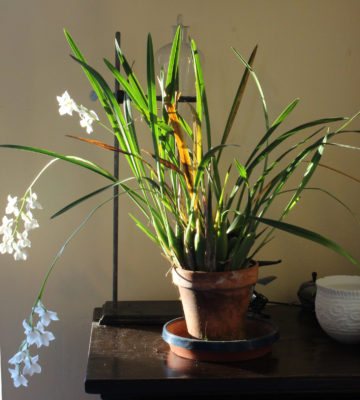
Odontoglossum pulchellum doesn’t sport knock-your-socks-off, traffic-stopping blossoms; instead, they have a soft, subtle beauty. Right now, delicate, arching flower stems rise up from clusters of torpedo-shaped, green pseudobulbs that are perched up out of the “soil.” Eight to 10 dainty, waxy, white blossoms line up along each flowering stem and waft a sweet fragrance, more like paper-whites than lily-of-the-valley to me, that transports me to spring.
I get all this for very little effort and without becoming orchid-crazy. For years, I didn’t know the name of my plants so couldn’t even look up how to grow them. Rather than pot them up in any special orchid soil, I merely mix an equal volume of wood chips from my outdoor pile into my regular, homemade potting soil, along with a bit of soybean meal for extra nitrogen. I keep the plants in a sunny window in winter and sometimes move them outdoors in summer, dividing and repotting the pseudobulbs to make new plants.
For this bit of effort, I get fragrant, white blossoms every winter, and they last for at least a month. Odontoglossum pulchellum is easy to multiply yet I’ve happily managed to restrain myself to keeping only 3 or 4 plants after I’ve divided and repotted them each spring.
Easy Celery
Growing good celery demands a gardener’s greatest skill, and this year, in the greenhouse, I have the finest celery I’ve ever tasted or grown. The stalks are large, thick, juicy, even a little sweet. Unfortunately, I’m not sure I can take credit for this horticultural achievement.
Every summer I sow celery seed to transplant into my minimally heated greenhouse to provide stalks for salads and soups throughout winter. I do take credit for selecting a good variety: Ventura. I also take credit for providing good soil conditions; each year I slather an inch or so of ripe compost on all the beds in the greenhouse. And I’ll take credit for providing timely watering, with drip irrigation until a couple of weeks ago and by hand through winter.
Ventura is an open-pollinated, rather than a hybrid, variety, which means that I can save my own seed for replanting each year. Beginning a few years ago, I’d allow one or two of the greenhouse Ventura plants that began to form flower umbels to do their thing and make seed, which they did prodigiously. I’d collect seed for planting the following season’s outdoor and indoor celery.
Some of those seeds would drop to the ground and germinate right in the greenhouse. These “volunteers” sometimes grew into seedlings as good or better than the plants I would later transplant back into the greenhouse.
So a couple of years ago I decided to let the celery self-sow freely in the greenhouse. Later in winter, I’ll transplant some of those seedlings into pots for eventual planting out in the garden.
In the greenhouse, I thin out excess seedlings, keeping the largest ones, which are already large enough for harvest. The stalks, especially welcome in winter, are, as I wrote above, “large, thick, juicy, even a little sweet.” I like to think I had a hand in horticultural achievement.
And Nothing To Do (For Now)
Nothing like a little snowfall to clean everything up in the garden. December 11th was the date of the first snow, followed by a second one on the 17th. The white blankets covered the pile of crocosmia leaves lying on the ground and waiting to be carted over to the compost bin, some weeds that sprouted in the mulched area beneath the dwarf apples, some of the smaller plants I haven’t yet cleared from vegetable beds, and numerous other messy distractions. The whole view was knit together in the sea of whiteness.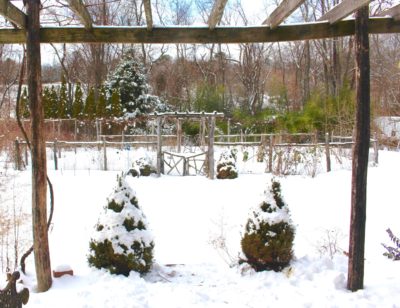
Spells of warmer weather and bright sunshine have eroded away some of the snow, mostly taking the fluffy, white lines and dots that rested atop fences and their fenceposts. The ground, as I write, is still pretty much covered in a white blanket. While I’m enjoying the wintry scene, I can forget about about the few odd jobs still left to do that are patiently waiting beneath the the snow.
FREE DRIP IRRIGATION WORKSHOP IN PHILLY
Learn about a way of watering that increases productivity, saves water, lessens diseases, and is easily automated. I’ll be holding a DRIP IRRIGATION WORKSHOP in Philadelphia on January 19, 2017 @ 6pm at PHS Town Hall, 100 North 20th Street (20th and Arch streets), first floor. The workshop is free.
GARDEN DREAMS AND REALITY
Figs (Cuttings) Galore!!
Cold weather and short days have put a not totally unwelcome lull in the gardening year. Nonetheless, I wander into the greenhouse occasionally just to drink in the sight and smell of lush greenery suffused in warmth and humidity, and to pull some weeds. The figs in there could use some pruning; they are dormant and leafless and need all stems cut back to 3 to 4 feet in height.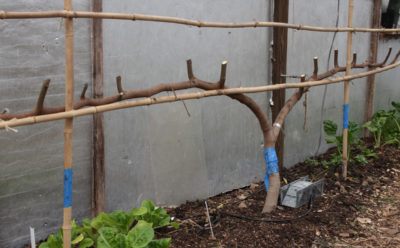
Gardening lull or not, I can’t just toss those cut stems away, putting them to waste. Each stem can make a whole new tree, and fairly easily. So I set up a little propagator for rooting some of these “hardwood cuttings.”
Being leafless, the cuttings lose little water so have no need for the high humidity demanded by softwood cuttings, which are cuttings taken while plants are actively growing and leafy. Any cutting, hardwood or softwood, does need its bottom portion, where roots will form, cozied in moisture and air. Some people just plop stems into a glass of water. That works for easy-to-root plants, like fig, as long as the water is occasionally changed so bacteria don’t build up and the roots get some oxygen from the freshly drawn water. Roots formed in water are morphologically different from those in soil, so the eventual and inevitable transfer to soil must be done with care, with attention to root breakage, aeration, and moisture.
My cuttings will root directly in soil, or a “soil” of some sort, actually a soil-less soil similar in makeup to most commercial potting mixes. This soil is nothing more than a mix of equal parts perlite, a “popped” volcanic rock, and peat moss. The perlite is for aeration; the peat moss is to hold moisture. (Coir, a byproduct of the coconut industry, or leaf mold could be substituted for the peat moss.)
Now here’s the cool part: After filling a large flowerpot with the rooting mix, I scooped out the center and put into the hole a smaller flowerpot. That smaller flowerpot has to be terra cotta and unglazed. It also needs it’s drainage hole plugged; some moldable wax, saved from when my daughter had braces, worked well. (I knew I had saved that wax all these years for something!) Rapping the large pot and pressing lightly on the soil ensured good contact and a continuous capillary connection between the water in the inner pot, the porous wall of the pot, and the surrounding soil.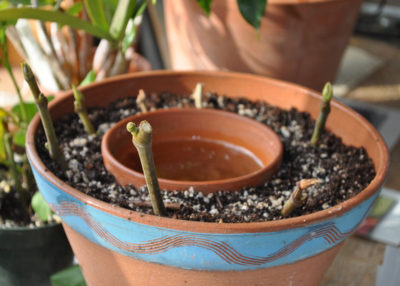
I slid the cuttings into the circle of soil with only one or two upper buds showing. Until leaves appear, and there’s no rush, the only attention the pot needs is to keep the inner reservoir of soil filled with water. Once leaves appear, the cuttings need light.
Sometime I’ll have to figure out what to do with all my new fig plants.
A Dream Breaks The Lull
New plants in the wings could have been the spark for a horticultural dream the night following setting up the propagator. In this dream, I lived in a large, modernistic house, the most significant features of which were its 3 stories and large, south-facing windows. I evidently wasn’t all that familiar with the house because I wandered around in amazement.
Most amazing were the plants sitting in the windows: potted fruit plants of all sorts, everywhere I turned. In one window was a potted pawpaw tree, in another a peach, then a guava, and still other fruits in other windows. Turning to go down the stairway from the uppermost floor, I came upon small pots of strawberries. (The floors themselves were broad expanses of polished wood and furniture was sparse or absent.)
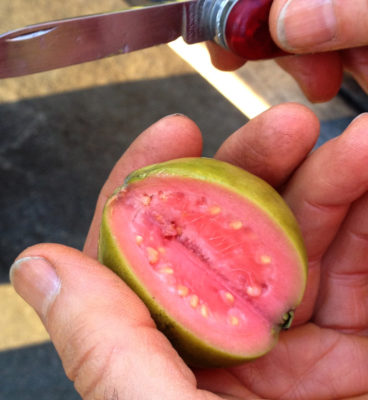
Strawberry guava
Most amazing was the shadow of a lush plant hanging in front of a shaded window. Coming closer, I saw that the plant in the hanging basket was a grape vine, a compact-growing one and that was loaded with tight bunches of delicious, ripe grapes.
Much of the dream is not far-fetched. True, I don’t live in a large, modernistic house of 3 stories. But some of my windows are, in fact, home to such edibles as bay laurel and rosemary. I even have some fruiting plants, tropical and subtropical ones such as Meiwa kumquat and Golden Nugget tangerine rather than pawpaw, grape, and other temperate-zone plants that need to experience winter.
A strawberry guava I once grew gave me good harvest in late autumn. Kumquats ripen in early winter. I look forward to my first tangerine and Meyer lemon harvest. Fruiting takes energy, so all these fruit plants sit near sunny windows. Indoor fruiting by a shaded window only works in dreamland.
Awake, Finally
In that same dream, I was in school. (I spent an inordinate number of years in school.) In the dream, I couldn’t keep track of my school assignments, even what classes I was taking or where. I was too preoccupied with caring for all those plants in all those windows at home.
It was good to wake up to a gardening lull.
