Oiling a fig

OILING MY EYES

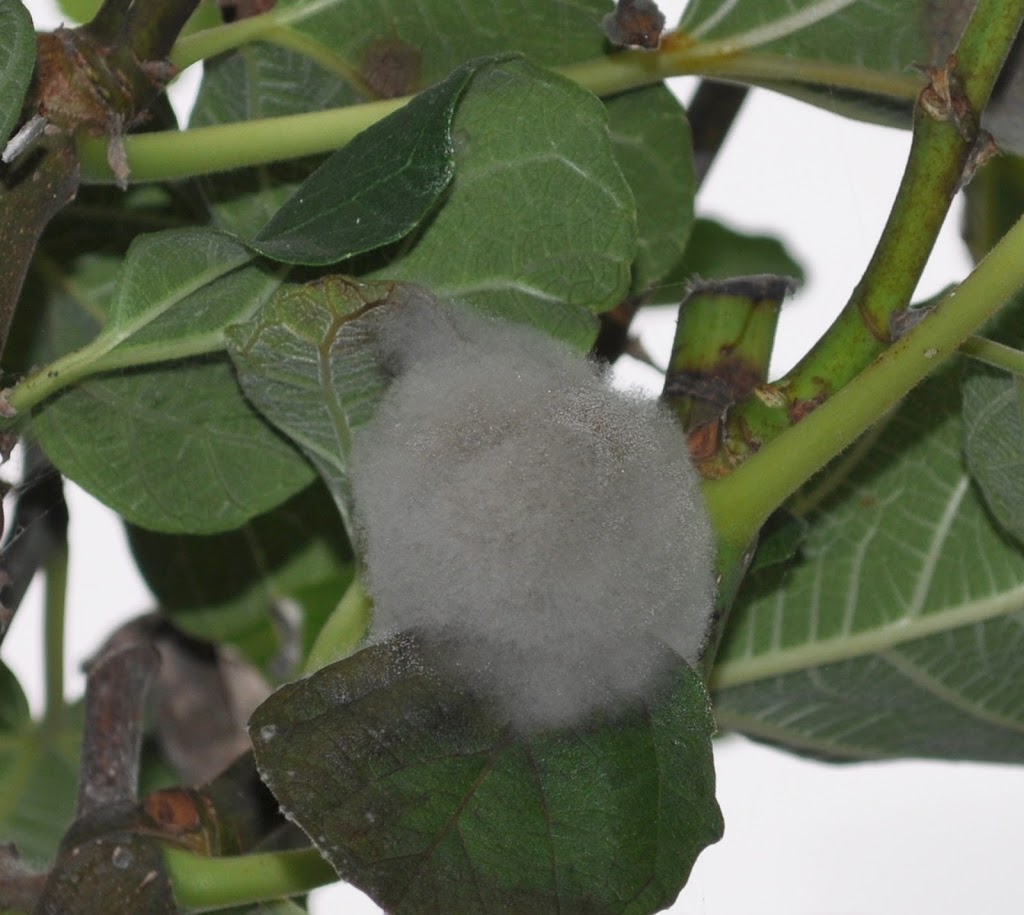
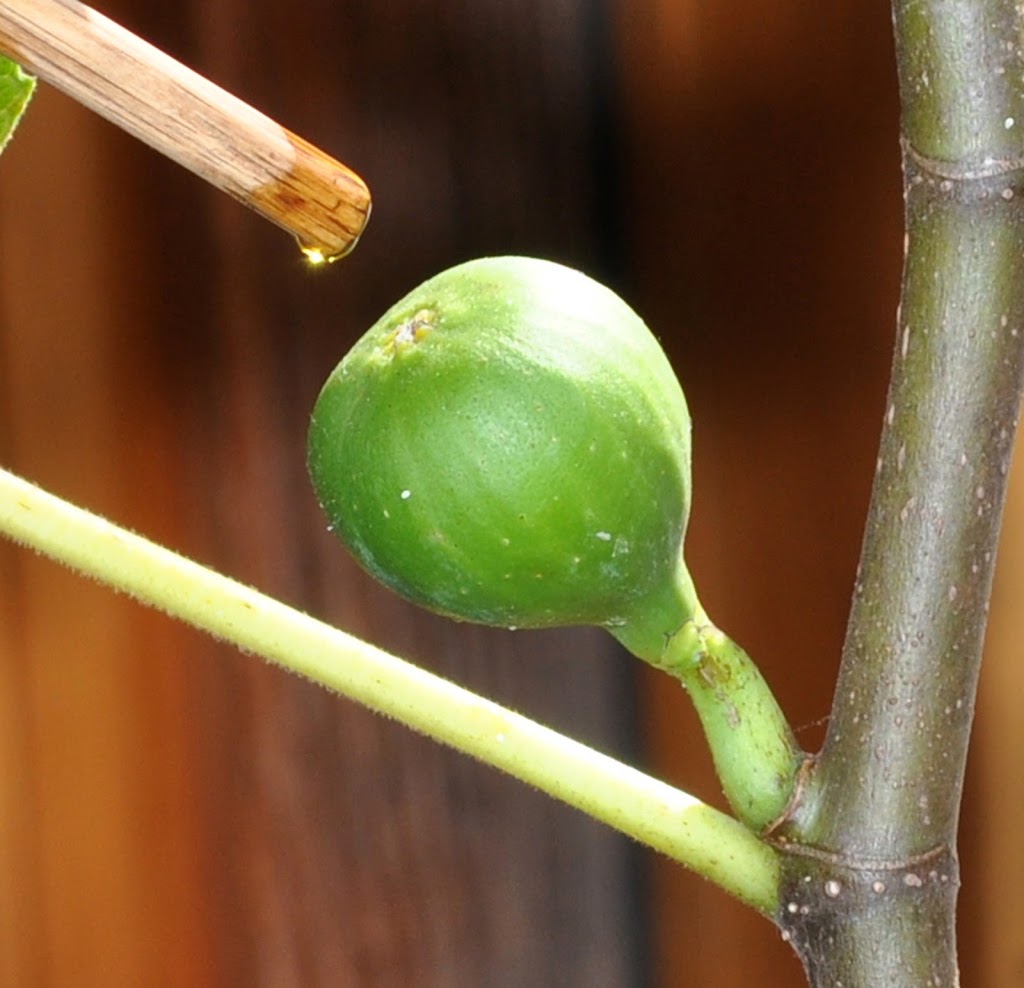
I’ve always wanted to oil the eye of a fig, and finally got around to it a couple of weeks ago. Not that oiling a fig’s eye is something new or something that I came up with; fig lovers have been oiling their eyes at least since 300 B.C.E. And our reason for doing it is to speed ripening.
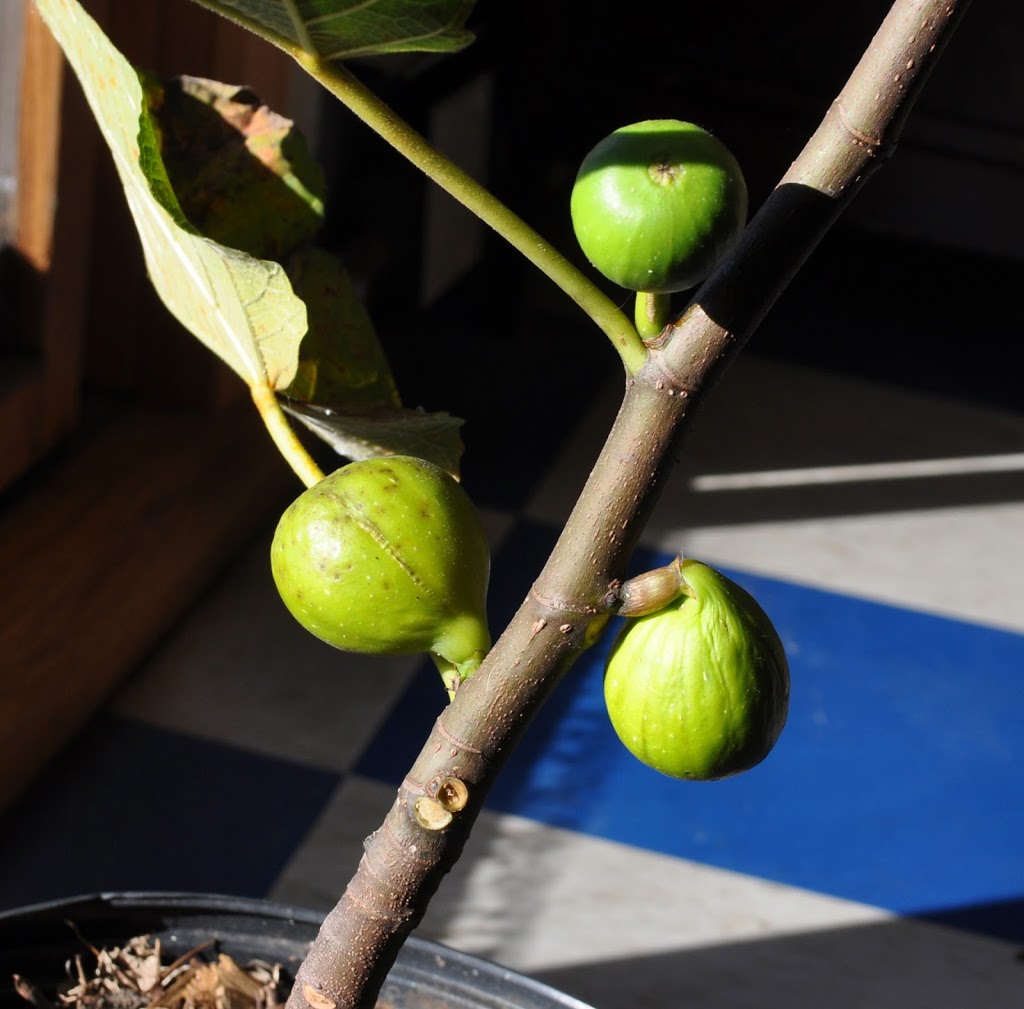
My oiled fig is the variety Kadota, which grows in a pot sitting in a sunny, south-facing window. Still, the amount of light streaming through those panes this time of year is around 500 foot-candles, as compared with a 10,000 foot-candle bath from summer sunlight, which figs do love. Light intensity and duration dropping daily justified a little oiling to speed up ripening. All that’s required is a drop of oil placed on the eye — the ostiole — of the fruit. Because olives and figs share Mediterranean origins, olive oil seemed most appropriate for fig-oiling.
Although fig-oiling has been practiced for centuries, it’s not some peasant tradition without scientific underpinnings. In fact, oiling releases ethylene; this simple hydrocarbon, comprised merely of two carbon and 4 hydrogen atoms, also happens to be a plant hormone. Present at the right time at the right concentration, ethylene stimulates ripening of fruit.
Not that I had to use olive oil. Other vegetable oils also speed ripening. The more refined they are, the greater the effect. 

You can’t oil just any old fig fruit and expect it to ripen. The fruit must be near enough to the time of natural ripening. The two fruit that I oiled were among the four that were large enough to be deemed by me to be ripe for ripening. In the past couple of days, the oiled fruits suddenly swelled and one is hanging flaccidly, ready to be harvested.
————————————————-
Ethylene’s magic is not restricted only to fig fruits, or even to fruits in general. Depending on timing and concentration, effects of this simple compound are far-ranging. For instance, ethylene was partially responsible for initiating the colorful display of autumn leaves a few weeks ago. Perhaps you have a houseplant whose leaves look uncharacteristically clenched and in pain. Ethylene again. Excessive watering could be the cause; roots gasping for air release a natural chemical that is transported to the leaves where it’s converted to ethylene. There, ethylene disrupts normal cell growth, with curling the result of cells in the upper part of the leaf outgrowing those that are below.
The swaying of stems under windy conditions — picture a pine growing on an exposed cliffside — also stimulates ethylene release which, in this case, results in stockier growth. I lightly brush the tops of my tomato seedlings in spring for the same effect.
This time of year, I’m paying most attention to ethylene’s effect on fruits, figs and otherwise. Apples, bananas, pears, and avocados put out a burst of ethylene just before ripening on or off the plant, and this ethylene stimulates further ripening with a snowballing effect. I keep my eye out for any damaged fruit in a bin or bag of fruits, because injuries further stoke the ethylene “fires,” speeding the transition from ripe to over-ripe. That’s why one rotten apple really can spoil the whole barrel.
————————————————-
“Ripe,” for a fruit, can mean different things to different people. Some people leave rock-hard peaches and plums on their kitchen counters to “ripen.” But not every fruit ripens off the plant, even if picked at a near ripe state.
That burst of ethylene just before ripening is not characteristic of all fruits; just so-called climacteric fruits. With non-climacteric fruits, ethylene production just gradually increases as ripening occurs. Non-climacteric fruits, which include raspberries, sweet cherries, and strawberries, definitely do not ripen at all after being harvested.
Climacteric fruits do allegedly ripen — or, at least, soften, sweeten, and change color — after being harvested, as long as ripening is sufficiently imminent at harvest time. But is softening, sweetening, and color change all that a ripe fruit has to offer? No. A whole spectrum of flavorful aromatics is also waiting. Although some fruits might ripen to perfection harvested before fully ripe (tomatoes and late apples, for instance), and other fruits must be harvested underripe for ripening off the plant (European pears and avocados, for instance), many fruits, climacteric and non-climacteric, taste best if fully ripened on the plant.
————————————————-
Fig is a climacteric fruit but one that I believe tastes flat if harvested anytime before it’s dead ripe. All of which made me most interested to taste my oiled fig. Would ethylene-induced premature ripening, from a single drop of oil in the eye of the fruit, result in a syrupy sweet, richly flavored Kadota fruit, such as I’ve harvested from my greenhouse tree in summer and fall, or would the fruit look and feel ripe, but lack full flavor. Drum roll . . . flavor is flat. (That flat flavor could also reflect the seasonal cooler and less bright conditions of this time of year.)
Fig scale

THINGS NOT SO ROSEY

Lest anyone believe that everything is always rosy here on the farmden, it ain’t so. True, right now, vegetable beds are brimming over with crisp, tender heads of delicious lettuce, broccoli, endive, and cabbage, and upright stalks of aromatic celery and leek. And, yes, the floor of the greenhouse is verdant with developing, young lettuce, large, leafy kale and Swiss chard plants, and 10 foot tall fig trees bearing fruits
But let’s start with those figs, three different varieties of which live with their roots right in the ground in the greenhouse. Green Ischia has been bearing large, copper-colored, firm, sweet fruits for weeks and weeks. No problem here.
About 8 feet from the Green Ischia grows a Brown Turkey fig. It kicked off the season as usual, loaded with fruit that started ripening in early September. Then scale insects moved in, dotting stems and eventually the fruits with their gray bodies, and sucking the life out of everything until the harvest petered away to almost nothing
About 8 feet from the Brown Turkey tree grows another fig tree, Kadota, with fruits lined up along its stems also. From past experience, I expected problems with Kadota. It’s a delectable and heavy yielder that thrives in hot, dry climates. The greenhouse is hot but hardly dry. With the high humidity in there, almost every Kadota fig has turned to a fuzzy, white ball just before ripening.
——————————
The Kadota problem is the one most easily solved. That white fuzz is fungal, and the fungal culprit is probably Botrytis cinerea, a cosmopolitan fungus boasting a slew of host plants. Botrytis claims credit, for example, for a wet spring’s fuzzy, gray strawberries, for a wet summer’s fuzzy, gray raspberries, and, in a more benevolent form, for “noble rot” of grapes, which makes for a sought-after wine. All sorts of ominous chemicals can control botrytis. More benignly, on stored fruits at least, it has been controlled with a 1% solution of baking soda, or an atmosphere of either 15 ppm acetic acid (i.e. vinegar) or 75 ppm cinnamaldehyde, the natural flavoring of cinnamon
Trying to control disease on my Kadota figs with sprays would be an uphill battle considering the perfect conditions for botrytis: a very susceptible variety of fig, a very humid environment, and presence of the fungus. My approach is straightforward, and that is to dig up Kadota and plant a more disease-resistant variety in its place
On to Brown Turkey . . . Scale insects get up into plants and move around with the help of ants. Stopping the ants goes a long way to putting the brakes on scale. Stopping the ants is easy: Masking tape wrapped around the trunk and coated with a continuous ring of sticky Tanglefoot Tangle-Trap Insect Trap Coating. I also, of course, have to make sure there are no leafy, stemmy, or other bridges around which ants can detour. Next year
One other possibility for reining in scale insects is to spray “summer oil” in spring after the plants have leafed out and greenhouse beds are clear of lettuce, kale, and other vegetables. Summer oil is highly refined so as not to damage plants while it’s smothering the scale insects.
————————————————
Another problem I notice in the greenhouse is that developing lettuce heads have some hole-y leaves and a few gobs of insect poop. Slugs are the usual, occasional problem in my greenhouse, but they don’t leave green, gobby, poopy calling cards. (No less unpleasant are the silvery trails they do leave, from their dried slime.) With more than usual grasshoppers this year, that was also a possibility. Nix on that. I just haven’t seen enough of them for all that poop, and they chew beginning at the edges of leaves. Attacked lettuce leaves were pocked with holes
The feeding resembles the handiwork of cabbageworms or cabbage loopers. They’ve never before indicated a liking for my lettuce but are known to include lettuce in their diet. Yet another possibility is another caterpillar, armyworm. This one feeds at night and, because I haven’t seen any caterpillars, is now the most likely culprit
The natural insecticide, Bt (sold under such trade names as Dipel and Thuricide), that I mentioned last week is very effective against the cabbageworms and loopers, as well as young armyworms. Larger armyworms are finished or just about finished feeding anyway.
——————————————–
These few problems notwithstanding, things are still rose-y, or at least carnation-y, in the greenhouse. The big, fat, fragrant ‘Enfant de Nice’ carnations that I grew this summer . . . well, I couldn’t just leave them out to die from cold. So I dug up some plants to grow in the greenhouse. They add a nice spot of red, white, or pink color, and the fragrance is, as billed, “intoxicating spicy-sweet clove.”
————————————————-

WORMS, WEEDS, AND BACTERIA

Autumn weather has been stellar this year, with a welcome number of crystal clear, sunny days, balmy temperatures, and enough rain to keep plants happy. Imported cabbageworms are evidently also happy, judging from the holes with which broccoli, cauliflower, and cabbage leaves are now riddled. Even worse, looking more closely I see dark, green caterpillar poop down in among the leaves. And even worse than that, all that feeding weakens the plants and — I think — ruins their flavors (even after they’ve been thoroughly washed).
Problems from imported cabbage worms, as well as two other leaf-munching caterpillars, diamondback moth and cabbage looper, are easily dispatched. All three pests are members of the insect order Lepidoptera, which includes moths and butterflies; the organic insecticide B.t., short for Bacillus thuringienses and commercially sold under such trade names as Thuricide and Dipel, kills them while doing essentially no harm to just about everything else, including humans.
So I got out my hand-pumped sprayer this afternoon, measured out enough B.t. to make up a couple of quarts of spray solution, and thoroughly spritzed the cabbage, cauliflower, and broccoli plants. I didn’t bother spraying kale, collards, and Chinese cabbages, which the cabbageworms evidently find less tasty, surely not enough to warrant their spraying.
My other approach to keeping cabbageworms in check is, I find, useful for many perceived gardening problems: Don’t look too closely. This advice may sound counterintuitive because attention to detail and keeping a close eye on plants are earmarks of good husbandry. Perhaps the advice should be restated as “Don’t look too closely if you’re going to panic and think that every hole in a leaf warrants action.” Today, cabbage, cauliflower, and broccoli plants had too many holes.
————————————————–
B.t. is pretty much the only thing I spray on my vegetables and, as I said, only on cabbage and its kin. It’s derived from a naturally-occurring bacteria that lives in the soil, first discovered in 1901 in Japan and used since 1925. Once more potent insecticides, such as DDT, were developed after World War II, “lightweight,” highly specific killers like B.t. fell by the wayside.
B.t. became popular among organic gardeners in the 1970s and, unfortunately, among genetic engineers in the 1980s. During the latter period, scientists developed techniques with which to insert foreign genes into organisms. Insect-resistant tobacco, with B.t. built into its genetics, was developed in 1985 and the first genetically engineered crop plant, potato, was put on the market in 1995. Yummy. (Tobacco and potato — and tomato — fall prey to another lepidopterous caterpillar, the tobacco hornworm.) 
So what’s wrong with genetically engineering plants with built-in resistance to insects? A lot! First of all, pleiotropy. As Carol Deppe states in her excellent book Breed Your own Vegetable Varieties, “pleiotropy is a genetic version of the ancient Taoist understanding that you cannot do just one thing.” Inserting a foreign gene (that is, one that could never have gotten there through natural processes, such as the fish gene that was inserted into tomatoes for cold hardiness) into a plant can have effects beyond the desired primary effect. That secondary effect may be good (unlikely), bad, or neutral in terms of nutrition, health, flavor, and anything else.
But that’s not all. In some cases, plants with built-in B.t. experience increased attacks from insects other than those for which B.t. has effect. Commercially, this has resulted in increased pesticide use to control those other insect pests.
And finally, having whole fields of plants uniformly oozing B.t. to kill lepidopterous predators sets up a Darwinian experiment: A very few of those caterpillars are going to be somewhat resistant to B.t. and over time, they will be the ones that will thrive and multiply. Eventually, then, we’ll have whole armies of caterpillars that can laugh off B.t. and just keep munching away. Which will be bad also for us backyard gardeners.
Here on my farmden, I don’t spray B.t. at the first sign of caterpillar damage. That’s another reason I don’t spray all cabbage kin. I’d like to keep a healthy population of B.t. susceptible caterpillars alive.
————————————————-
The warm, sunny weather has also been a boon to cool weather weeds, especially quackgrass and oxalis. I usually clear and cover with compost any vegetable beds just as soon as I am through with them for the season. Clearing a bed rids it of most perennial weeds and the 1 inch deep icing of more or less weed-free compost snuffs out any small annual or perennial weed roots or seedlings that try to grow. That’s the theory, at least.
This past spring, beds were weedier than usual. I reasoned that weeds were sneaking in during autumn’s warm spells, before weather turned frigid. So this autumn, I waited until this week to clean up most beds and ice them with compost, leaving little time before cold weather for weeds to sneak in. Finally, everything looks neat and pretty.
————————————————-
Pepper, like tomato, cabbage, and some other vegetables, has its caterpillar predators, in this case the corn earworm which, as you may guess, also attacks corn. In decades of growing peppers, damage has never been severe enough to warrant spraying peppers or, for that matter, corn with B.t. for that pest.
My attention turned to peppers this week because a few plants were still green thanks to the blanket over them during recent severe frosts. The pepper plants’ days are numbered though, and the beds need cleaning up, so I pulled the plants but harvested any full-sized fruits. Green peppers are immature, not ripe. Some people enjoy them at this stage; I don’t. If sufficiently mature, though, sound green peppers will ripen, turning yellow, red, or purple, depending on the variety, on a kitchen counter. That’s where mine went.
———————————————–

(Quoting from an old Jimmy Rushing blues song, “there’s a change in the weather, there’s a change in the sea”  . . . I’ll say. As I wrote this post, Hurricane Sandy was storming nearer. The weather was still balmy, but with lots of wind and, soon, rain. The landscape swayed. The hurricane took a left turn as it headed up the Hudson Valley and the farmden was spared, experiencing only fairly strong winds and a half an inch of rain. I was ready, though.)


THE CLOSING SCENES . . .

In the wee hours of the night of October 12th, temperatures here plummeted to 24°F, and it’s about time. Not that some garden plants wouldn’t have enjoyed a few more weeks of frost-free weather, but in the recent past, that depth of cold would typically arrive on the scene a couple of weeks or more earlier.
So I had plenty of time to prepare everything for the frigid night. Drip irrigation timers, filters, and pressure reducers are safely stowed away in the basement until next April. Frost-tender houseplants are lounging near sunny windows. The extra vents on the greenhouse have been sealed shut for winter. And the near-final cleanup is well underway.
————————————————-
Tidying up the garden is a very satisfying job, especially in a no-till garden like mine. (I detail the benefits of no-till to plants and humans in my book Weedless Gardening, whose title hints at one of those benefits.)
Take the okra bed, for instance, the ground strewn with old leaves above which rose stalky plants capped with a few leaves and an occasional flower or pod. Or the pepper bed. Yesterday it was a jumble of flopped over, old plants still coughing forth a few peppers here and there. Peeking out between the overlapping leaves of the double row of pepper plants was a row of golden beets, planted in spring before the peppers went into the ground.
We cleared the beds by digging around at the base of each plant with a hori-hori knife, a most useful tool that results from the mating of a trowel with a garden knife. With roots cut, the plant is yanked out of the soil and tossed into the garden cart for composting. The comes the finer work. Starting at one end of the bed, we pull each and every weed, roots and all, and pick up every leaf.
What’s left, then, is a smooth expanse of ground, 3 feet wide by 10 or 20 feet long, in the case of my garden beds. The pepper bed is not yet a smooth expanse. Up its center runs that row of golden orbs, each with a dark green, leafy topknot; the spring-planted beets are quite cold-hardy and can remain in place longer.
————————————————-
The thorough cleanup is for more than just aesthetics. Some pests overwinter in old plant debris. Crop rotation, that is, not planting a crop or its kin where it’s been grown for the past 3 years, is one way to move that particular crop away from next year’s potential source of the pest problem (for immobile pests). Thorough cleanup is another way. I opt for both ways.
————————————————-
Cleaning up my bed of crocosmia, a plant with sword-like leaves though which rises an arching stalk of traffic-stopping, orange-red flowers, is for tidiness and for more flowers. Crocosmia was once deemed not hardy here; it was a “summer bulb” planted in spring, flowering in late summer, then dug up a stored until the following spring.
I stopped digging it up each autumn years ago, and these days the plant flowers profusely as early as July. Global warming.
I’ve been digging up crocosmia this week because it grows — and multiplies — too well. The bulbs (actually “corms,” which are underground, thickened stems) have crowded so much that the plants are taking over a corner of the garden. Flowering has suffered. The plants grow mostly leaves.
So I’m digging up every crocosmia corm I can find for replanting somewhere new. I am sure I’ll have missed enough corms so that crocosmia will also appear again in its present location.
————————————————-
The garden looks neater every day. Quoting and agreeing with Charles Dudley Warner, writing in 1898 in My Summer in a Garden, “The closing scenes are not necessarily funereal. A garden should be got ready for winter as well as for summer. When one goes into winter-quarters he wants everything neat and trim . . . so that its last days shall not present a scene of  melancholy ruin and decay.”
————————————————-
Eco-mowers

TO MOW OR NOT TO MOW, THAT IS THE…

Cooler weather and moister conditions are keeping the lawn happily lush, and still growing. I figure we’ll need to do one or two more mowings before the season ends. That is, unless you count yourself a member of the anti-lawn movement.
The vendetta against lawns is two-fold. First, those lawn areas could be used for growing food. “Food not lawns” is the calling cry (and the website, www.foodnotlawns.com) for those who have repurposed their front and/or back yards for food production. And second, lawns often are ecological disasters, especially those maintained lush and weed-free no matter what the summer weather. But even a lackadaisical lawn needs regular mowing, or it becomes something other than lawn. One hour of mowing with a gasoline-powered mower spews as much fumes into the air as does driving a couple of hundred miles.
I choose a middle ground, and enjoy the appearance, the convenience, and feel of some well-placed turf. Many years ago I gave over some of that lawn to growing all our vegetables and much of our fruits.
My original property of 3/4 of an acre has grown to almost 2 and a half acres, much of it was once regularly mowed (by previous owners). I originally maintained it with a scythe but have since acquired a tractor for giving most of the fields once-a-year haircut, with more frequent cutting around orchard and vegetable gardens.
————————————————-
But just suppose I had a smaller property, a much smaller property, say 1/8 of an acre with a smooth lawn. An environmentally-friendly and pleasant option for this lawn would be a push mower. Newer materials and newer engineering bumped weighty, clunker push mowers of yore into modern sleek, lightweight grass eaters.
An excellent choice among the many push mowers offered today is one of Fiskars Reel Mowers. They’re relatively easy to push and sing a pleasant tappity-tap beat as they roll along spewing cut grass in front.
The only caveat with a push mower is that mowing grass that has grown too long is very difficult. The solution? Mow frequently enough. It’s also better for the grass.
————————————————-
No need for the roar of exploding gasoline for a bigger lawn. For three-quarters of an acre, perhaps more, I’d opt for an electric mower, a cordless one. Battery technology has greatly improved in recent years, giving contemporary cordless mowers a lot more power and longer running times.
My choice among these mowers is Stihl. The cutting width is a bit narrow but the mower is extremely light and very spry to push around. With a mere push of a button and squeeze of a bar needed to start it, this mower won’t make you give a second thought to stopping to move a lawn chair or dog bowl out of the way. This mower plows through even long grass. Run time is 25 minutes on a charge but charging (with the more expensive of the two chargers available) takes only 45 minutes. Take a break; have a cup of tea.
The Stihl mower has just one downside: price. The mower, the battery, the charger, and the mulching attachment (better for the lawn) require a hefty layout of hundreds of dollars. But think long term. When you consider the cost of running and repair, over the long term this mower is cheaper to run than a gasoline-powered mower. And it’s a lot quieter and lighter.
————————————————-
An even bigger lawn? A larger area, even a few acres, can be eco-friendly by converting it to what I call, in my book The Pruning Book (which has a chapter on “pruning” grass), “Lawn Nouveau.”
With Lawn Nouveau, you sculpt out two layers of grassy growth. The low grass is just like any other lawn, and kept that way with, depending on the expanse of low grass, either the push mower or the cordless electric mower. The taller portions are mowed infrequently — one to three times a year, depending on the desired look. “Clippings” from the tall grass portions are good material for mulch or compost.
A crisp boundary between tall and low grass keeps everything neat and avoids the appearance of an unmown lawn. That boundary itself becomes a landscape element. No need for straight edges and 90° corners; instead, carve out curves in bold sweeps that can carry you along, then pull you forward and push you backward, as you look upon them. Avenues of low grass cut into the tall grass invite exploration, and, like the broad sweeps, can be varied from year to year.
That tall grass portion could be mowed with a tractor, but more fun and better for the environment is to use a scythe. Not just any old scythe, though, surely not those heavy, dull ones you sometimes find at garage sales. I use a lightweight, European-style scythe with a razor-sharp “Austrian blade.” Scything in early morning (the swooshing of the blade doesn’t disturb neighbors) when the grass is dewy on the outside and plump with moisture inside, plant cells practically pop apart when touched by the sharp blade.
Quoting one-time Congressional candidate, homesteader, and swinger of a scythe into his nineties, Scott Nearing: “It is a first-class, fresh-air exercise, that stirs the blood and flexes the muscles, while it clears the meadows.” And helps maintain Lawn Nouveau.
———————————————-
So there you have it: Three expanses of grass to mow; three environmentally friendly tools for the job. The push mower (Fiskars), the cordless electric mower (Stihl), and the scythe (available from www.themaruggcompany.com/index.html and www.scythesupply.com).
Colossal chestnut

FINDING THE RIGHT CURE

“Cure” is a funny sort of word. It means, on the one hand, to relieve from illness, and, on the other hand, to subject to some sort of preservative process. (And, on yet another hand, a few other things.)
The chestnut variety ‘Colossal’
Which brings me to my chestnuts . . .  no, they’re not diseased, but they do need to be cured. We chestnut growers face two opposing goals with our harvested nuts: Good storage versus good eating. A freshly fallen chestnut is rich in starch and moisture and, because it is alive, it’s able to fight off mold and store well if kept near freezing temperatures. But it doesn’t taste good. For best eating, the nuts need to cure, a process whereby some moisture is lost and some of the starch changes to sugars, dramatically improving flavor. But cured nuts don’t keep well.
This story has one other wrinkle, the chestnut weevil. This bugger lays eggs in the nuts while they’re on the tree and, after nuts drop, eats some nutmeat and then crawls into the ground for winter. 
Chestnuts begin to lose moisture usually as soon as they touch ground. They start at about 50% moisture and once moisture drops below 35%, they’re dead and will rot unless eaten quickly or thoroughly dried (for chestnut flour, for instance). The way to store chestnuts, then, is to make sure they’re plumped up with water, and the way to do this is with a dunk in water for about a week. Soaking also kills weevils. The nuts may begin to ferment, so the flavor is ruined after the dunking — but they’re not supposed to be eaten yet. 
Another way to deal with hydration and weevils is with a 30 minute dunk in water heated to 120° F. The temperature and timing are exacting so I this week opted for the less exacting week-long soaking from my just-harvested nuts.
Kept plump with moisture and at temperatures near freezing, nuts subjected to either water treatment will store well until — since they are alive — they begin to sprout.
The way to get chestnuts ready for eating is to bring them to a drier and slightly warmer, but still cool, location. Depending on temperature and humidity, the transformation from foul to flavorful could take from 3 to 14 days. Cooler temperatures and moister air lengthen the curing time, but also offer better flavored chestnuts.
(Much of this information was gleaned from an article by Greg Miller in The Chestnut Grower, http://www.centerforagroforestry.org/pubs/chestnut/v8n3/v8n3.pdf. Greg is the owner of the Empire Chestnut Company, http://www.empirechestnut.com, which sells high-quality chestnuts, chestnut trees, and chestnut seeds.)
——————————————–
The sweet potato harvest is in, as it should be before cold threatens. Soil temperatures below 50° F. cause chilling injury to the roots and internal decay. As I’ve written previously, I planted the vines atop piles of wood chips and leaves that arborists and landscapers dump here and that I spread as mulch later in autumn. All summer, the sweet potatoe vines multiplied and stretched out as far as 20 feet from my original plants. 
Unfortunately, it looks like the plants put more energy into making vines than fat roots. From 4 plants and a lot of vine growth I harvested a mere half-bushel of sweet potatoes. A couple of the potatoes were football-sized, others were below average, and too many were like swollen, orange strings. 
Stringy roots result from too rich a soil, but I didn’t even plant in soil! Probably the hot summer and sometime moist weather sped decomposition of the chips and leaves to release nutrients.
But we’re here to talk about curing. Like chestnuts, sweet potatoes need to be cured for good storage and good flavor. In this case, what’s needed are a week and a half of temperatures 80 to 85° F. and high humidity, not easy to find this time of year. My greenhouse benches are cleared and temperatures there  get quite warm on sunny days, so that’s were I’ve spread out the sweet potatoes. Longer curing times are needed at cooler temperatures, such as at room temperature. Covering potatoes with cloth or putting them in perforated plastic bags, or keeping them in the greenhouse, maintains high humidity.
Once cured, sweet potatoes are ready for eating. My paltry crop will be eaten soon, but for longer storage, medium humidity and temperature around 60° F. are ideal. Refrigeration is a no-no. The roots get chilled, just as they would in the ground (or my mulch pile), and show it. 
——————————————–
Black walnuts trees abound and the nuts are raining down and free for the taking. The sooner the fleshy husk is taken off, the less stained and better-flavored the nuts. No end of innovative ways have been devised for separating the husk from the shell, everything from spreading the harvested nuts on the driveway and running over them with your car to stomping on each nut to cutting the husks off to letting the weight of a small sledge loosen them and then twisting them off with gloved hand. We opt mostly for the latter, followed by hosing and drying them in the sun for a couple of days.
Of course, hulled black walnuts are not yet ready to crack and eat; they need to be cured, for a couple of months. Curing black walnuts is simple, involving nothing more than storage in any cool or cold, dry location impervious to squirrels. There are plenty of black walnuts for human and squirrels alike, but a cache of hulled, clean nuts is too tempting to those rats with tails. 

KEEP OFF THE SCALE

Shortening days and cooling temperatures have certain potted plants crying out to be brought indoors. Soon, soon. Subtropical plants, such as bay laurel, rosemary, and fig, tolerate — even enjoy — temperatures below freezing, so cold isn’t the threat, for the next few weeks at least. But the later the evergreen plants come indoors, the more chance that I will have fired up the woodstove. The resulting drier air will shock plants if they’ve recently come in from cool, moist outdoor conditions; leaves will yellow and drop.

As for my poinsettia, staghorn fern, orchids, and other tropical plants, temperatures that dip below freezing could do them in.

But nobody’s coming indoors yet. First I have to make sure that no creatures are hitchhiking in with the plants. No, not creatures that would threaten me, but creatures that would threaten the plants themselves, and those would be mostly scale insects. Outdoors, ladybird beetles, parasitic wasps, some fungi, and other natural predators and diseases keep scale populations more or less in check. Indoors, plants are on their own.

Scale insects are so named for the waxy covering that protects the adults. They need that protection because once they start sucking plant juices through their straw-like stylets, they settle down in one place for good. Infested plants become weakened and the insects secrete a sticky honeydew that drips on the plant and surrounding furniture and carpet. A dark-colored fungus feeds on this honeydew, blackening leaves and surroundings. Blackening of the leaves, although superficial (the fungus isn’t attacking the plant), further weakens the plant by shading it from light.

Scale trivia: Male scale insects die after a couple of days without ever feeding. Some scale species consist only of females. Some scale insects are herded by ants who move them about and protect them from predators; in return ants “milk” the insects for their sweet honeydew. And not all scale insects are bad. Red cochineal dye comes from a scale insect, as does lacquer.
—————————————–

For the past few weeks, once a week, I’ve taken out my arsenal against scale insects. Insecticidal soap is relatively nontoxic and is a kind of soap especially formulated to kill soft-bodied insects. Two teaspoons of mild detergent in a gallon of water is also effective.

Repeated applications are needed because the soap is ineffective against scale insects protected by their covering. It’s the little ones, the “crawlers,” as they are called, that I’m gunning for. After birth, they scoot out from beneath their mother’s protective cover to find their own sucking spots, and that’s when they’re most vulnerable to soap. My goal is to keep at it to kill each hatching until there’s no more fecund mothers still giving birth. If the soap merely knocks crawlers off the plant, a subsequent spray will also kill or knock off any that climb back aloft.

My last couple of sprays will be oil, which smothers protected mothers and crawlers. (I know this sounds brutal, but experience yourself a houseplant heavily infested with scale and the associated sticky, blackened carpet and furniture before passing judgement.) Oil can damage plants also, especially evergreens, so the oil to use is “horticultural” oil, also known as “summer” oil, which is highly refined to remove harmful ingredients. Like soaps, these oils are relatively nontoxic to nontarget organisms.
—————————————–

Usually, scale insects hardly make their presence known until just after midwinter. I do notice a couple of scaly bumps on citrus and staghorn fern; these I deal with mano a mano, with a flick of my fingernail.

Strawberry guava, though, already has plenty of tufts of white cottony cushion scale on it. The guava also is loaded with ripening fruits so needs all the energy it can get, especially with shortening days. This tropical fruit tastes nothing like strawberry but has a sweet, perfume-y flavor with a nice tang. The reddish flesh and abundant, edible seeds probably give rise to the “strawberry” part of the name.

It Ain’t Over — The Fall Garden Begins

If I wasn’t a gardener, I’d look upon the late summer and fall weather as a glorious succession of warm sunny days and crisp nights with intermittent periods of mostly gentle rains. As a gardener, the crisp nights make me a little nervous.
Temperatures so far have only dipped into the low 40s; any night, though, that low could plummet below freezing. Below freezing temperatures would ring the death-knell for okra, peppers, tomatoes, and the any other summer vegetables still braving cooling temperatures. 
Actually, there’s not much oomph left in the okra and tomatoes. Okra doesn’t bear pods except when temperatures are downright hot. And disease, mostly early blight (not the dreaded late blight of a few years ago) has reduced tomatoes to nothing more than bare stems capped by a few green leaves and fruits. So loss of tomatoes or okra would hardly be noticed except to indicate it was finally time to clear those beds and ready them for next spring.
Peppers are another story. The leaves are still green and spry, and cool weather hurries the fruits along on their way to full red ripeness. 
—————————————–
With cooler and cooler weather descending on the garden, the race is on with cool-weather vegetables — cauliflower, broccoli, cabbage, turnips, and winter radishes. These vegetables tolerate temperatures well below freezing. But will they do what they have to do, whether it’s making flower buds, heads, or roots, before their growth slows almost to a standstill? Further south, they could wait out winter and finish growing as weather warmed. This far north, they eventually succumb to cold, perhaps headless, flower bud-less, or fat root-less.
I seeded cauliflower, broccoli, and cabbage in early June and transplanted them a month later. Turnips and winter radish seeds went directly into the ground in early August. According to my records, they should all be on time. But roots are only just beginning to swell in the ground beneath the turnips and radishes, and there’s no sign yet of flower buds on broccoli and cauliflower or developing heads on cabbage. Which makes me nervous.
Kale, of course, is yielding abundantly. It enjoys both warm and cool weather. All it needs to do is keep growing leaves, which it does.
—————————————–
No need to leave everything to Mother Nature; I’m going to change the weather. On a very small scale, within my cold frame. For years, I’ve used my cold frame — essentially a 5 foot by 5 foot wooden box with a hinged, clear top sloping southward — to extend the season for fresh salad fixings. This year it has become a hotbed, which is a cold frame with warmed soil.
Soil can be warmed in a number of ways. Most modern is with an electric soil heating cable made for this purpose and woven back and forth beneath the ground. Most old-fashioned — and the method I’m using — is with manure, utilizing the heat of its fermentation.
Successfully growing plants in a manure-heated hotbed demands a mix of art and science. Too much heat, too fast is to be avoided as is, of course, too little heat. To start, I and my able assistant David dug almost 2 feet of soil out of the cold frame. I had on hand horse manure mixed with wood shavings and a little straw; the mix was fairly fresh and moist. As David forked the manure mix into the bed, I watered it and occasionally got right into the frame and stomped it down — not too hard, which would drive out all the air, but enough to pack everything together for a critical mass to start heating.
Once the bed was filled, the mix was topped with a 4 inch layer of ripe compost. Those few inches are needed to keep young, tender roots above the hot layer which, as it eventually cools, can increasingly accommodate roots. A few days later I scratched out furrows into which I sprinkled lettuce, spinach, and arugula seeds. Spinach usually survives winter here in a cold frame. Lettuce and arugula do not, so will provide a good measure, along with speed of growth, of the efficacy of the heating. 
One week after planting, temperatures about a foot down into the bed are around 80°F.
I’m lucky in not having to leave things to Mother Nature even if the hotbed’s performance proves less than stellar. A few steps away is my greenhouse, now sprouting a panoply of cool weather greens, as well as ripening cucumbers and figs.

Melon-ic Efforts

I like to keep my vegetable garden trim and neat and intensively planted. Melons have a different perspective on life. They like to sprawl every which way, tumbling across garden beds and latching their tendrils onto whatever they might come across to pull themselves up. Can ever the twain — homegrown melons, here — meet? Yes, and especially this year.
First, let’s look at the melons I planted in the garden. Seedlings a few weeks old went into the center of columns of concrete reinforcement wire 18 inches in diameter by 2 feet high. The idea was that the wire cage would contain the vines by letting them grow around and around the cylinder in an upwardly spiral fashion. Ripe muskmelons, the varieties Hannah’s Choice and Jenny Lind, could drop to the ground, the 2-foot maximum drop causing no harm.
My melons evidently weren’t in on my plan. Hot weather in early summer spurred fast and furious growth, with new shoots outstripping my efforts at coaxing the vines around and up  the cylinders. Most of the vines escaped their confines and sprawled over the bed, then onto the paths. I did manage to turn the vines inward before they overran adjacent beds.
Not to complain, though. There was a good crop of melons harvested, and vines have now been cleared away and beds prepared for next spring, with everything trim and neat again.
——————————————
Melon-ic efforts did not end in the garden. My compost bins are, like my garden, relatively neat and trim. This is not to say that some sprawling vines couldn’t be accommodated on top of those piles. The compost isn’t needed until the end of summer or fall, anyway, and melons enjoy rich, moist soils. What could be richer and moister than pure compost?
So I pulled back the corners of the coverings on a few of the compost piles and planted Hannah’s Choice and Jenny Lind seedlings there also. These melon plants grew even more vigorously than those in the garden and sprawled over the tops of the piles and down the sides.
The compost pile planting was a total success. It also yielded the earliest melons, probably due to extra heat from the innards of the pile and the dark cover on the pile, and from the richness of compost.
——————————————
Even then my melon-ic efforts were not at an end.
Every autumn I get a truckload of leaves from a landscaper, and through winter get truckloads of wood chips from arborists. The leaves and chips mostly sit in place until the following autumn when they get spread as mulch beneath trees and berry bushes and in pathways in the vegetable garden.
Lately, I’ve been thinking of making some use of that pile of organic material even as it sits waiting to be spread. Last spring a year ago I planted sweet potatoes — another sprawling vegetable — in the pile and harvested some humongous, orange tubers. This past spring melons, including Blacktail watermelon, were introduced to the pile along with my new planting of sweet potatoes.
Until raw organic materials start to decompose, they are relatively poor in nutrients, especially nitrogen. So instead of going directly into the pile, melon and sweet potato transplants went into holes scooped out of the pile into which I had added a few handfuls of compost. The compost would get the plants off to a good start. The melons, which are more demanding about their soil than are sweet potatoes, initially sulked and had to be encouraged with periodic watering and some additional fertilizer early in the season.

  The slow start was for the better. Melon plants, except for the watermelons, don’t keep bearing for a long time, and these leaf/wood chip melons brought up the end of the season with a late crop. Right now, the leaf and woodchip pile is completely overrun with melon and sweet potato vines. A few watermelon fruits are still ripening atop the pile and within lurks, I expect, a good crop of sweet potatoes.
——————————————

To experience firsthand the possibilities in home-grown fruits, come to my workshop BACKYARD FRUITS: A TASTING AND A WORKSHOP, which will be held here art my farmden. Learn how to grow delicious fruits organically and then taste some that are in season, such as pears, grapes, pawpaws, persimmons, and kiwifruits. The workshop is Oct. 6th, 2-5 pm. Contact me for registration information.

Beans, Beans, . . .

 
Lima beans are one of those things, like artichokes, okra, and dark beer, that people either love or hate. I love them. The problem is that this far north, summer temperatures usually hover below those in which lima bean plants thrive, at least those best-tasting varieties of lima having large seeds and dry, sweetish flesh something like chestnuts.
 
A few years ago, I grew the variety Jackson Wonder, which was billed as a “prolific, cold-hardy heirloom with bright nutty flavor.” It was cold-hardy and prolific, and it is an heirloom dating back to 1888, but the flavor was blah.
 
A long, long time ago, I grew what might be the best-tasting of all lima beans, a pole variety named Dr. Martin. Dr. Martin’s demand for warm summers resulted in a harvest that was too paltry to justify space for those long vines again.
 
The earth has warmed in the quarter century since I grew Dr. Martin. The growing season is longer and summer temperatures are hotter. So this spring I thought it was time again to try growing some big, fat, flavorful lima beans. King of the Garden was the variety at hand, a variety perhaps as good as Dr. Martin. I started the seed in spring in pots indoors and planted out the seedlings, 2 per bamboo pole with 3 poles tied at their tops to form a teepee, a the end of May, by which time hot weather had worked its way into both air and soil.
 
King of the Garden plants grew, and grew, and grew. And flowered, and grew, and grew. And occasionally, I noticed a little, very little, pod beginning to develop. But no flowers or mini-pods grew to become large pods filled with big, fat, flavorful lima beans.
 
Lima beans are a finicky lot. Not only do they shiver in cool weather; they also underperform in weather that’s too hot. Like the hot weather we had, at times, this summer. More recent, cooler nights should improve pod set. That is, unless something else is the roadblock to pod production. That “something else” could be stinkbugs. Stinkbugs and stinkbug problems are moving north from their more traditional southern haunts. There were plenty this summer. The buggers enjoy limas.
—————————————-
 
Moving over to another bean, green beans, my third and last planting of which is now being feasted upon by Mexican bean beetles. (They also feed on the limas, but not enough to cause significant damage.) Mexican bean beetles are not something new that’s become more problematic with warmer summers and winters; they’ve been showing up in my garden for decades although few other gardeners with whom I speak seem to have problems with them.
 
Despite the beetles, I harvest plenty of green beans; my main beef with the beetles is that they keep me from being able to grow pole green beans. Pole beans, unlike bush beans, which get sequentially planted and then pulled out after a few weeks of harvest, are a long season crop planted in late spring to grow and bear until frost. That long season of growth offers a 24/7 dinner to bean beetles. Growing only bush beans restricts my choice of varieties and makes growing and harvesting the beans, for fresh eating and for freezing, more frantic.
 
This year, I tried to check bean beetle infestations with weekly sprays of neem, a relatively nontoxic pesticide derived from the Indian neem tree. It was ineffective. Another possibility is to elicit the help of a stinkbug! No, not any old stinkbug but one known as the spined soldier beetle, a predator a many plant pests. These bugs can be purchased as such or pheromone attractants can be purchased to attract them to the garden. I tried the traps many years ago to no good effect. Perhaps it’s time to import the bugs themselves.
—————————————–
 
One bean that seems to be pretty much ignored by bean beetles and stinkbugs, and any other pest, is soybean, which I harvest green as edamame. The edamame harvest this season has, as usual, been excellent. I grow the variety Shirofumi, both for its flavor and good yields.
 
Edamame usually flower and ripen pods in response to daylength, and Shirofumi edamame harvest ends in early August. Then, I usually pull the plants to make space for late plantings of cabbages, radishes, lettuce, and other cool weather vegetables. This year, the space was not needed so I decided to leave the plants in place.
 
Soybeans, along with green beans, lima beans, and other beans, are legumes, which are plants that, with the help of symbiotic bacteria in their roots, can use nitrogen from the air as food. Much of that nitrogen becomes the protein in the soybean seeds; the rest is in the leaves, stems, and roots. Leaving my soybean plants in place is helping to enrich the soil with nitrogen, from old roots that slough off. The rest of the plants, once pulled, go into the compost pile to provide nitrogen there and, as the finished compost is spread, subsequently in the garden. My lima bean plants, even if they remain podless, provide those same benefits. The same goes for my green bean plants, from which I’ll get a little extra nitrogen from all the Mexcan bean beetles on their leaves.
——————————————
 
Do you want to grow fruit but think you don’t have room? I’ll be giving a workshop “Fruit for Small Gardens,” covering the fruits and growing techniques needed to reap delectable rewards from spaces as small as a balcony to as “large” as a small suburban yard. The venue is Stone Barns inn Pocantico Hills, NY on September 22nd from 1-3 pm. For more information, see http://www.stonebarnscenter.org/products/backyard-fruit-for-small-gardens.html